Basic Nodes Tutorial
Introduction
The following tutorial will introduce you to the most common Node-Red nodes, and show you some of their use cases.
Tutorial Flow Source Code
To explore the nodes featured in this tutorial, simply download the attached JSON file below and import it into your flow app.
You can do this by either pressing Ctrl + I simultaneously or by navigating to the main settings and selecting the Import option.
Tutorial
This guide and basic_nodes.json flow is split into distinct sections, with each one focusing on a specific node(s). This structured approach ensures that you can easily navigate and find information on the nodes that matter most to your project.
Inject and Debug Nodes
The first tab shows how the Inject and Debug nodes work.
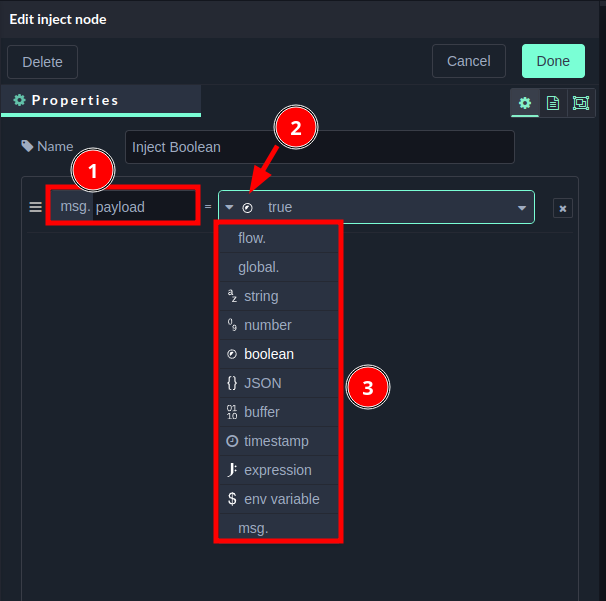
You can use the Inject node to start/trigger a flow and also to set various parameters of the msg object. For example, you can use it to set the msg.payload (payload parameter) to different types like:
Boolean (
TrueorFalse)String
Unix Timestamp (the number of milliseconds since the 1st of January 1970), e.g.
1698676848107->14:40:48.107UTCNumber
Array (please note that this array can be nested and contains objects or nested arrays inside
Object (JSON object) that can also be nested or contain nested arrays
Adding New msg Properties
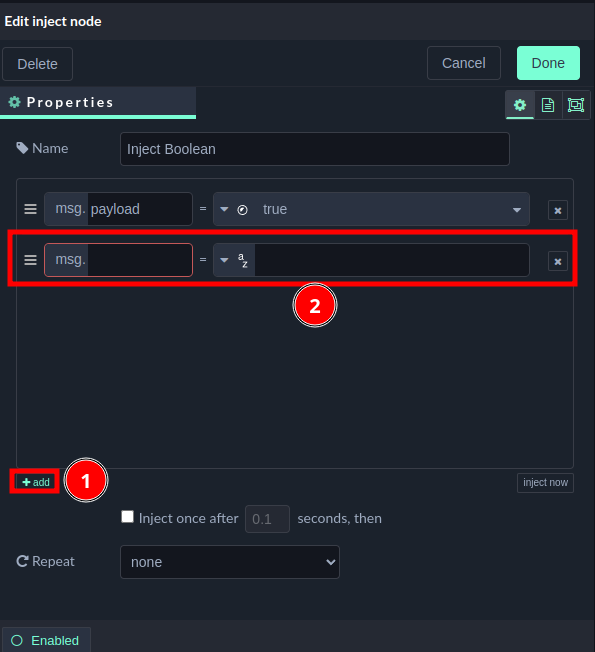
You can add new message properties by simply clicking over the Add button on the inject node. This would automatically create a new property, that can be configured according to your needs.
Adding New msg Properties
For example in the below screenshot, we set the msg.payload to a boolean value of True.
Inject Node, Setting up The msg.payload
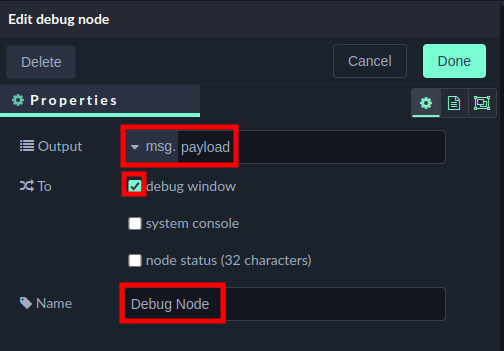
With the help of the debug node, you can display in the Debug Messages tab of your qibb flow editor either the whole msg object or a specific property of the msg object.
In the below screenshot we are displaying the msg.payload in the debug window and the name of the debug node is set to “Debug Node”.
Debug Node
Manual Injection
You can manually trigger the inject node by pressing the small square on the left ot the inject node with your mouse.

Manual Trigger
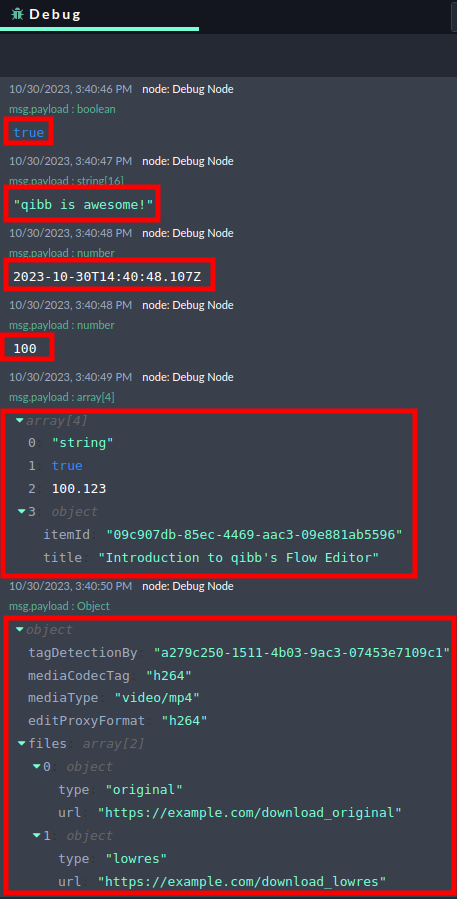
After that, the values of the msg.payload would be visualized in the debug tab, where it would automatically formatted appropriately. For example:
Boolean values would be colored in Blue
Unix timestamps will be automatically converted into UTC, local time, and a hexadecimal representation, which can be easily changed by a simple left click with your mouse over it
Arrays would automatically recognized and the size of the array would be written in gray
Objects would be automatically recognized and formatted accordingly
Debug Messages View
Additionally, you can also use the three icons that appear on the right of the values to:
Copy the path - to copy the full path to this particular property key
Copy the value - to copy the value of this msg property
Pin Open - to highlight this particular value
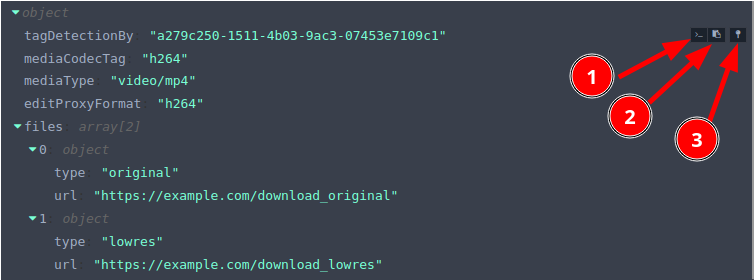
Copy path 1️⃣ , copy value 2️⃣ and pin open 3️⃣
The second grouped node represents a small demo of the scheduled triggering of the flow.
At the bottom of every inject node you have a couple of options:
Inject once after (0.1) seconds - a checkbox to ensure that the flow is triggered 100 ms after re-deployment or restart of the flow.
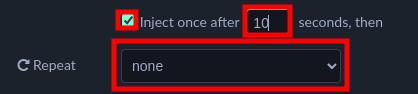
Inject once after 10 senconds, then don’t repeat
It's important to note that you have the flexibility to modify and set a different delay value. The 0.1 values can be edited as soon as you select the checkbox.
This option can also be combined with the below scheduling options.
Repeat - a dropdown with the following options:
none - self-explanatory
interval - you can set an interval in seconds, minutes, or hours after which the inject node would be re-triggered
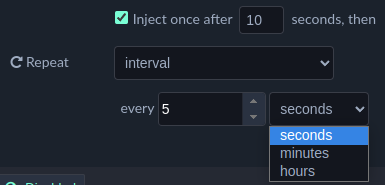
Inject once after 10 seconds and repeat every 5 seconds
interval between times - You can select an interval between specific hours of the selected days that the inject node would be triggered, e.g. trigger the inject node every 10 minutes between 18 and 19:00 on Monday till Friday
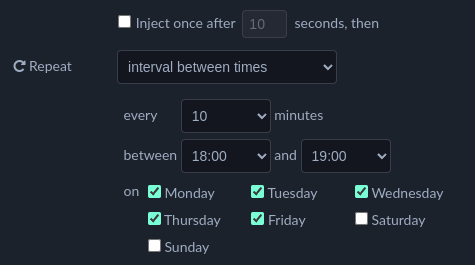
Never inject and repeat every 10 minutes ONLY between 18:00 and 19:00 on Monday till Friday
at a specific time - set at what time and on which day the flow would be executed
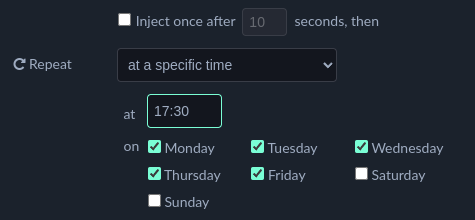
Never inject and repeat from Monday till Friday at 17:30 sharp
Disabled Nodes
The Inject Every 5 Seconds node is grayed out that means that it is disabled. You can re-enable it by double clicking on it and clicking on the bottom left Disabled button. Once re-enabled the node won’t look grayed out anymore.
This functionality is present on almost every qibb flow editor nodes.
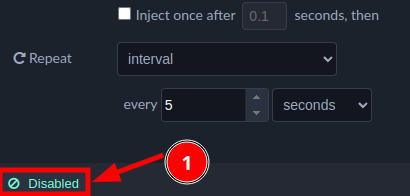
How to Enable a Node
There are various methods to display status messages, and one of them involves utilizing the debug node. By selecting the last checkbox option, node status (32 characters), you gain the ability to define the status message. It's important to note that the node status is limited to 32 characters, and any content beyond this limit will be automatically truncated.
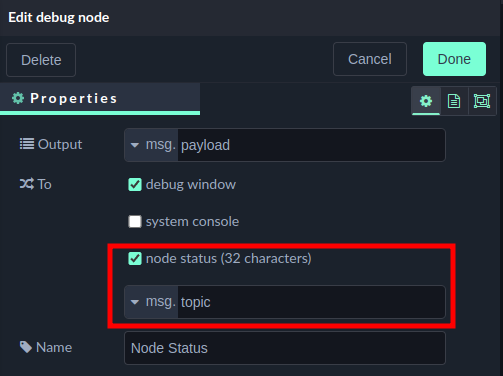
Node Status displaying the content of msg.topic
In the above case the content of msg.topic would be displayed under the debug node as shown in the screenshot below:

Node Status Visualiasation Below The Debug Node
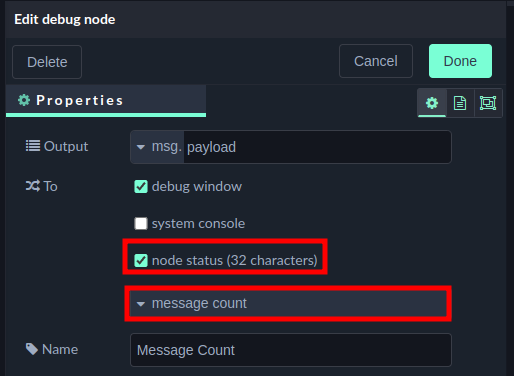
In the following example, we demonstrate how to implement a message counter within a debug node. This feature ensures that each time a new message reaches the debug node, an internal counter increments by one, and the total message count is displayed beneath the debug node.
To enable this functionality, follow these steps:
Check the node status checkbox.
Select Message Count from the dropdown menu below, as illustrated in the screenshot below:
Debug Node with Message Count
This feature is particularly useful for visualizing the number of times a flow has been triggered or when it transitions to a specific branch.

Debug Node with Message Count
Many nodes within the qibb flow editor support JSONata expressions. In this particular example, the msg.payload has been configured to concatenate a string with the content of msg.topic.
"Today's topic: " & "'" & topic & "'"Keep in mind that when working with JSONata, if you intend to perform operations on certain properties of the msg object, you should omit the msg. prefix, as demonstrated in the code snippet above.
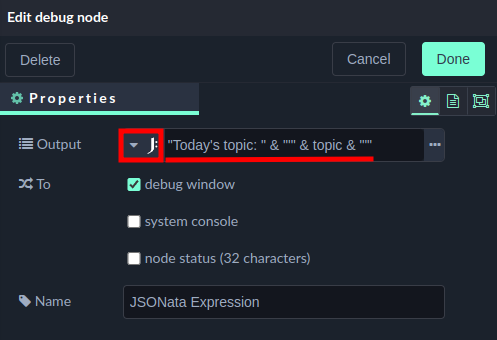
Debug Node with JSONata Expression
Switch Node
The switch node is a versatile tool that enables conditional routing of messages based on user-defined rules, allowing for dynamic and flexible data flow within a flow-based programming environment, akin to the if-elif-else structure.
The switch node evaluates conditions sequentially from top to bottom, and at the node's bottom left, you can customize its behavior and specify:
checking all rules, or
stopping after first match
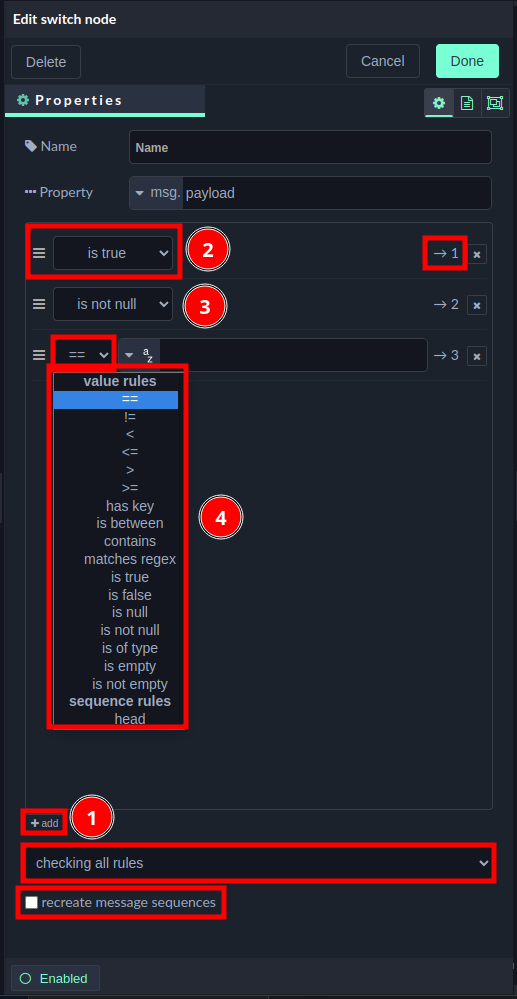
Switch Node Basic Configuration
The switch node offers a variety of pre-defined conditions and supports JSONata expressions. To introduce custom conditions, you can simply click the Add button 1️⃣, which will automatically create a new output 2️⃣ and associate it with the corresponding exit point 3️⃣ for matched conditions within the node.
In the initial example, we perform dual string comparisons against msg.payload (akin to if and elif conditions), directing the message to the corresponding output when a match is found; if none of the comparisons yield a positive result, the message is routed to the third output, simulating an else scenario.
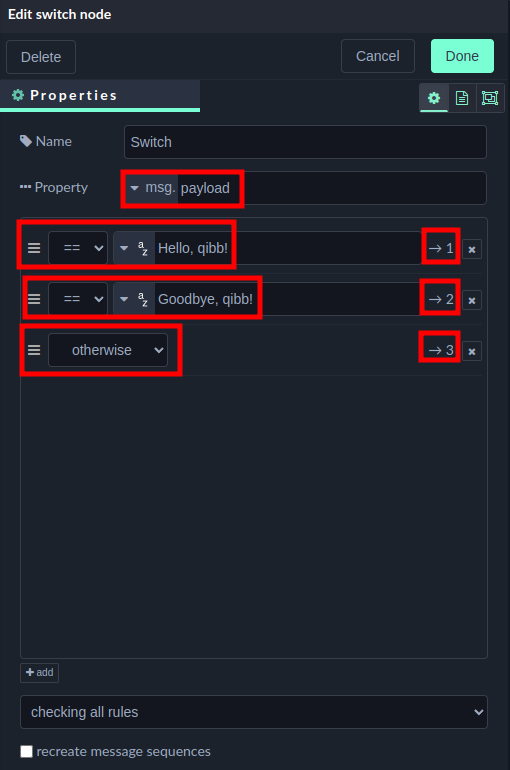
Switch Node Resembling if-elif-else Statement
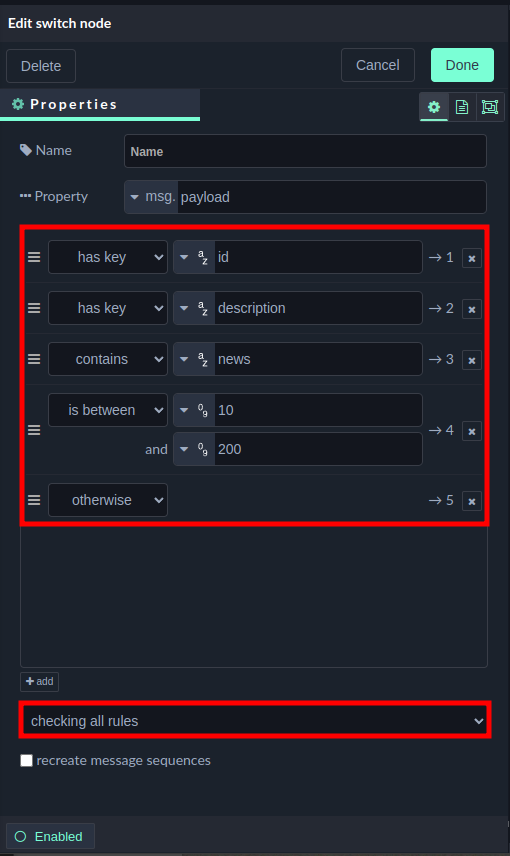
In this example, various JSON objects, an array, a number, and a boolean are injected into a switch node, which evaluates the msg.payload for the presence of specific conditions, including whether the msg.payload:
Has a key called id
Has a key called “description”
Contains the string “news”
Value is between 10 and 200, or
Otherwise (if none of the above conditions are met)
Notably, the switch node is configured to assess all the defined rules (checking all rules), allowing a single inject node to potentially route the msg object to multiple outputs simultaneously.
Screenshot of the Switch Node With All Conditions
You can notice that if you trigger the first inject node (Inject Object1) both the first and the second debug node will be shown in the debug messages tab.
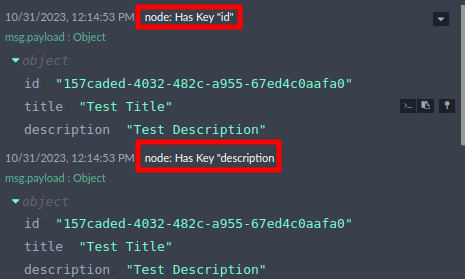
Debug Output After Injecting Object1
This example represents the most complex case within this section, employing the split and join nodes for advanced message handling.
First, an inject node inputs a msg.payload array into the flow, which comprises various data types such as numbers (both positive and negative), a string, and a boolean value.
Subsequently, the split node breaks up this array into its individual elements, resulting in the emission of multiple msg.payload messages, each containing precisely one element from the original array.
Following this, the switch node is configured to check all rules, and to reconstruct the message sequence based on three distinct checks whether the value of the msg.payload:
Is positive.
Is negative
Otherwise
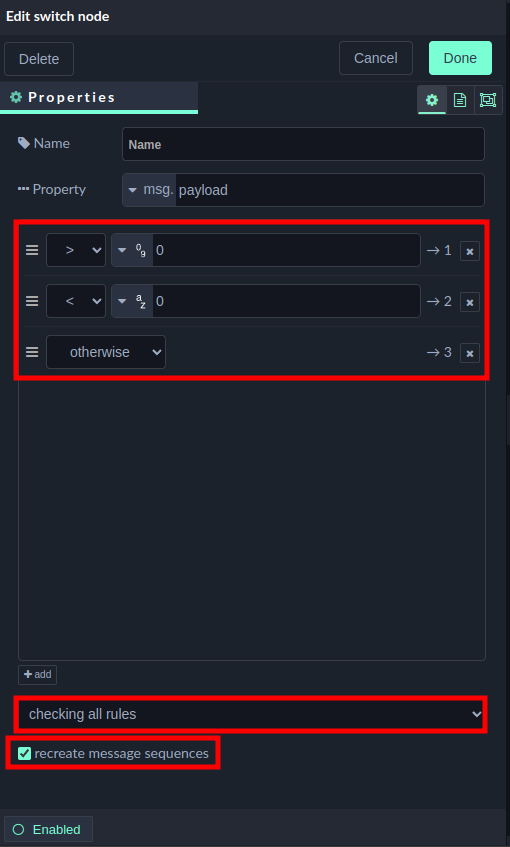
Switch Node Configuration
The subsequent join node is re-creating the array and the debug node is displaying the content of the modified msg.payload to the debug tab.
The settings on the split and join nodes are the default ones.
All three outputs would be triggered, but:
The first one would contain an array containing ONLY the positive numbers
The second one, all the negative numbers
The third would display, every element of the initial injected
msg.payload, that is not a number
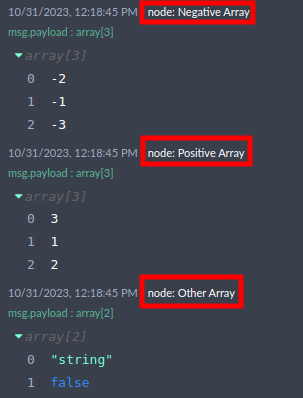
Debug Out
Change Node
The change node can modify different properties of the msg object, by:
Set - creating/overwriting a new/existing msg property
Change - replace a part of an existing message property with a different one
Delete - deletes the specified message property
Move - move an existing message attribute to another key.
In this example flow, we have used an inject node to set some attributes to the msg object and the change node, to modify those attributes.
The change node is configured to:
delete the
msg.deleteMepropertymove the
msg.odlMeattribute tomsg.newMeset the
msg.payloadto the string: “qibb is awesome!”. Note that themsg.payloadattribute didn’t exist in the injectedmsgobjectchange (find and replace) the string
worldwithqibbin themsg.topic
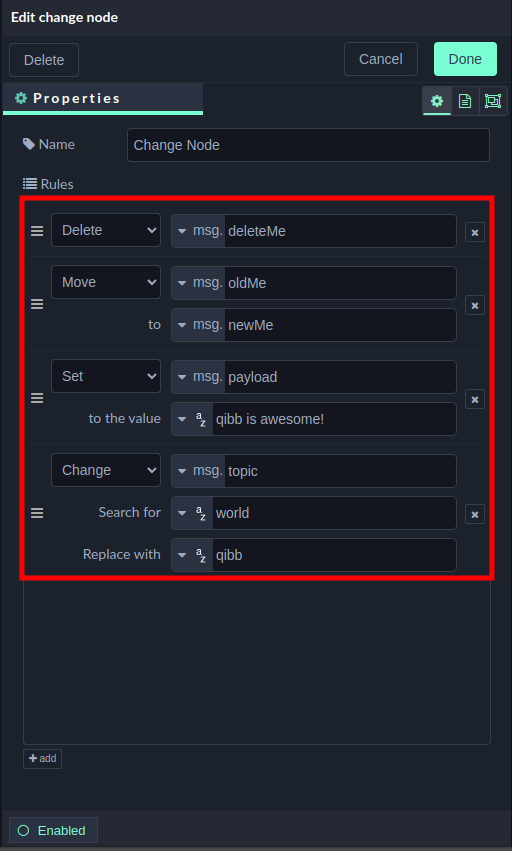
Change Node Configuration
And this is the debug out of this flow:
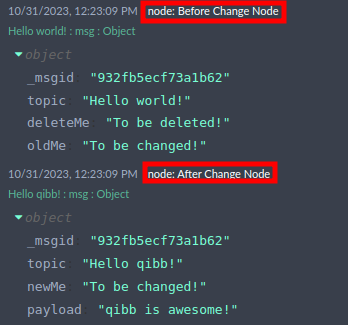
Debug Out of Introduction of the Change Node Flow
Note down the content of the original and the final message is as shown in the screenshot above.
Template Node
The template node is a powerful tool for creating dynamic and customizable content within your flows. It allows you to generate HTML, text, JSON, YAML, or other types of content by combining static text with data from incoming messages.
It supports the Mustache templating engine, allowing you to create dynamic content. With Mustache, you can include placeholders in your templates, called tags, which are then replaced with actual data when the template is rendered. These tags are enclosed in double curly braces, such as {{variable}}. You can use these Mustache tags to reference msg properties and inject dynamic content into your templates.
You can set the output format of the template node to either:
Plain Text
JSON
YAML
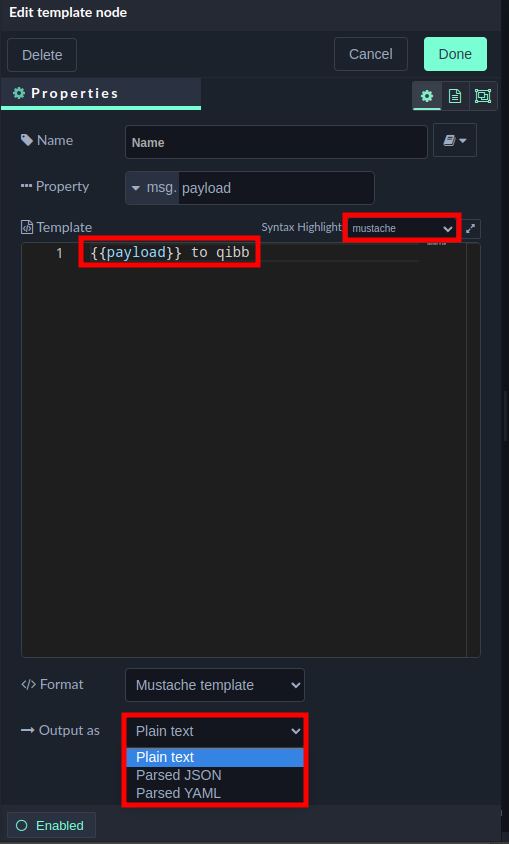
Template Node
The first template flow shows very basic usage of the Mustache template language and the {{payload}} would be replaced with the content of msg.payload (“This is an introduction”) and would be concatenated with the rest of the string to qibb.
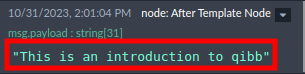
Template Node Debug Output
Function Node
The function node allows JavaScript code to be run against the msg object that is passed through it.
Function’s Return Statement
It is a convention to conclude your function nodes with the return msg; statement; without it, the flow will not seamlessly progress through the subsequent nodes. Returning a number or string will trigger an error.
Furthermore, the returned message object doesn't have to be identical to the one initially received; the function has the flexibility to create an entirely new object before returning it.
In the first introduction to function node flow, the function node is receiving a Unix timestamp (milliseconds since the 1st of January 1970) and it is checking if this value is dividable evenly by 2:
if (msg.payload % 2 === 0) {
    // Check if the current Linux Timestamp is odd or even
    msg.even = true;
    msg.odd = false;
    return [ msg, null ];
} else {
    msg.even = false;
    msg.odd = true;
    return [ null, msg ];
}
This function node code checks if the msg.payload contains an even or odd number and modifies the message accordingly. Here's an explanation of how it works:
if (msg.payload % 2 === 0)- This line checks if the remainder of dividingmsg.payloadby 2 is equal to 0 using the modulo operator. In other words, it checks ifmsg.payloadis an even number.If
msg.payloadis even:msg.even = true;- It sets the even property in the msg object (msg.even) to truemsg.odd = false;- It sets the odd property to false to indicate that the payload is not oddreturn [msg, null];- It returns an array with two elements. The first element is the modifiedmsgobject, and the second element isnull. This means that themsgobject would be passed to the first output of thefunctionnode and the second one would not be activated.
If
msg.payloadis odd (not even):msg.even = false;- It sets the even property in the msg object to false to indicate that the payload is not even.msg.odd = true;- It sets the odd property to true to indicate that the payload is oddreturn [null, msg];- It returns an array with two elements. The first element isnull, and the second element is the modifiedmsgobject. This also means that themsgobject would be passed to the second output of thefunctionnode only
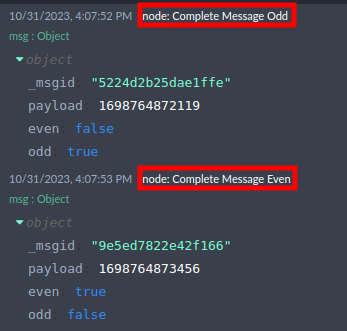
Debug Output of the Function Node
Note here that instead of simply returning the msg, object, we return an array, containing of two elements, null and msg. You can create a function node no outputs or with more than one outputs.
return [ null, msg ]; is a standard notation to activate the second output, which output would be activated is defined by the index of the msg object in the array.
You can also return the msg object to more than one output or simply return null; if you don’t want your function node to have an output.
Function Node with Two Outputs
Similar to the debug node, the function node can also display status, but you can extend this functionality by defining the
The
shapeproperty can be:ringordot.The
fillproperty can be:red,green,yellow,blue, orgreyThe
text- the text that would be displayed as a status message
// calling node.status show status information below the function node
switch (msg.payload) {
    case "red":
        node.status({fill:"red",shape:"dot",text:"disconnected"});
        break;
    case "green":
        node.status({fill:"green",shape:"ring",text:"connected"});
        break;
    case "text":
        node.status({text:"Just text status"});
        break;
    case "clear":
        node.status({});   // to clear the status
        break;
}
This code evaluates the value of the msg.payload to determine which case to execute.
The first case would set the status of the node to “disconnected” and use a red dot:
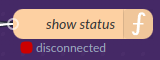
Disconnected Status
The second case would set it to green ring and the status would be connected:
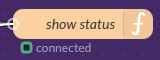
Connected Status
The third case to text only:
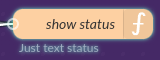
Text Status
The last one to clear, no status message text.
In the “Sending Multiple Messages” flow we are setting up four different msg objects and we are returning the first three to the first output and the last one to the second output.
This means that you would see four debug messages return [ [ msg1, msg2, msg3 ], msg4 ];
Three from the first debug node
[ msg1, msg2, msg3 ]One from the second debug node
msg4
In the code execution field, we set each msg object to a respective JSON object, containing only one payload property:
// returning array of message send elements to output ports
let msg1 = {
    payload: "first out of output 1"
    };

let msg2 = {
    payload: {
                "id": "696a05b1-c4e0-403d-b72e-31149015f887",
                "title": "Test Title"
            }
    };

let msg3 = {
    payload: [
                "sport",
                "news",
                "entertainment"
            ]
    };

let msg4 = {
    payload: "only message from output 2"
    };

// Returns message objects
return [ [ msg1, msg2, msg3 ], msg4 ];
This is the parsed output of the node:
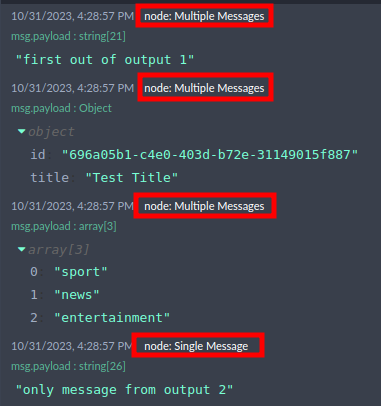
Parsed Debug Output
You can use the node.send() function to return the message object pre-maturely and continue the execution of the function node code. This way, you can send messages asynchronously inside a function node.
For example:
for ( let i = 0; i < 10; i++ ) {
    if ( i % 2 === 0 ) {
        msg.payload = i;
        node.send(msg);
    }
}

msg.payload = "Done!"
return msg;
In this for loop, we send the msg object on every iteration if the count is evenly divided by 2, and we assign the msg.payload to the count variable.
After we are done with the loop the msg.payload is assigned to the string Done and the msg object is once again returned.
The difference between node.send(msg); and return msg; is that after node.send() the rest of the code in the function node, continues to be evaluated, while if using the return statement, the rest of the code is being ignored.
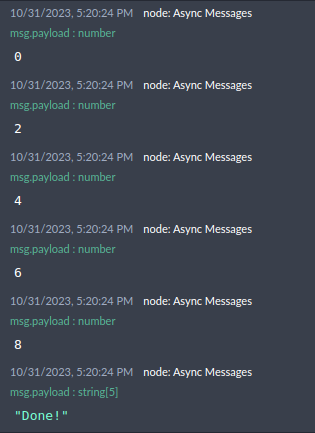
Debug Out of the Async Flow
In the qibb flow editor, you have the capability to trigger errors using the node.error() statement. This feature can be effectively combined with a catch node, which can monitor one or multiple nodes for errors and, upon detection, retrieve and return those errors.
This is the content of the function node:
// In function node, calling node.error functions with the original input message as its second argument triggers catch node
// See debug sidebar and console output
node.error("Oh no, something bad happened", msg);
// execution should stops here
return null;
Here we simply raise an error with the following text: “Oh no, something bad happened” and this error would be caught by the catch node.
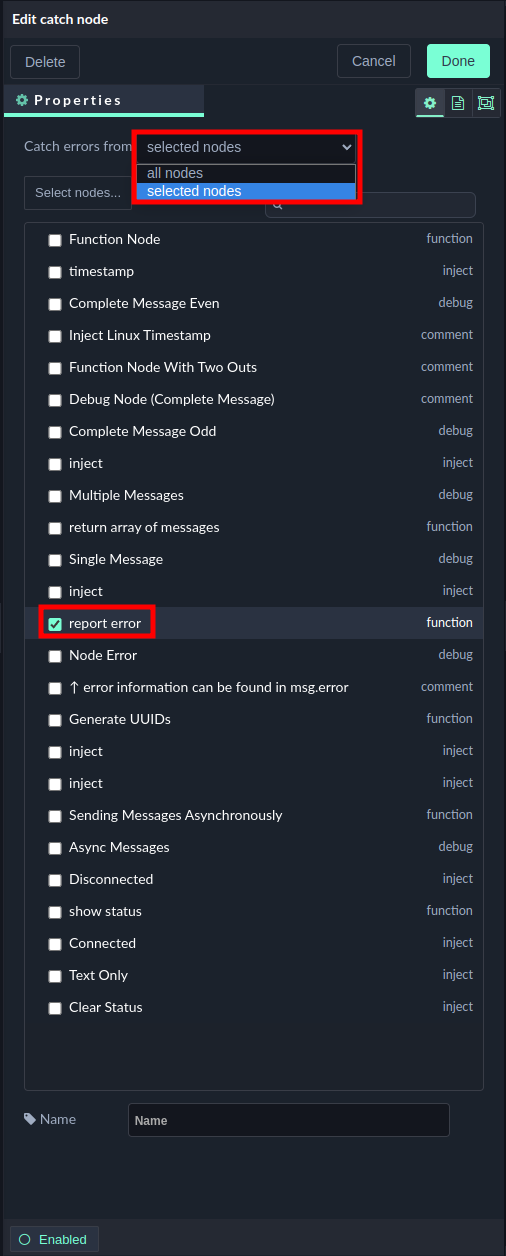
Catch Node Configuration
The screenshot above displays the configuration of the catch node, which in this case is configured only to monitor the function node with a name: report error.
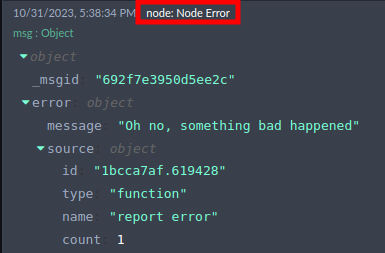
As you can notice the function node doesn’t have an output, but you can still see the error in the debug node, connected after the catch node:
Catch Node Output
Please note the format of the error message object:
{
   "_msgid":"692f7e3950d5ee2c",
   "error":{
      "message":"Oh no, something bad happened",
      "source":{
         "id":"1bcca7af.619428",
         "type":"function",
         "name":"report error",
         "count":1
      }
   }
Here you have information about the error message and the node source that generated it. As you can see the source, outlines the node ID, node type, node name, and the count of the error messages. The function ID can also be checked in the Information tab:
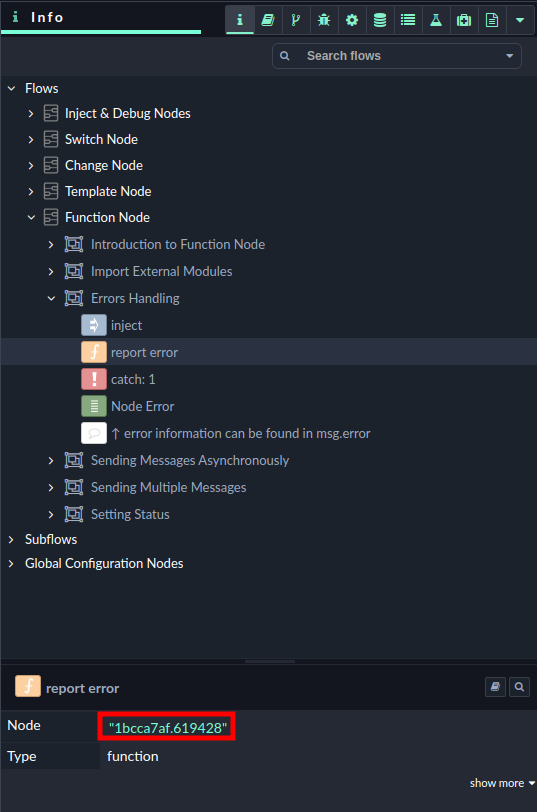
Function Node ID
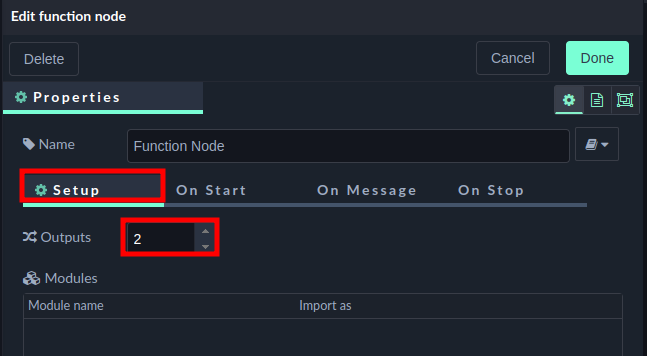
The last flow in this tab shows you how to import external node.js modules.
First, you need to click on the Add button 1️⃣, then define the modules in the function node Setup tab 2️⃣ and define how you want to refer to them 3️⃣.
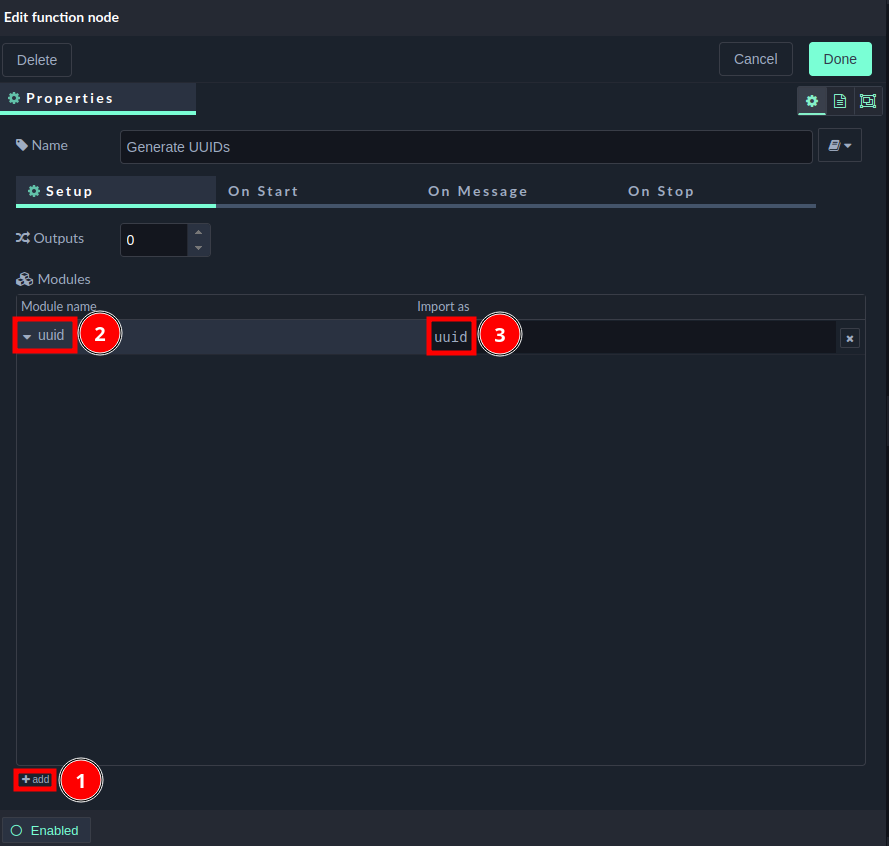
Importing The UUID Node.js Module
In this example, we import the UUID node.js module and we import it as uuid.
What is UUID?
UUID stands for "Universally Unique Identifier." It is a 128-bit identifier that is guaranteed to be unique across both space and time. UUIDs are often used in software and systems to uniquely identify resources or entities, such as documents, objects, or records. They are designed to be unique, even when generated in different locations and at different times, making them suitable for distributed systems.
UUIDs come in several versions, each with a different algorithm for generating the identifier. The most commonly used versions are:
UUID version 1 (UUIDv1): Generated based on the host's MAC address and the current timestamp. It provides a relatively unique identifier that also encodes the time of creation.
UUID version 4 (UUIDv4): Generated using random data. This version is often used when uniqueness is more critical than encoding time information.
UUIDs are represented as 32 hexadecimal digits separated by hyphens (e.g., 550e8400-e29b-41d4-a716-446655440000) and are typically used in various software applications, databases, and distributed systems to ensure the uniqueness of entities and avoid conflicts when different parts of a system generate identifiers.
In the function node, we define:
// Creating two variables and assigning to them UUIDs v.1 and v.4
const uuidV4 = uuid.v4();
const uuidV1 = uuid.v1();

// Printing in the debug messages tab the generated UUIDs
node.warn(`UUID v.1 generated using the UUID external module: ${uuidV1}`);
node.warn(`UUID v.4 generated using the UUID external module: ${uuidV4}`);

// When a Null value is returned, it serves as a flow-stopping mechanism,
// ensuring that no further actions are triggered beyond the scope of this function.
// This behavior guarantees the containment of any downstream processes.
return null;
We are using the external UUID node.js module to generate two UUIDs:
uuidV1- version 1 UUIDuuidV4- version 4 UUID
The node.warn() statement is logging messages to the debug tab. The template literals are used as string interpolation to create the warning message that would be passed to the debug node.
Template Literals
The backtick character `` in JavaScript is used to create template literals.
These literals can be used for:
String interpolation - You can embed variables and expressions within a template literal using `${}`
Multi-line Strings - Template literals allow you to create multi-line strings without the need for escaping line breaks or using concatenation.
Expression Evaluation - You can include expressions and functions within template literals, and they will be evaluated
Tagged Templates - Template literals can be used with a tagging function to customize the behavior of string interpolation. This is a more advanced usage, often used in libraries for creating custom string processing functions.

UUID v1 and UUID v4