When working with Git-enabled Flow App projects, merge conflicts can occur if changes are made in parallel by different users or environments.
This page explains how merge conflicts are handled in the Flow App and how to resolve them depending on their complexity.
The resolution process differs depending on whether a conflict can be merged automatically or requires manual user intervention.
How merge conflicts are handled in Flow App projects
Each Flow App project is connected to a Git repository. Changes to flows are tracked and synchronized between the current project state and incoming updates from the Git backend.
A merge conflict occurs when:
-
The Git backend contains incoming changes that are not yet applied in the current project state, and
-
The current project state also contains changes that are not yet synchronized
The Flow App evaluates each conflict and determines whether it can be resolved automatically or requires a manual decision.
Resolving merge conflicts caused by concurrent edits in the Flow App
This section covers merge conflicts that occur when multiple users work on the same Flow App at the same time.
All users interact with a shared, cloud-hosted project state. Conflicts arise when parallel changes overlap and cannot be applied automatically. These conflicts are detected and resolved directly within the Flow App UI, typically during save or deploy actions.
The focus here is on UI-guided conflict resolution between concurrent edits made inside the application.
Simple merge conflicts (automatic resolution)
Simple merge conflicts occur when parallel changes do not overlap in a critical way.
Typical examples include:
-
Additions of new nodes that do not modify existing ones
-
Structural changes that can be safely combined
In these cases, the Flow App can automatically merge the changes without user interaction.
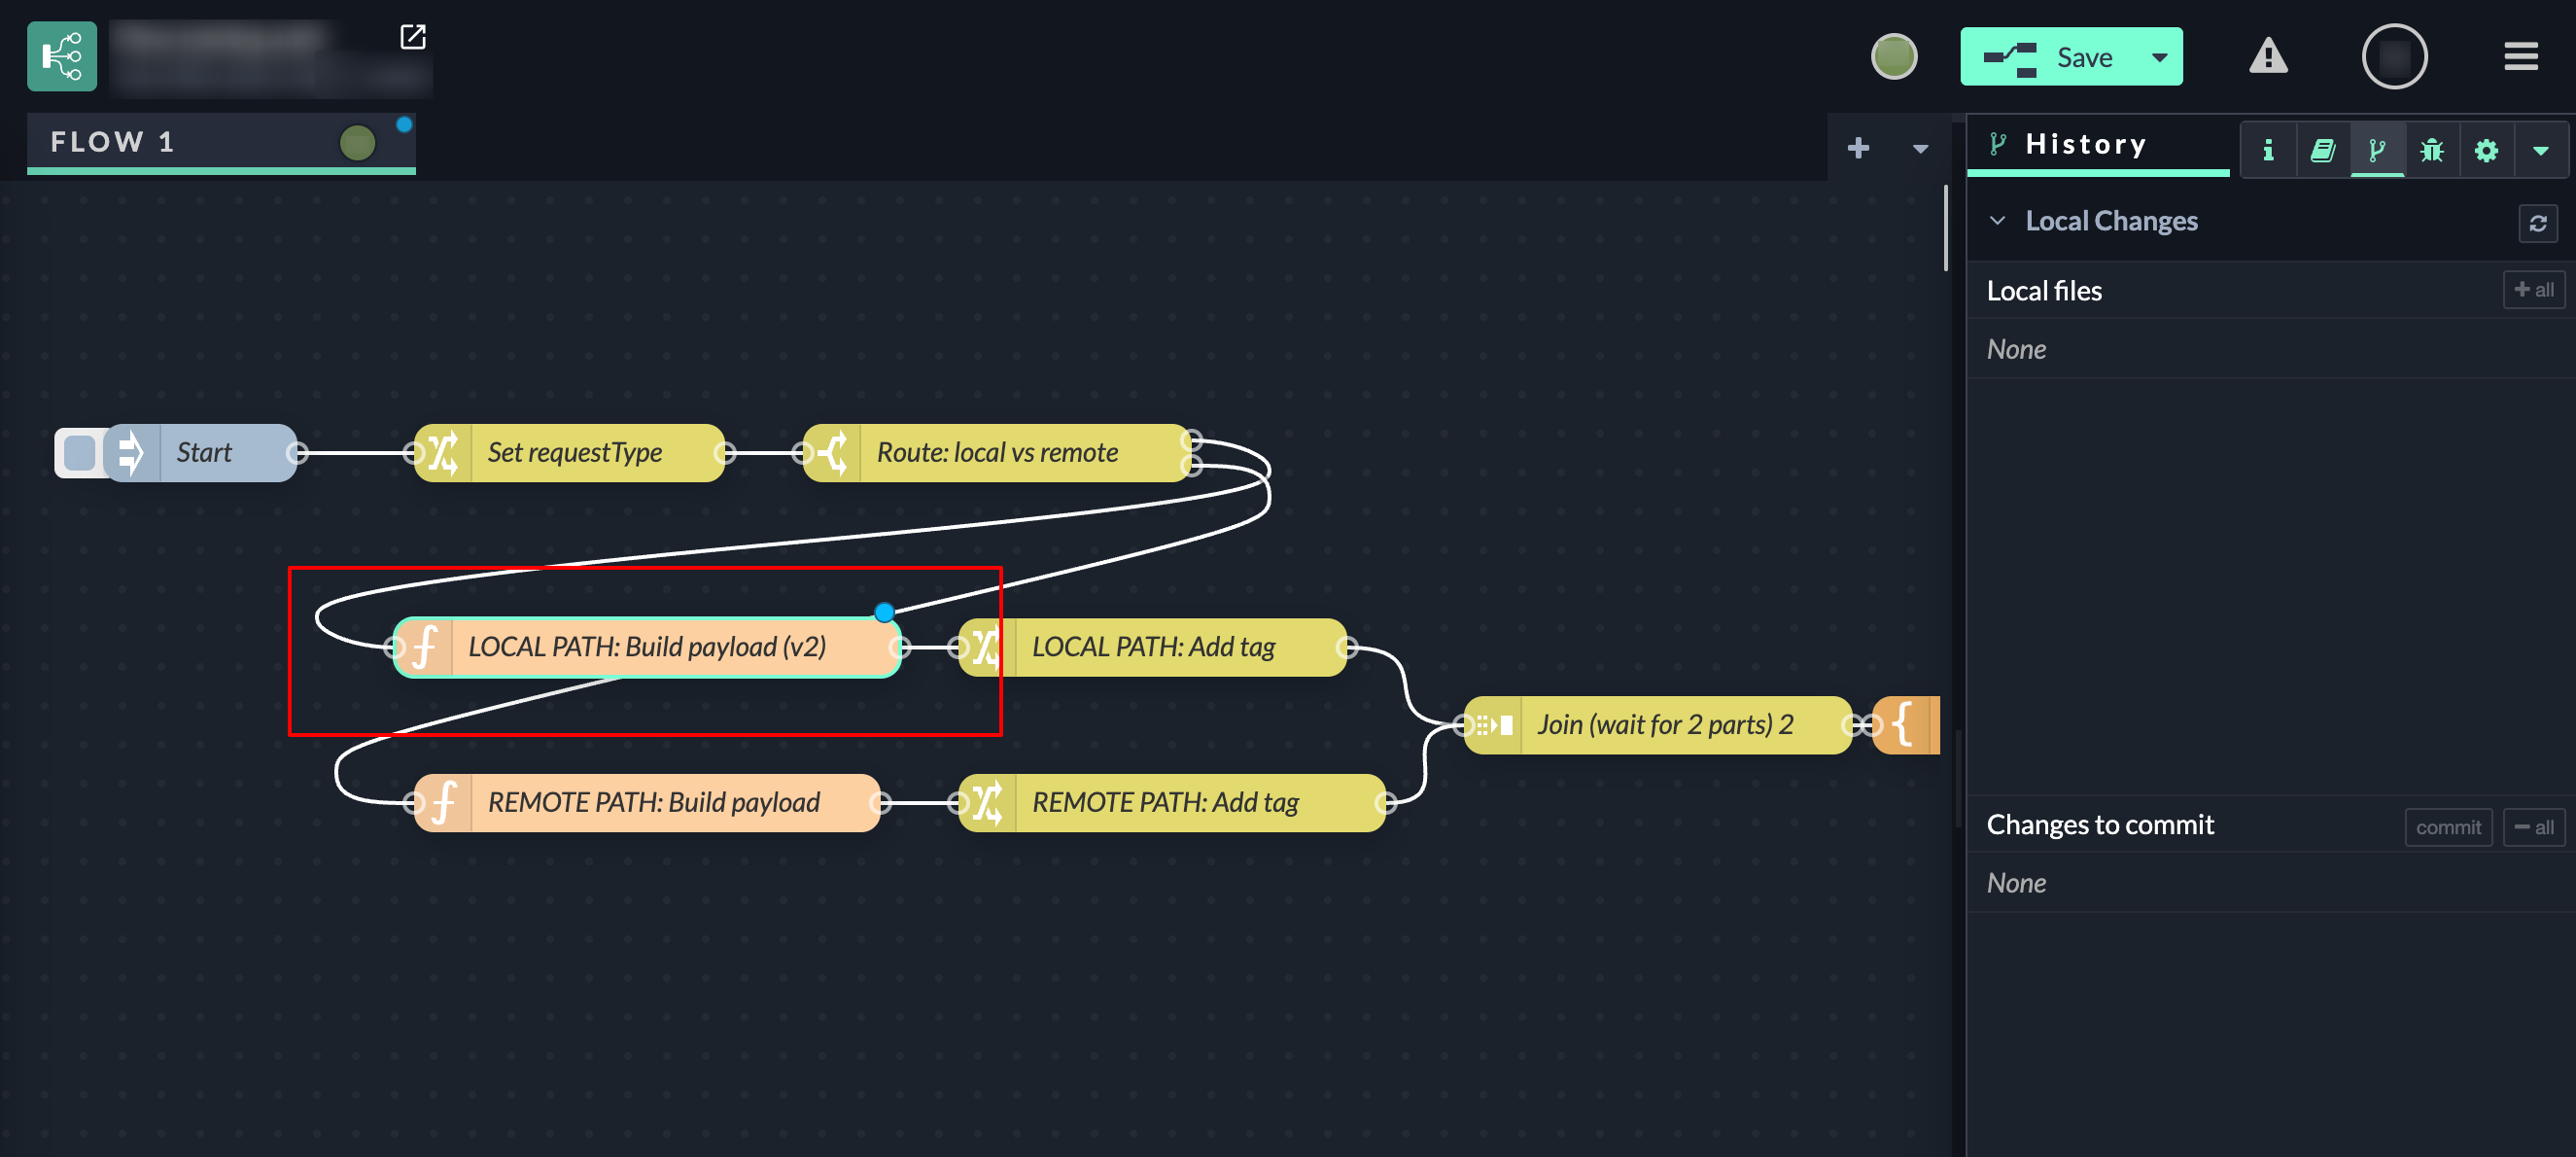
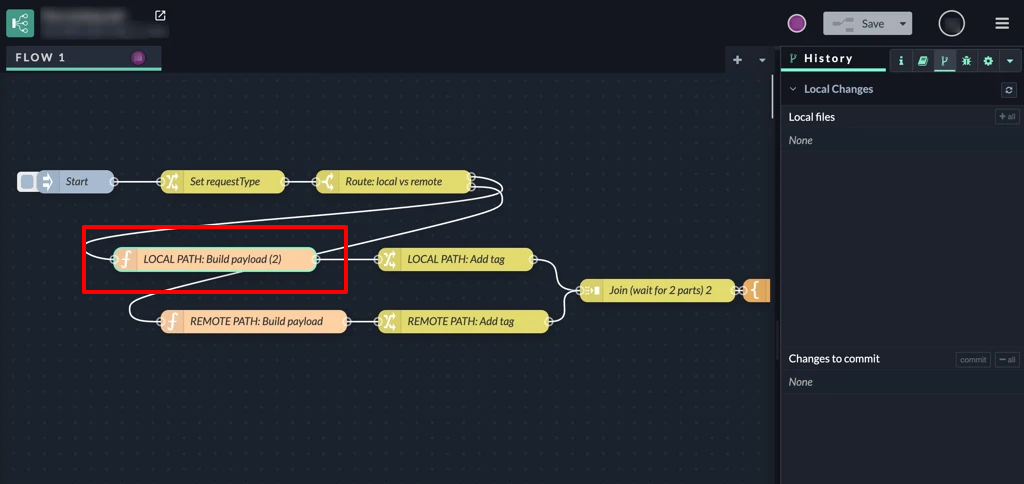
Example: automatically mergeable conflict
In this example, two parallel changes were made to the same project:
-
One change modified a processing path on one side of the flow
-
Another change extended a different node of the same workflow
Although the current project state and the incoming changes differ, the Flow App determines that the changes are compatible. In this case you will see
|
User A

|
-> |
User B
|
|
|
|
↓ |
|
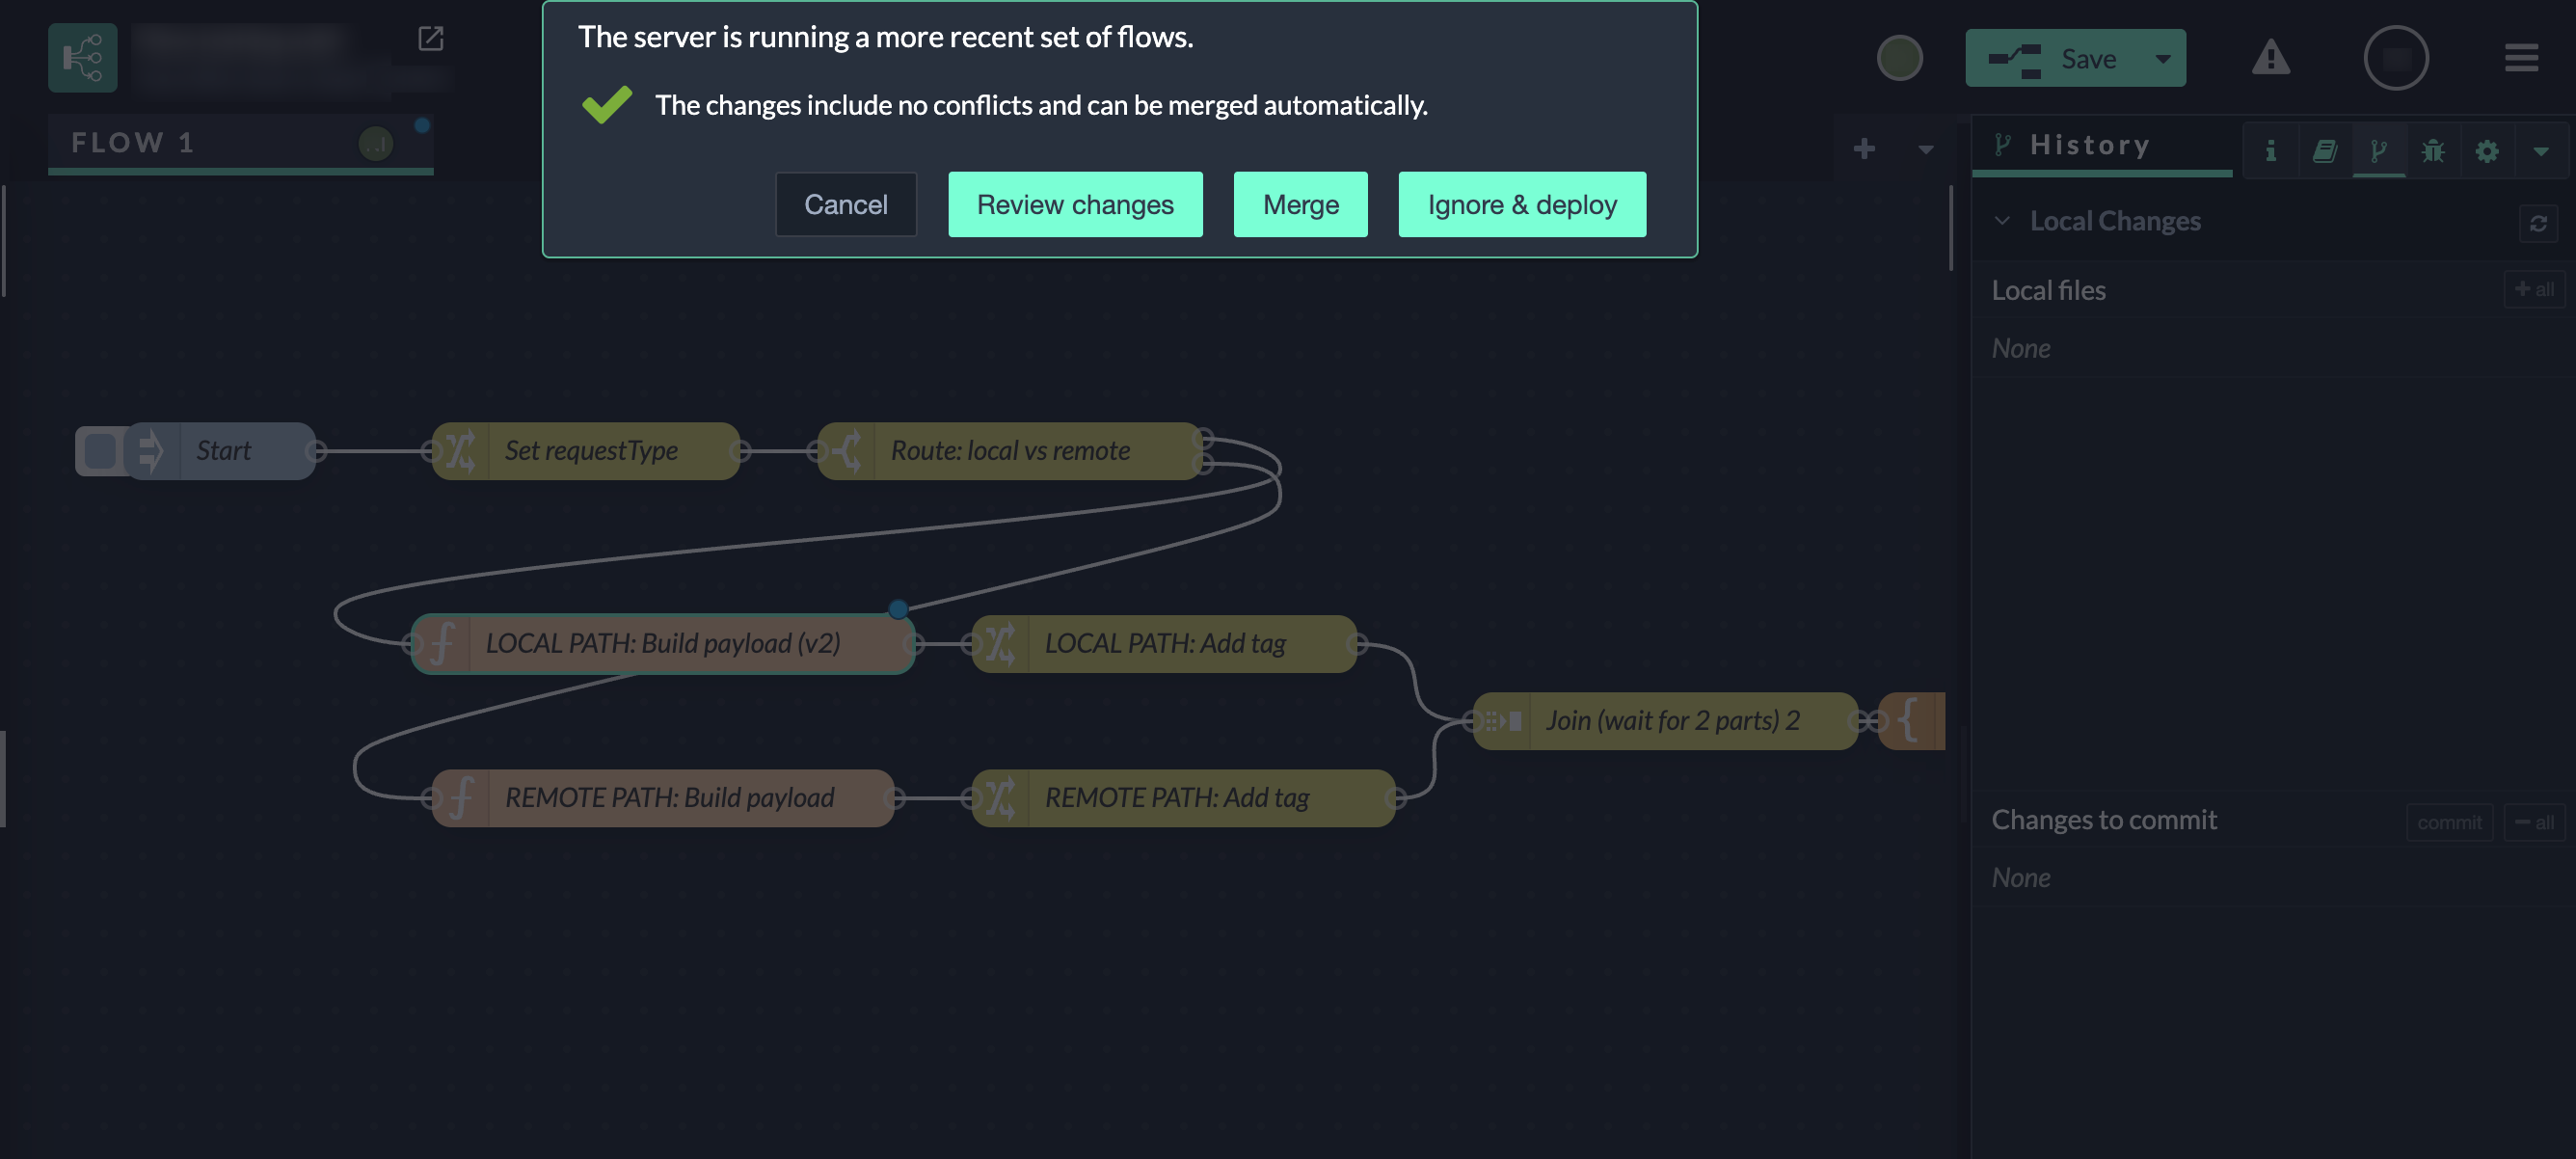
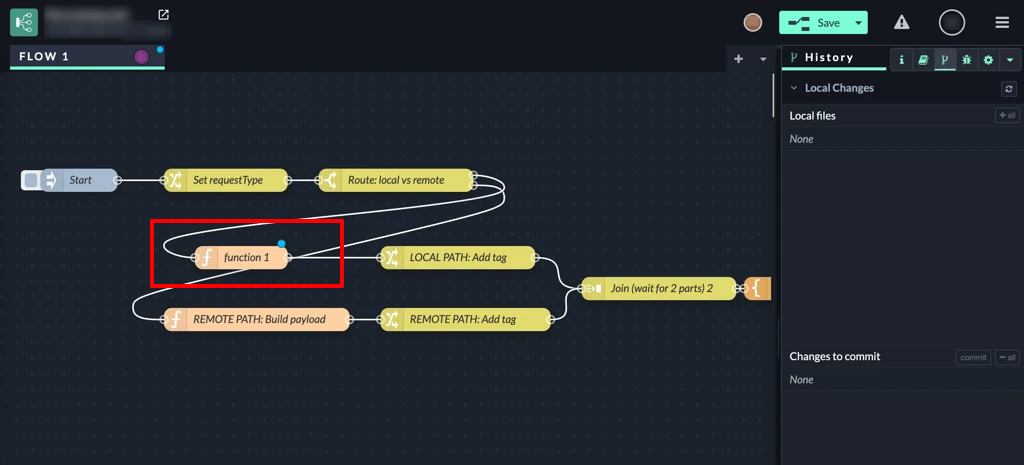
User B At this point, the Flow App detects that the server is already running a newer set of flows than the version currently shown in User B’s editor. Before applying User B’s changes, the Flow App compares:
The system determines that:
As a result, the Flow App classifies the situation as automatically mergeable. This is communicated clearly in the UI:
|
||
|
↓ |
||
|
When User B clicks Merge:
If Auto-Commit is enabled, this merged state is committed automatically after the merge. 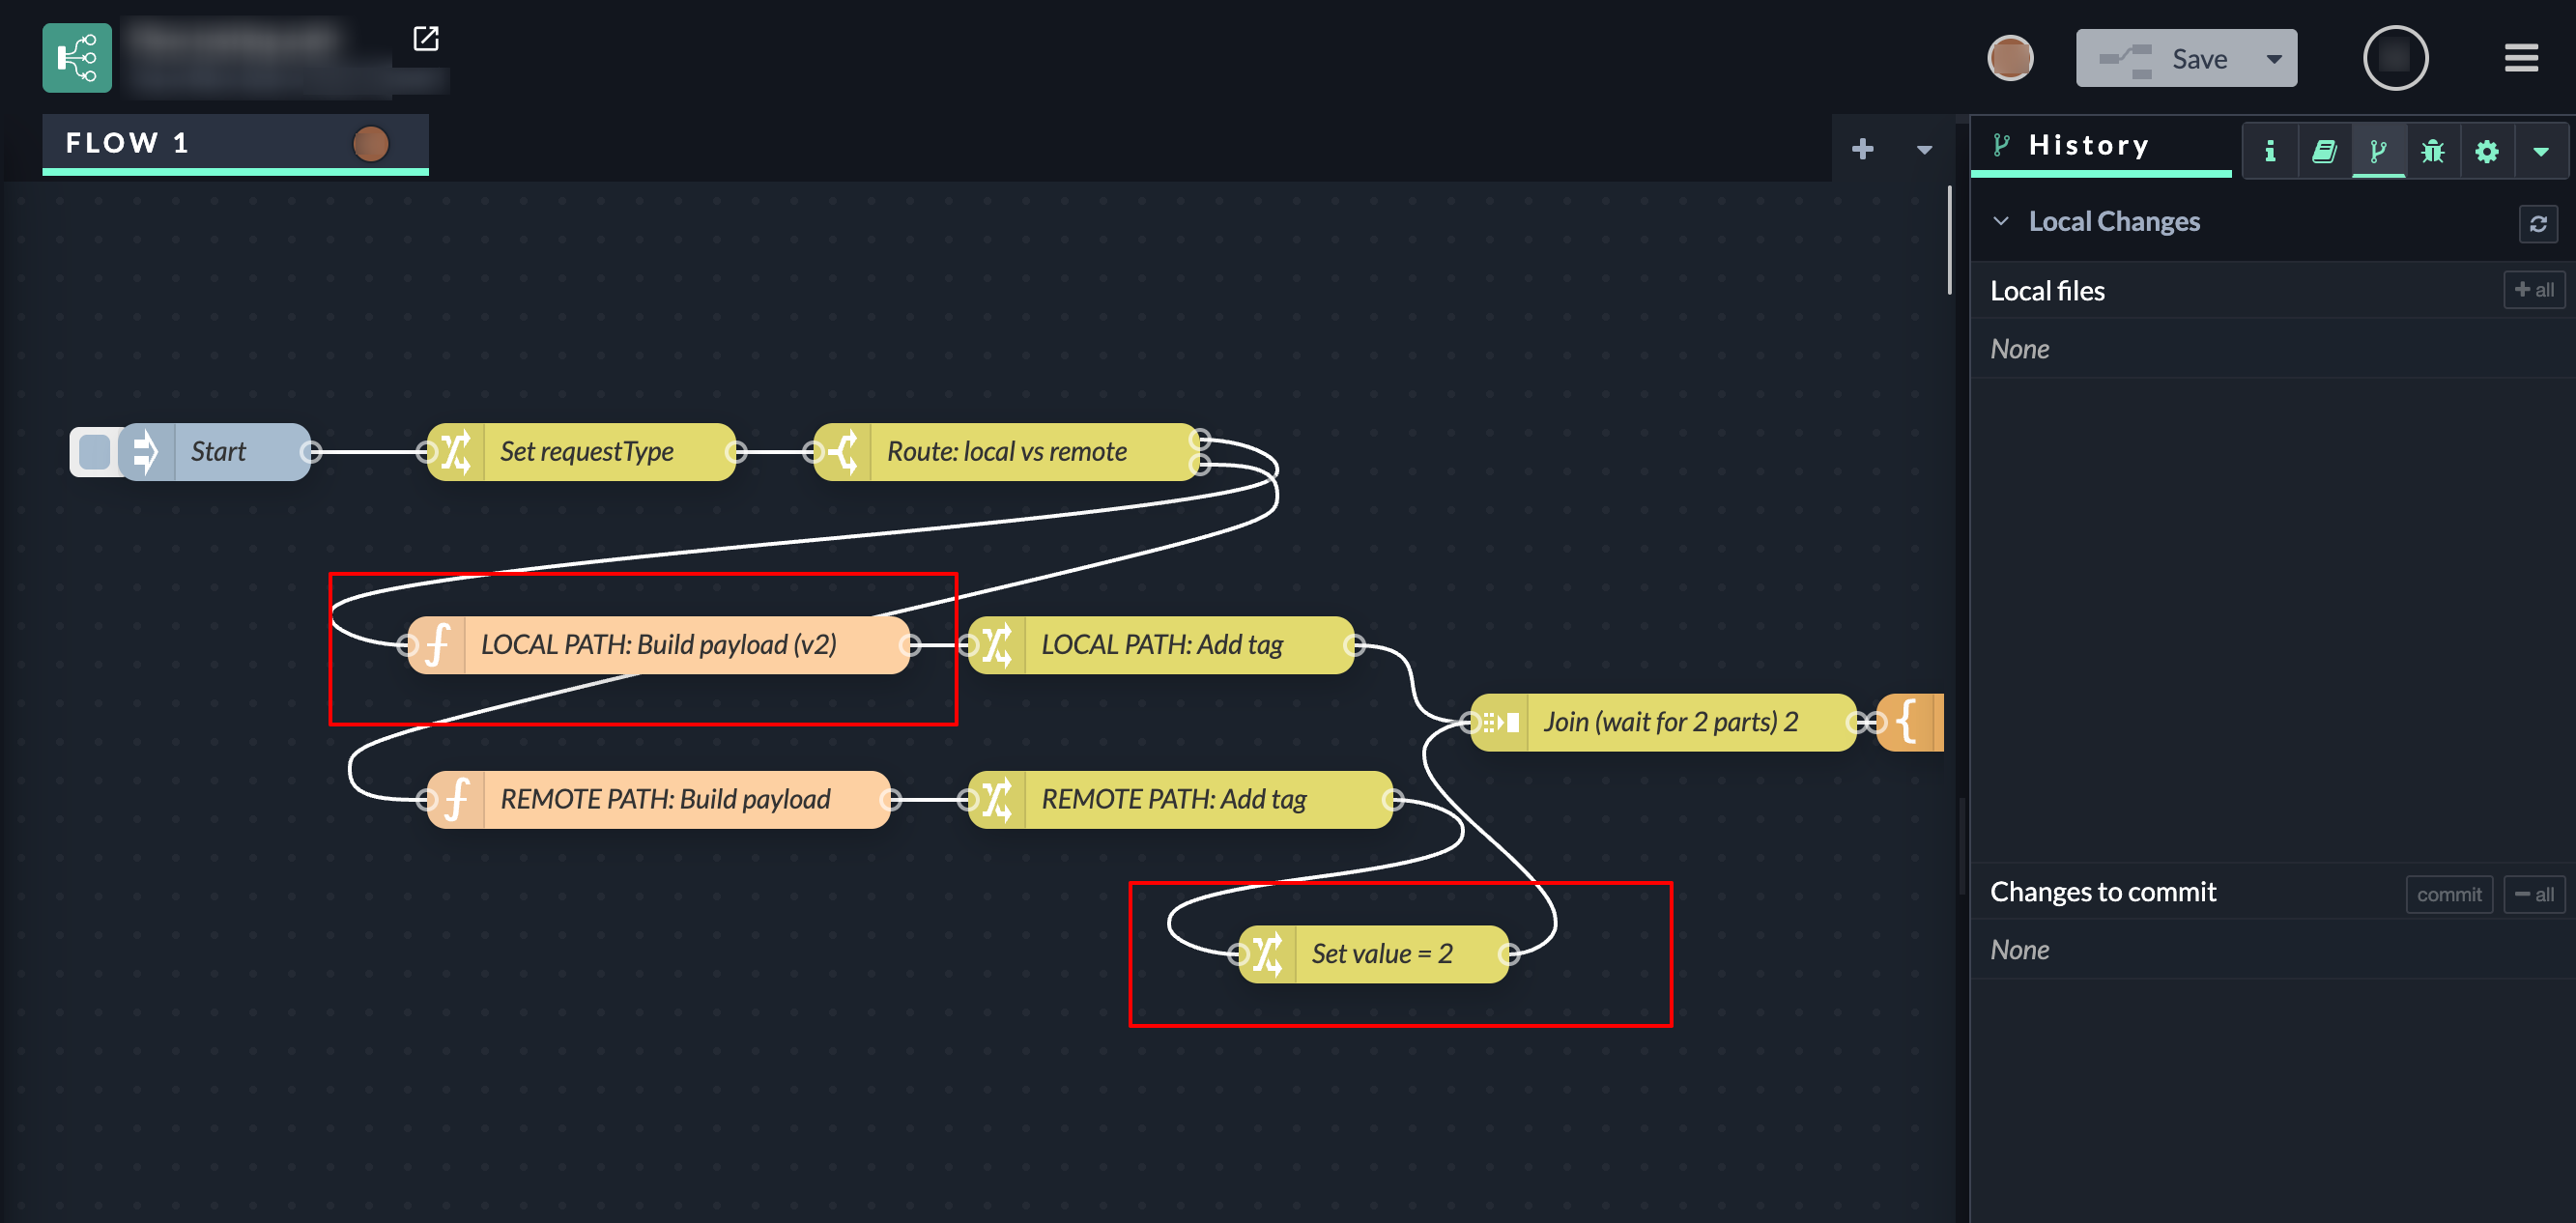
|
||
Complex merge conflicts (manual resolution)
Complex merge conflicts occur when parallel changes overlap in a way that cannot be resolved automatically.
This typically happens when multiple users modify the same workflow elements at the same time.
Examples include:
-
The same node being modified differently by multiple users
-
Conflicting changes to node wiring
-
Node configuration changes that cannot be merged safely
-
A node being deleted by one user and modified by another
In these cases, the Flow App requires a manual decision to resolve the conflict.
Example: conflict requiring manual resolution
In this example, two users are working on the same Flow App project in parallel.
|
Initial state 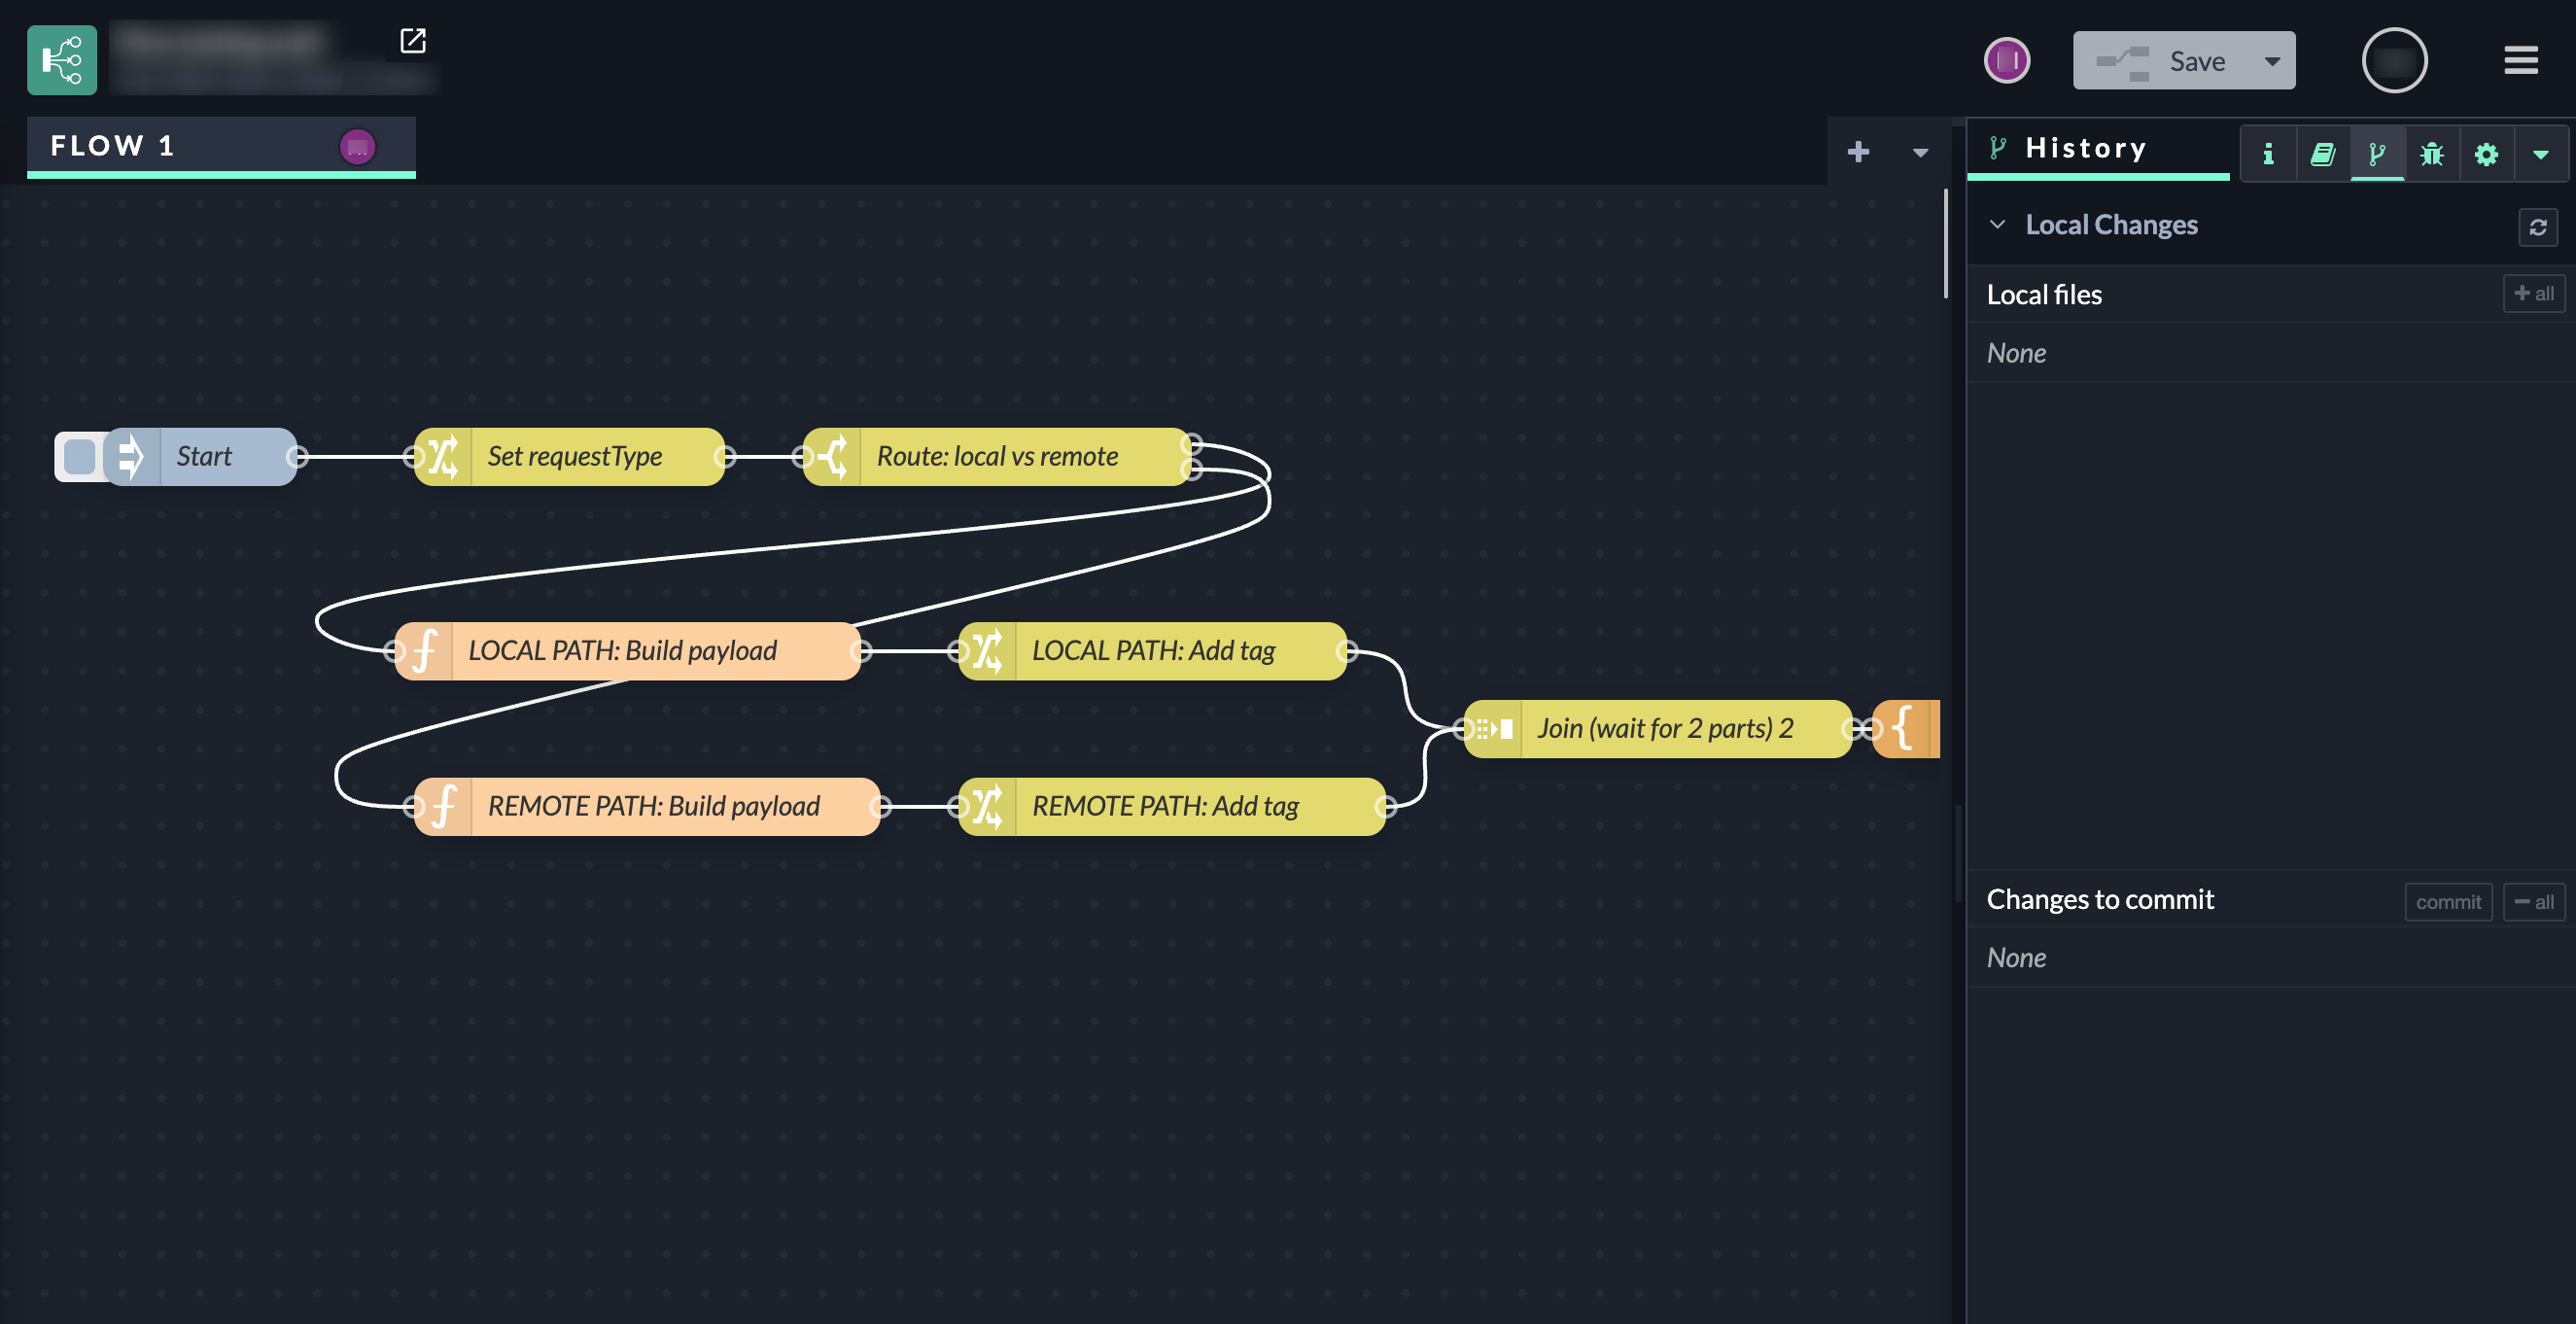
|
||
|
User A
Because Auto-Commit is enabled:
|
-> |
User B
|
|
|
|
↓ |
How the Flow App evaluates the situation
Before applying User B’s changes, the Flow App compares:
The system determines that:
Because one version modifies an existing node while the other replaces it entirely, the Flow App cannot determine how to merge the changes safely. As a result, the situation is classified as a manual merge conflict. 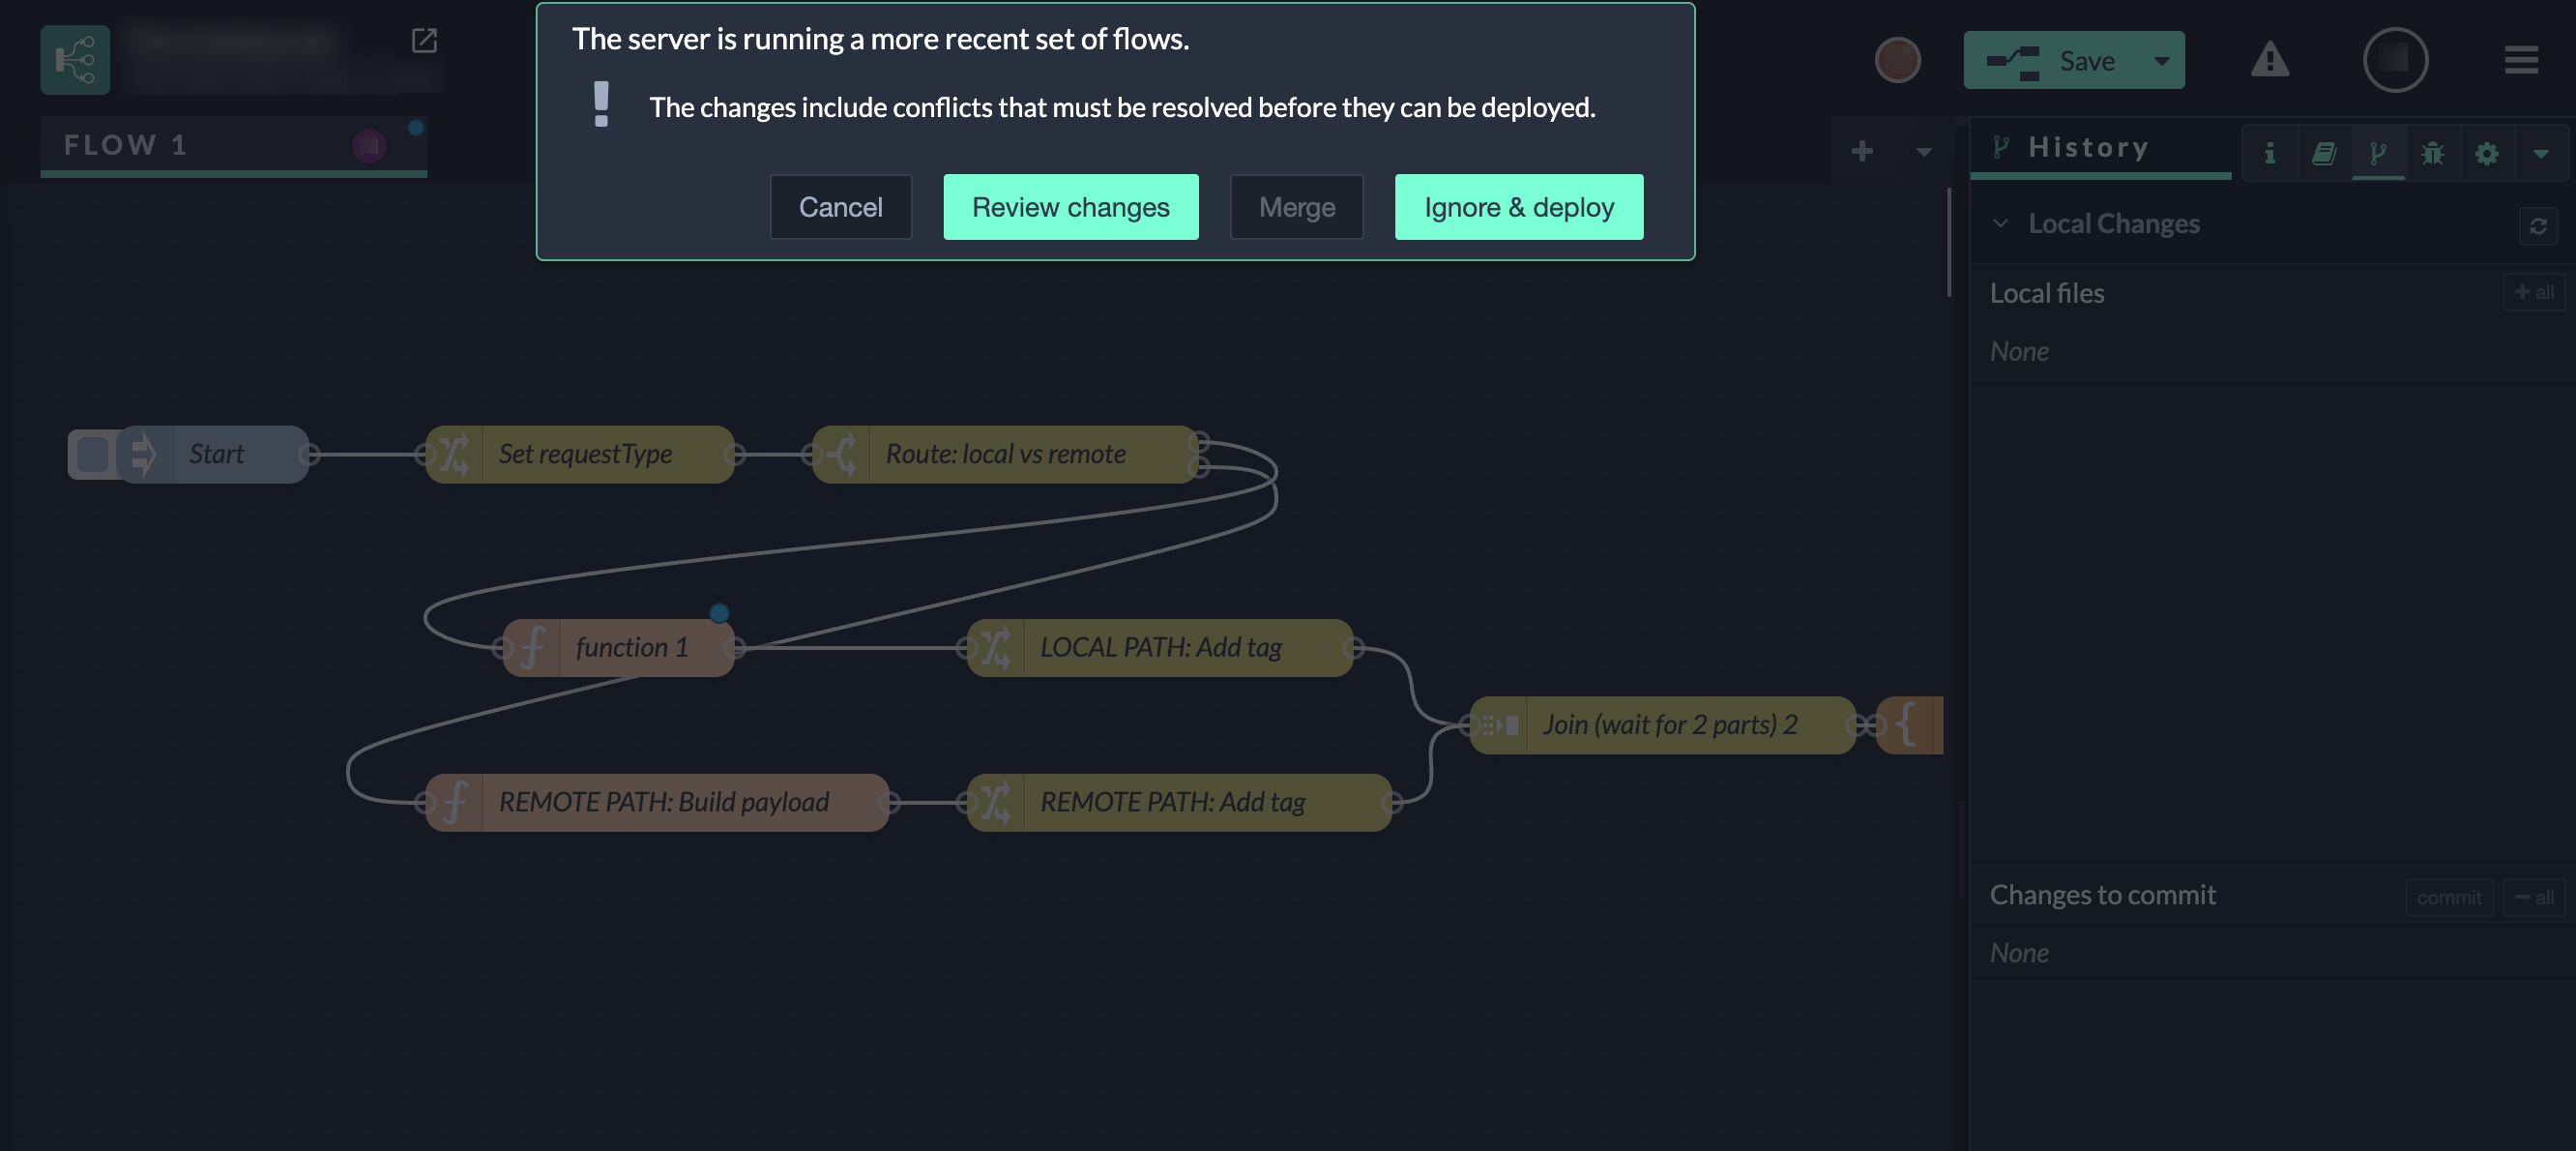
|
||
Available actions
|
|
Cancel
|
Review changes
|
Ignore & deploy
|
|---|---|---|---|
|
Purpose |
Stops the current operation without applying any changes. |
Allows User B to inspect the detected conflicts before making a decision. This step will be chosen and described in this example. |
Deploys the pending changes while discarding the conflicting changes currently running on the server. |
|
What happens when clicking |
|
|
Result
|
|
When to use this option |
|
This option does not resolve the conflict by itself; it is a preparatory step. |
|
For our example we gonna showcase how to resolve the merge conflict using the Review Changes step.
Resolving a merge conflict using Review changes
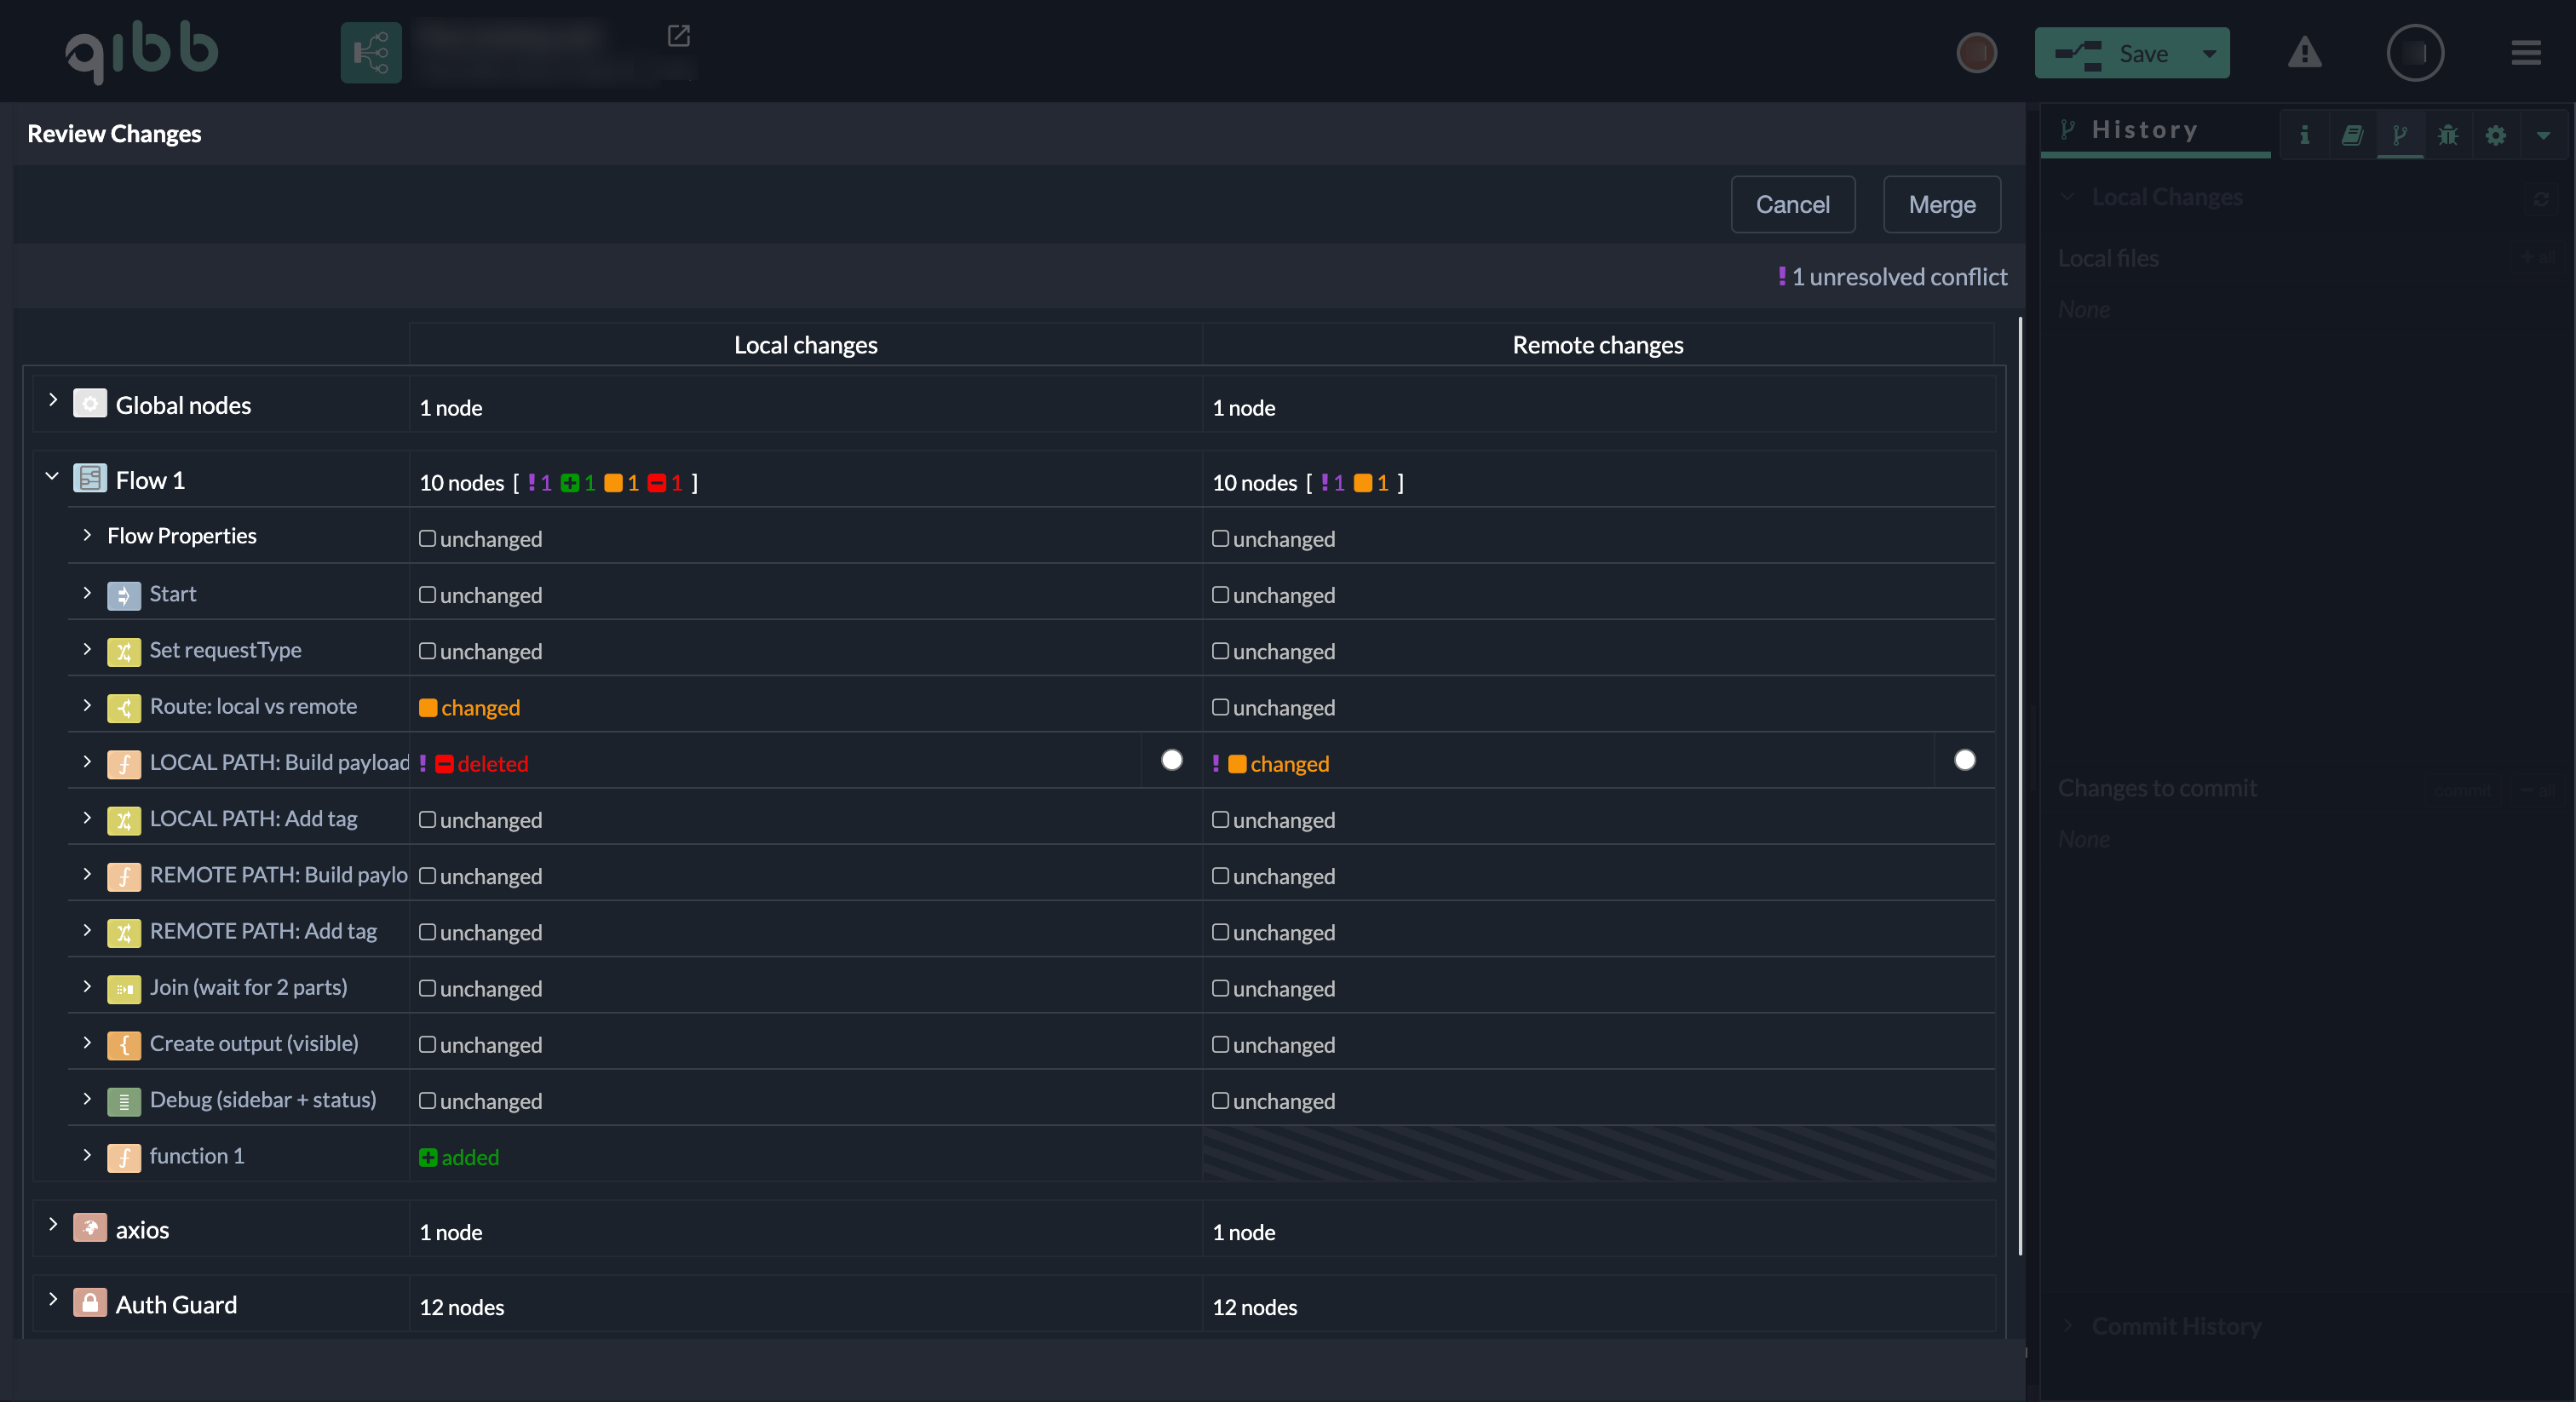
After clicking Review changes, the Flow App shows an overview of all detected differences and highlights whether conflicts are still unresolved.
At the top of the view, you can see the current status:
-
The number of unresolved conflicts is displayed
-
The Merge button remains disabled as long as at least one conflict exists
This indicates that further action is required before the changes can be merged.
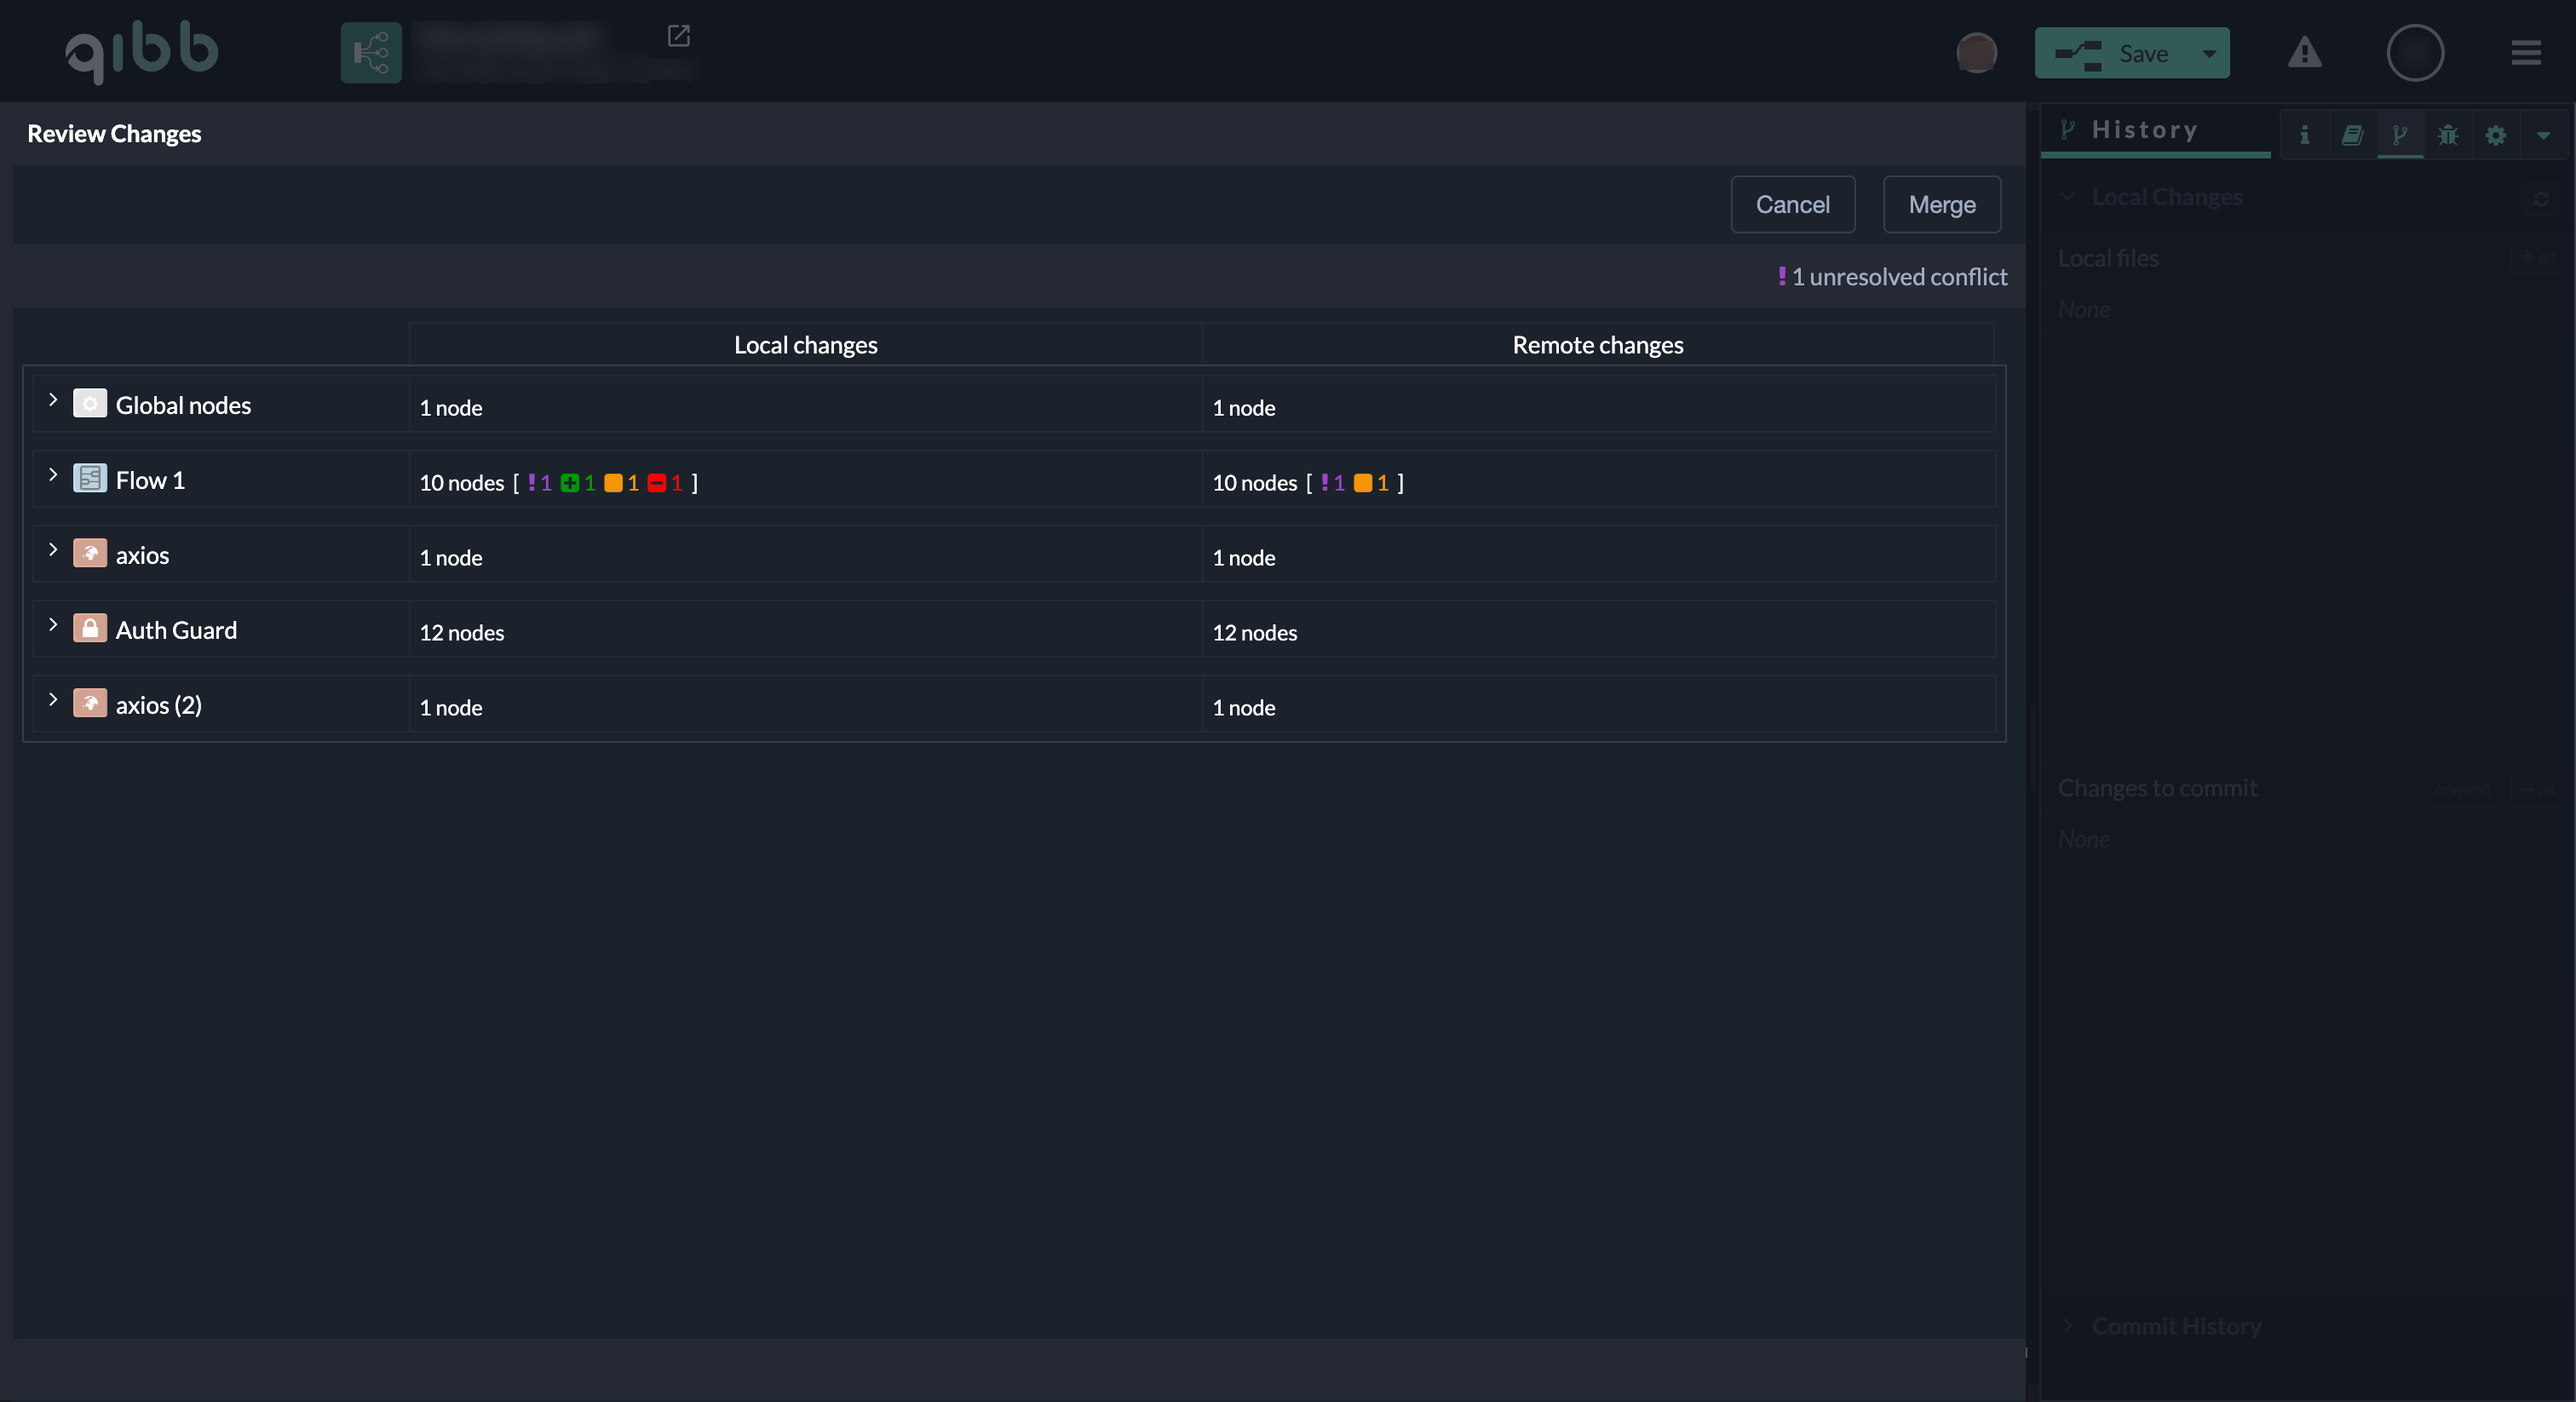
Step 1: Expand the affected flow
In the list of changes:
-
Locate the flow that contains the conflict (example: Flow 1)
-
Expand the flow to see the individual nodes and their change status
At this point, you can already see which nodes differ between the two versions.
Step 2: Identify the conflicting node
Within the expanded flow:
-
Look for a node where the change status differs between the two sides
(example: deleted on one side and changed on the other) and click on it -
Radio button marks this node as the active conflict
Step 3: Review the conflicting changes
After selecting the conflicting node:
-
The detailed comparison view opens
-
Both versions of the node are shown side by side
-
The conflict indicator remains visible
This view allows you to see exactly which version of the node exists on each side before making a decision.
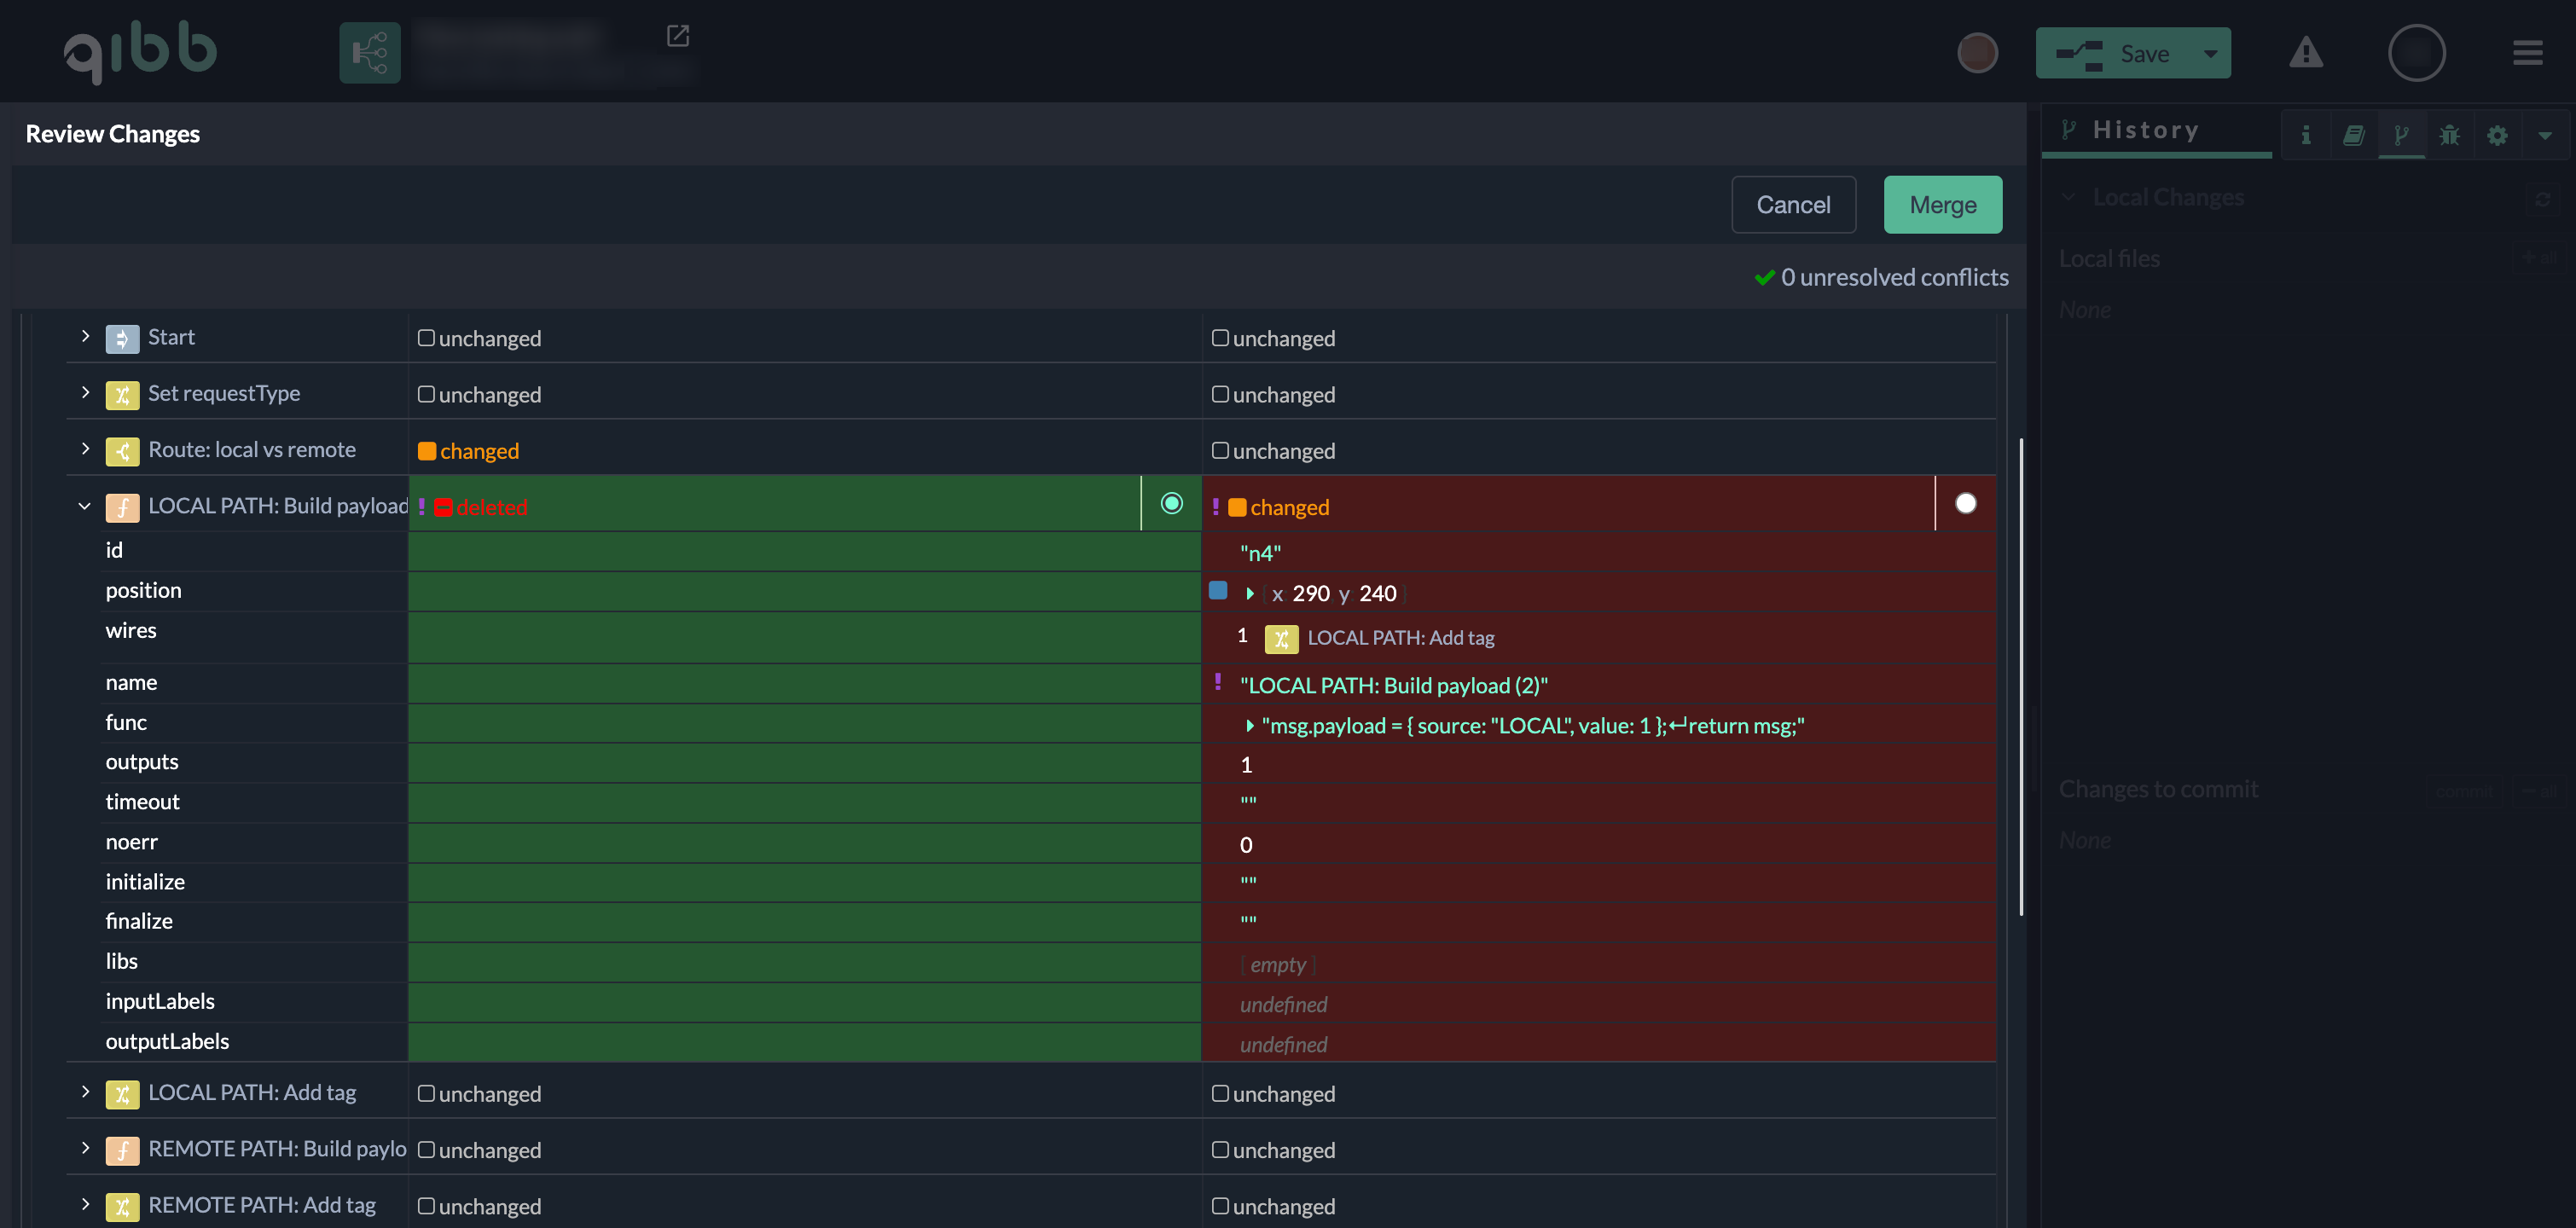
Step 4: Resolve the conflict
For the selected conflict:
-
Use the radio buttons to choose which version of the node should be kept.
-
The UI visually indicates the outcome of your selection:
-
The selected version is marked as green - kept
-
The other version is indicated as red - discarded
-
In the example shown in the screenshot:
-
The deletion of the node is selected and will be kept
-
The changed version of the node from the other side will be discarded
-
As a result, the node that was deleted in one version will not exist in the final workflow
This makes it explicit which version will remain and which one will be removed before the resolution is applied.
Once the selection is made:
-
The conflict indicator is cleared
-
The header updates to show 0 unresolved conflicts
-
The Merge button becomes enabled
This confirms that the conflict has been successfully resolved and the changes can now be merged.
Step 5: Merge the changes
After all conflicts are resolved:
-
Click Merge
-
The Flow App applies the selected resolutions
-
The editor opens with the merged workflow
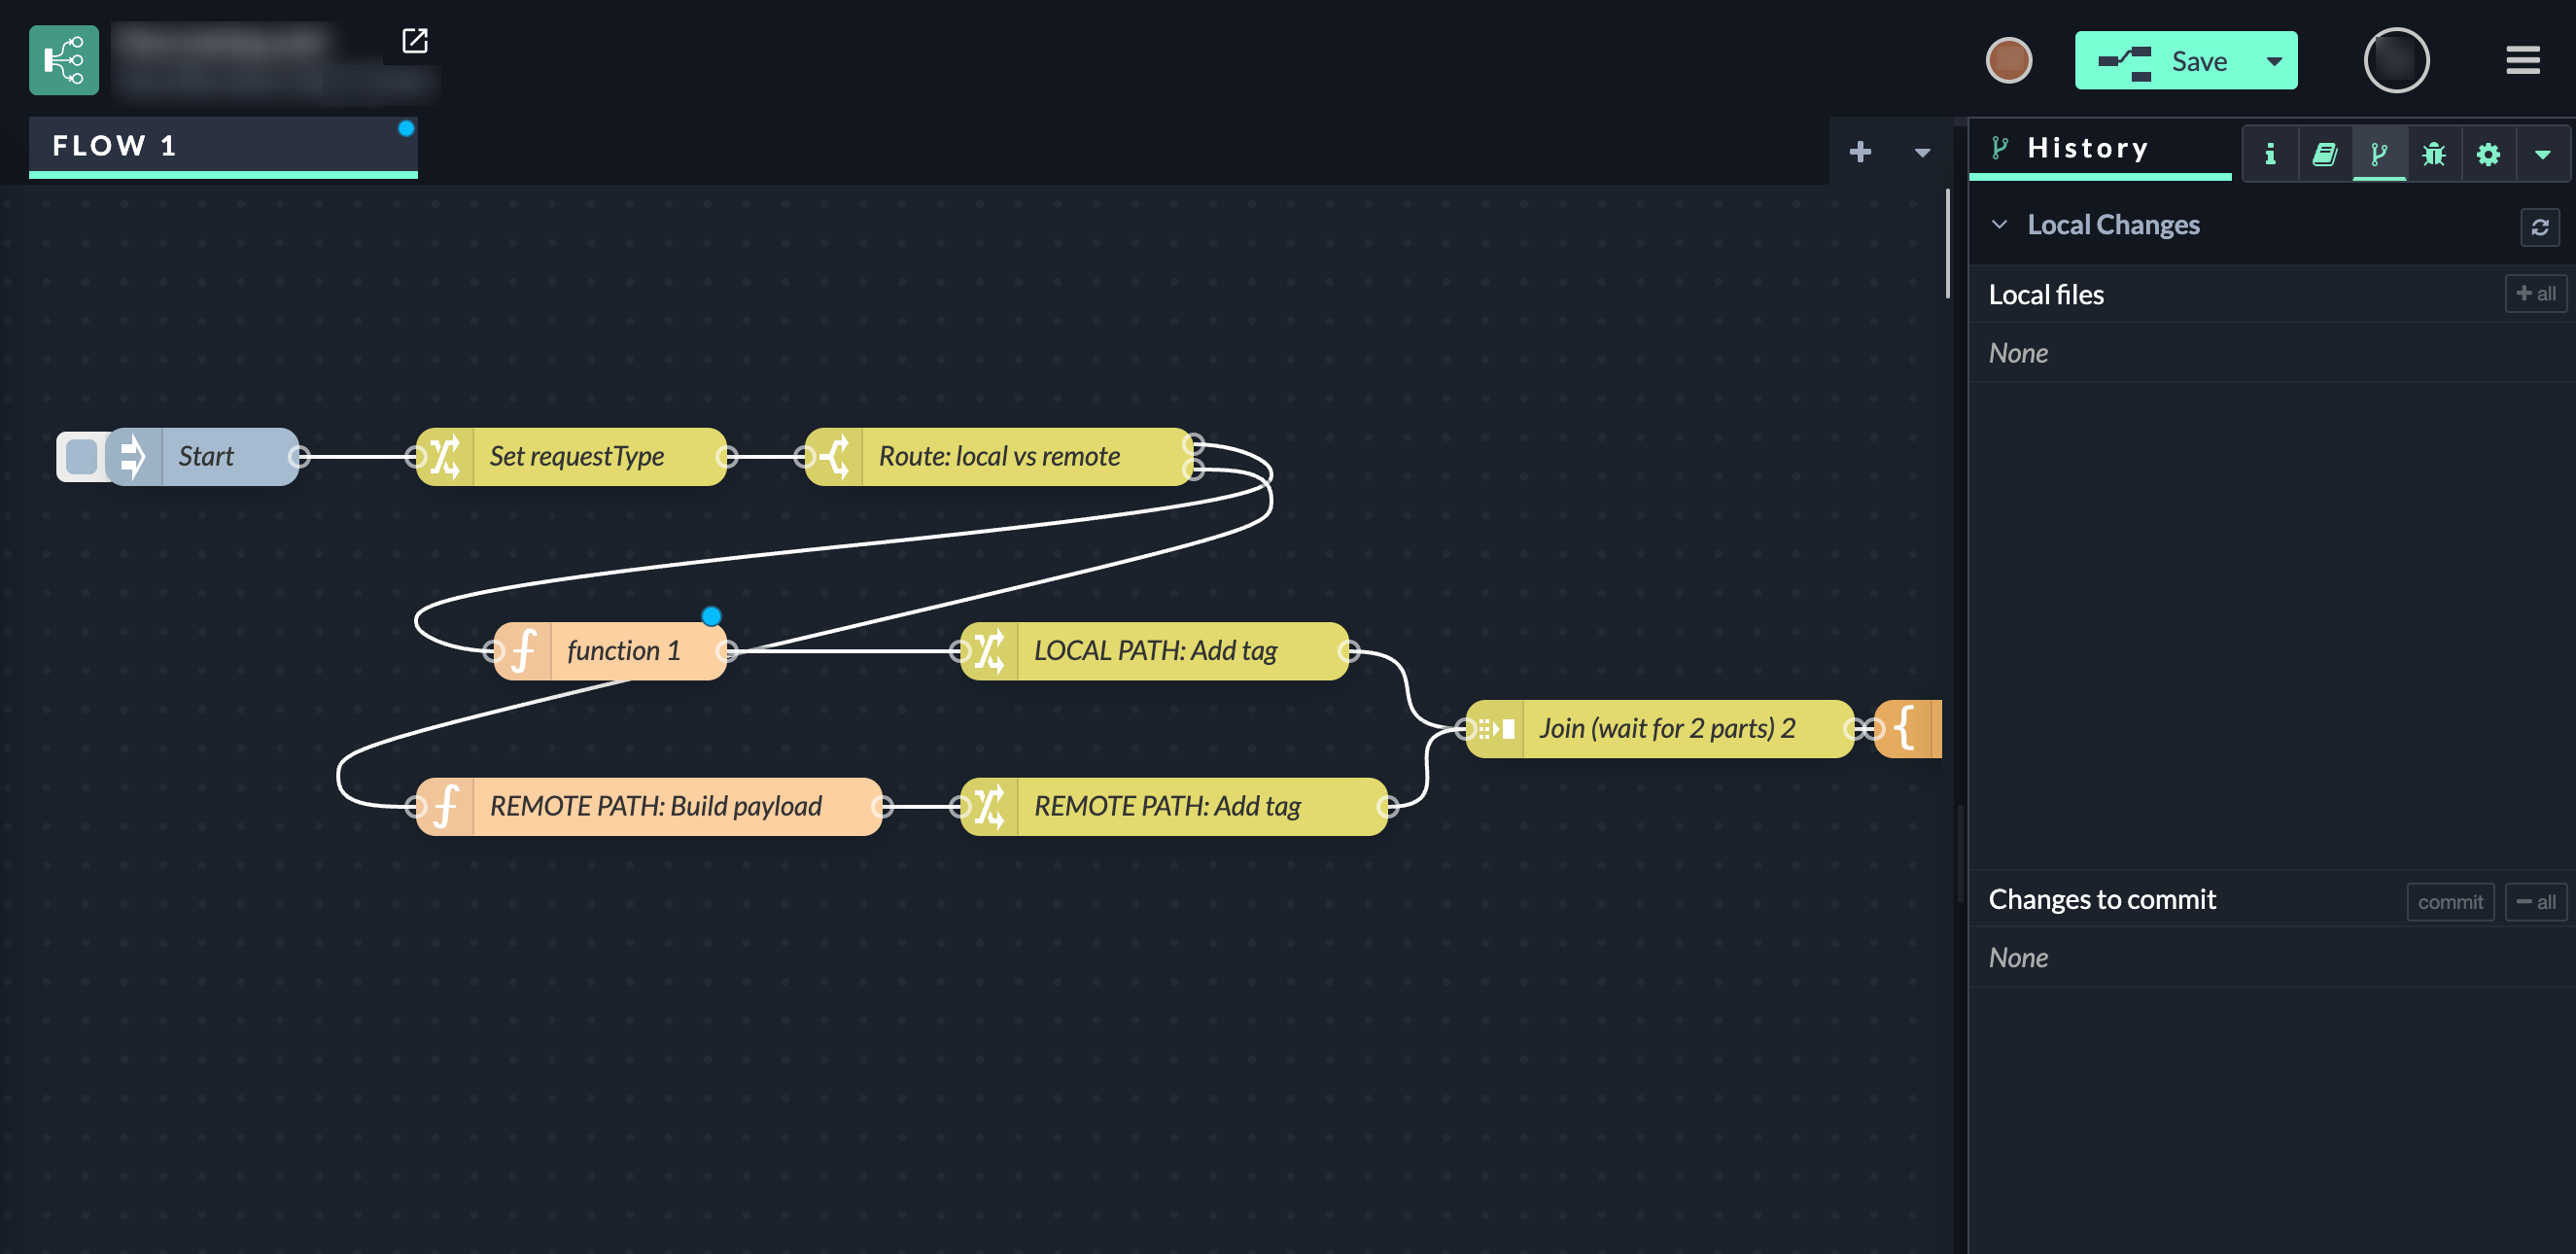
You can now review the final state of the flow and continue working or deploy the changes.
Resolving merge conflicts in Git-connected Flow App projects
This section covers merge conflicts that occur when a Flow App project is connected to a Git repository (for example, GitLab) and multiple users work with Git workflows.
Conflicts arise at the Git level, such as when:
-
multiple commits are made to the same branch, or
-
changes from different contributors overlap during a merge.
These conflicts are reflected in the Flow App via the Git integration and are resolved by reconciling project history and changes tracked in Git.
The focus here is on Git-based collaboration and conflict resolution, rather than real-time concurrent editing in the UI. This section shows how to resolve merge conflicts that can occur when a Flow App project is connected to Git.
The steps are demonstrated using a concrete example.
Example setup: App A and App B
In this example, a project already exists in Git and is actively used.
-
App A is already connected to the Git repository and has created commits.
-
App B is now connected to the same Git repository.
When App B connects to the project, it immediately runs into synchronization issues because the remote repository already contains changes created by App A.
The following steps show exactly how to resolve this situation in App B and bring the project into a clean, working state.
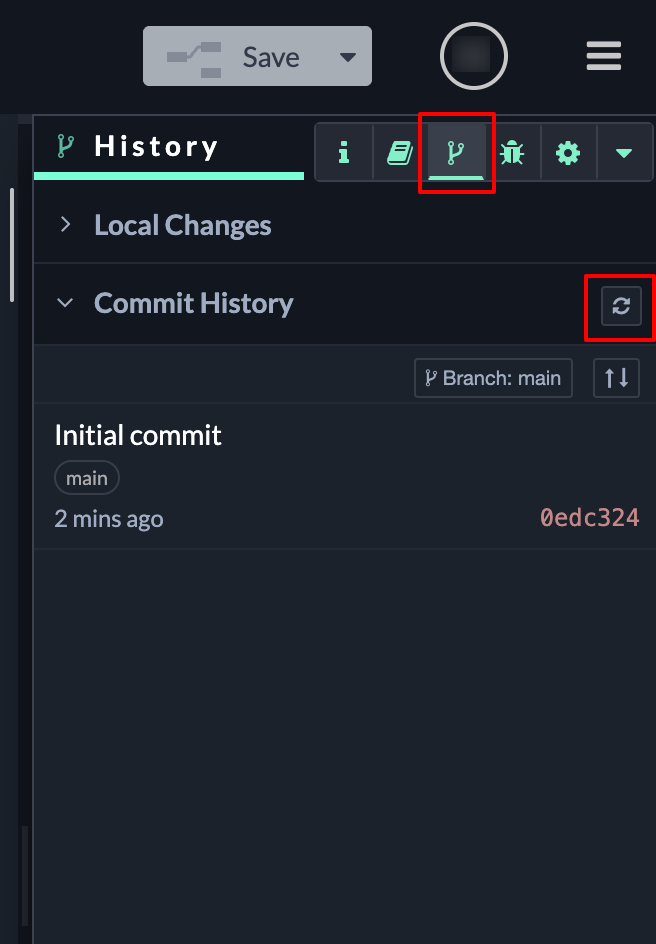
Step 1: Refresh the commit history
After adding the Git remote in the Project Settings, open the History panel and refresh the commit history.
This ensures the app fetches the latest state from the remote repository.
Step 2: Pull remote changes
After refreshing, the History panel shows that:
-
remote commits are available, and
-
local and remote states are not yet aligned.
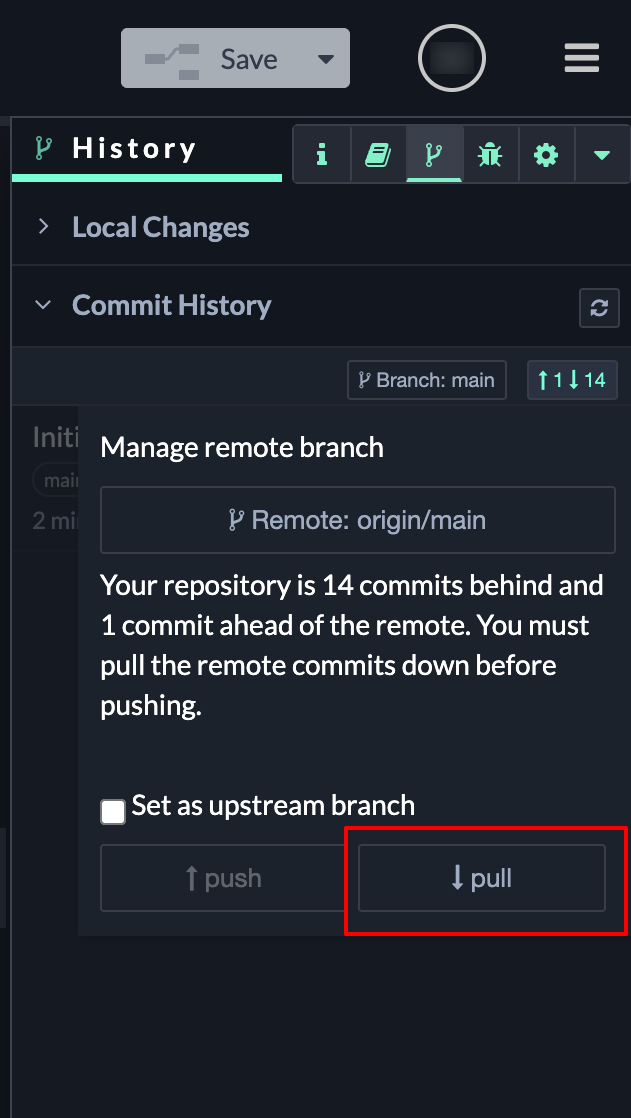
At this point, pull the remote changes immediately to avoid additional conflicts later.
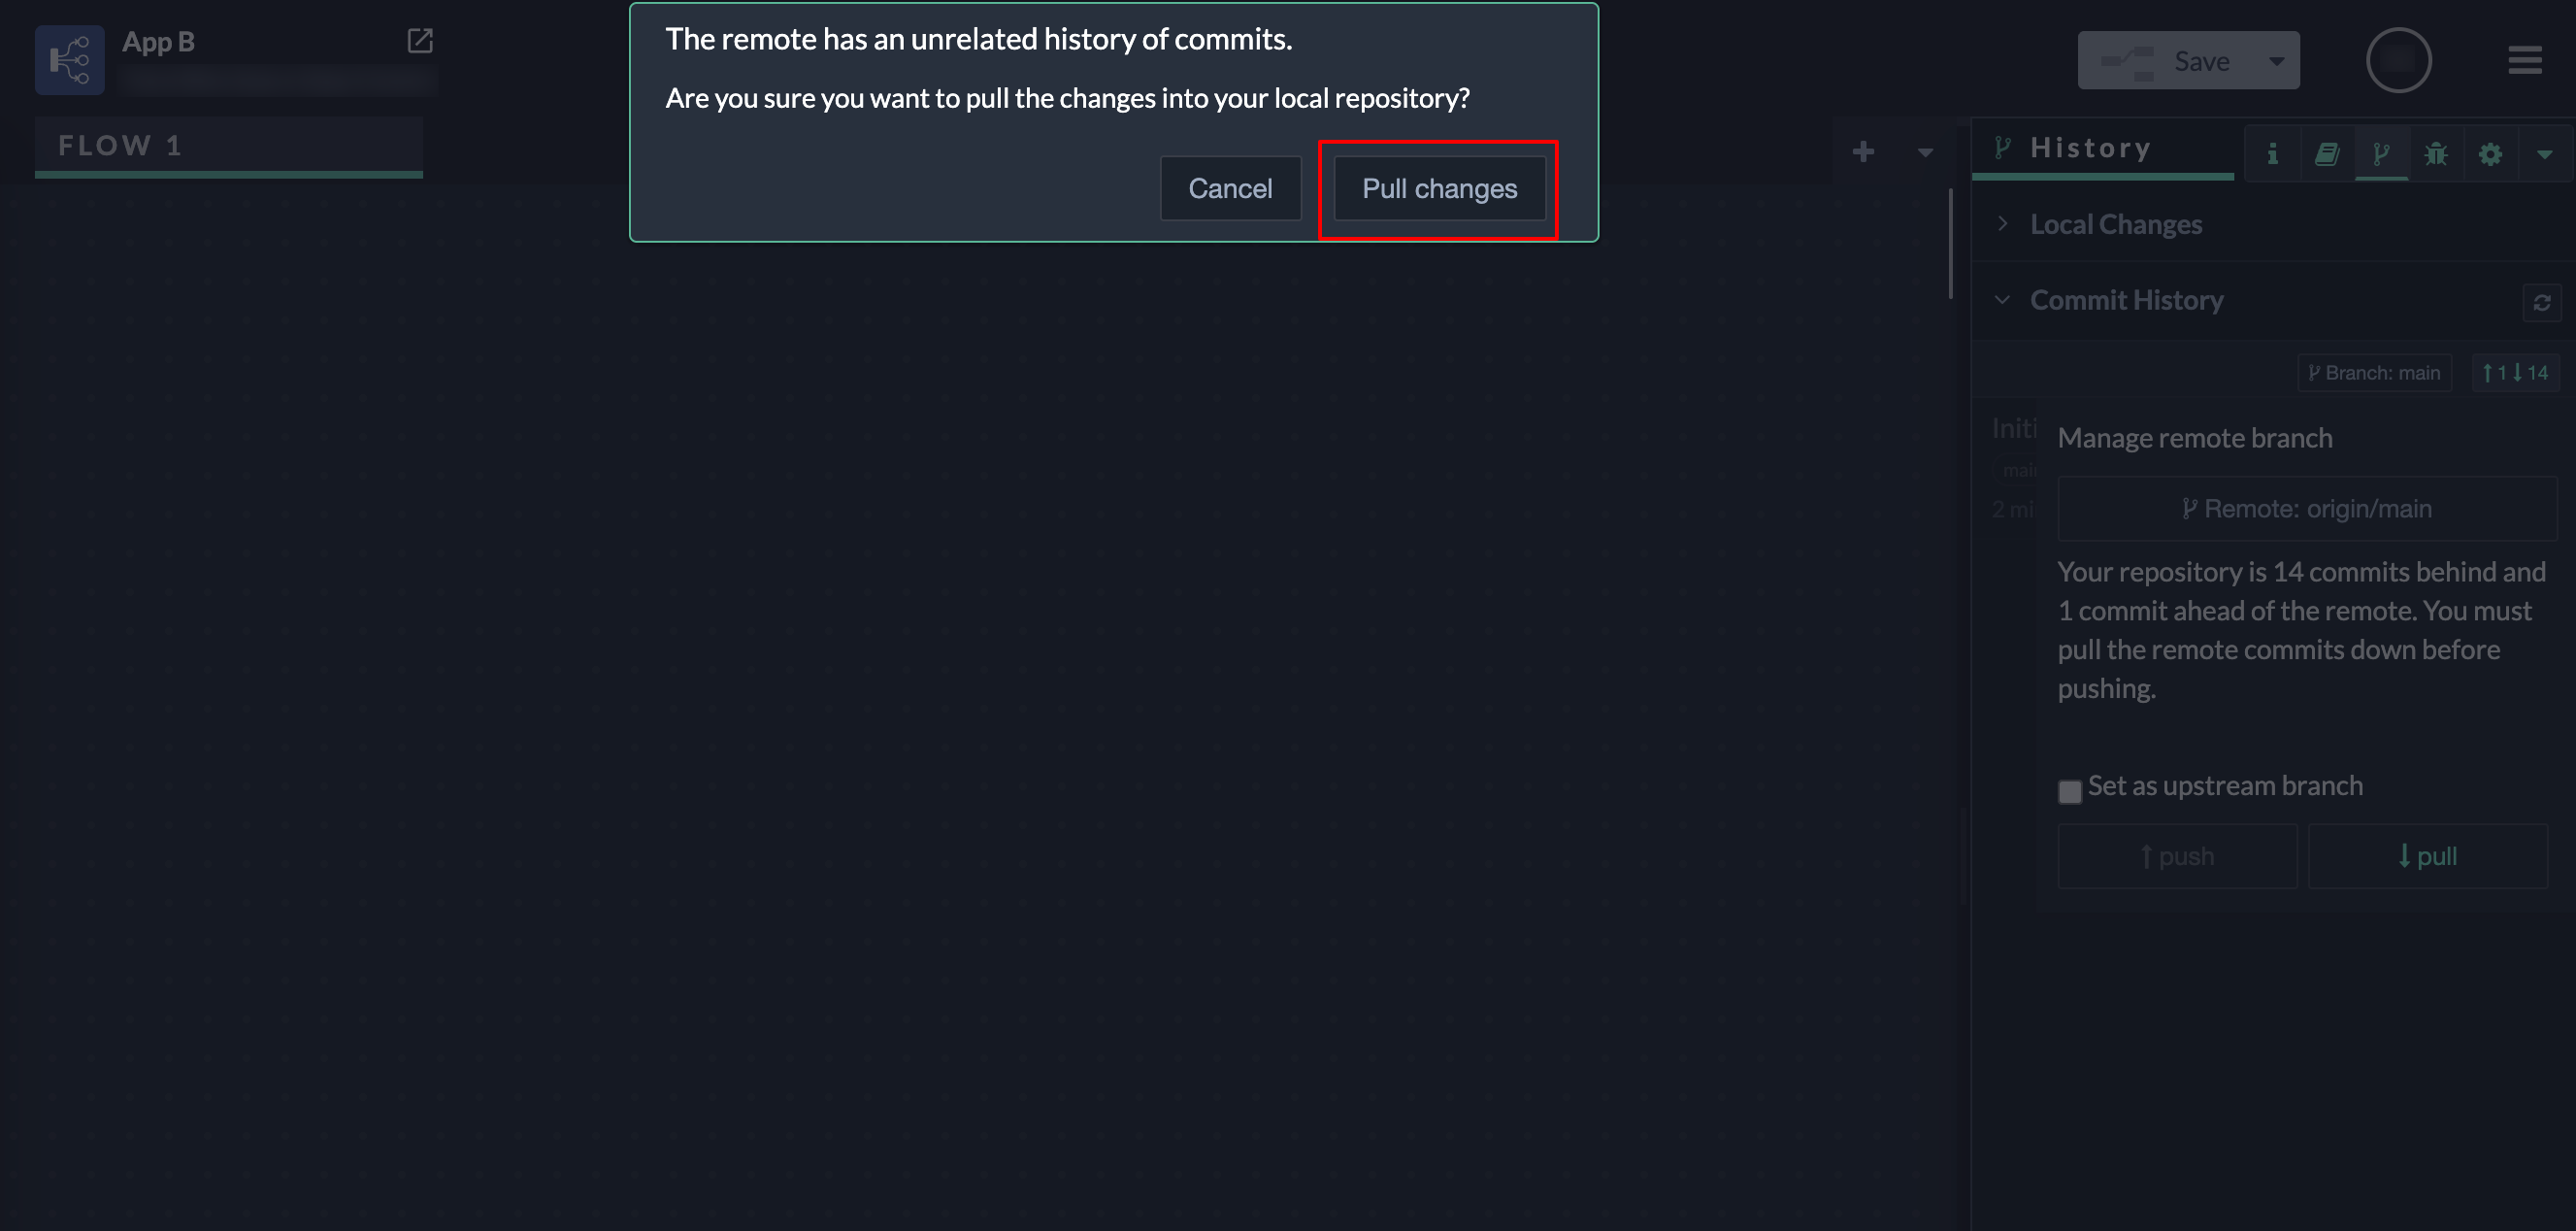
Step 3: Confirm pulling unrelated history
When pulling for the first time, a message appears:
The remote has an unrelated history of commits.
Confirm this by clicking Pull changes.
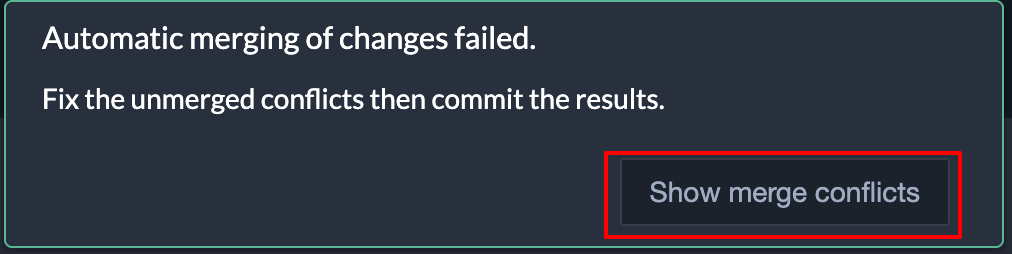
Step 4: Open merge conflicts
In most cases, automatic merging will fail at this stage.
When the notification appears, click Show merge conflicts.
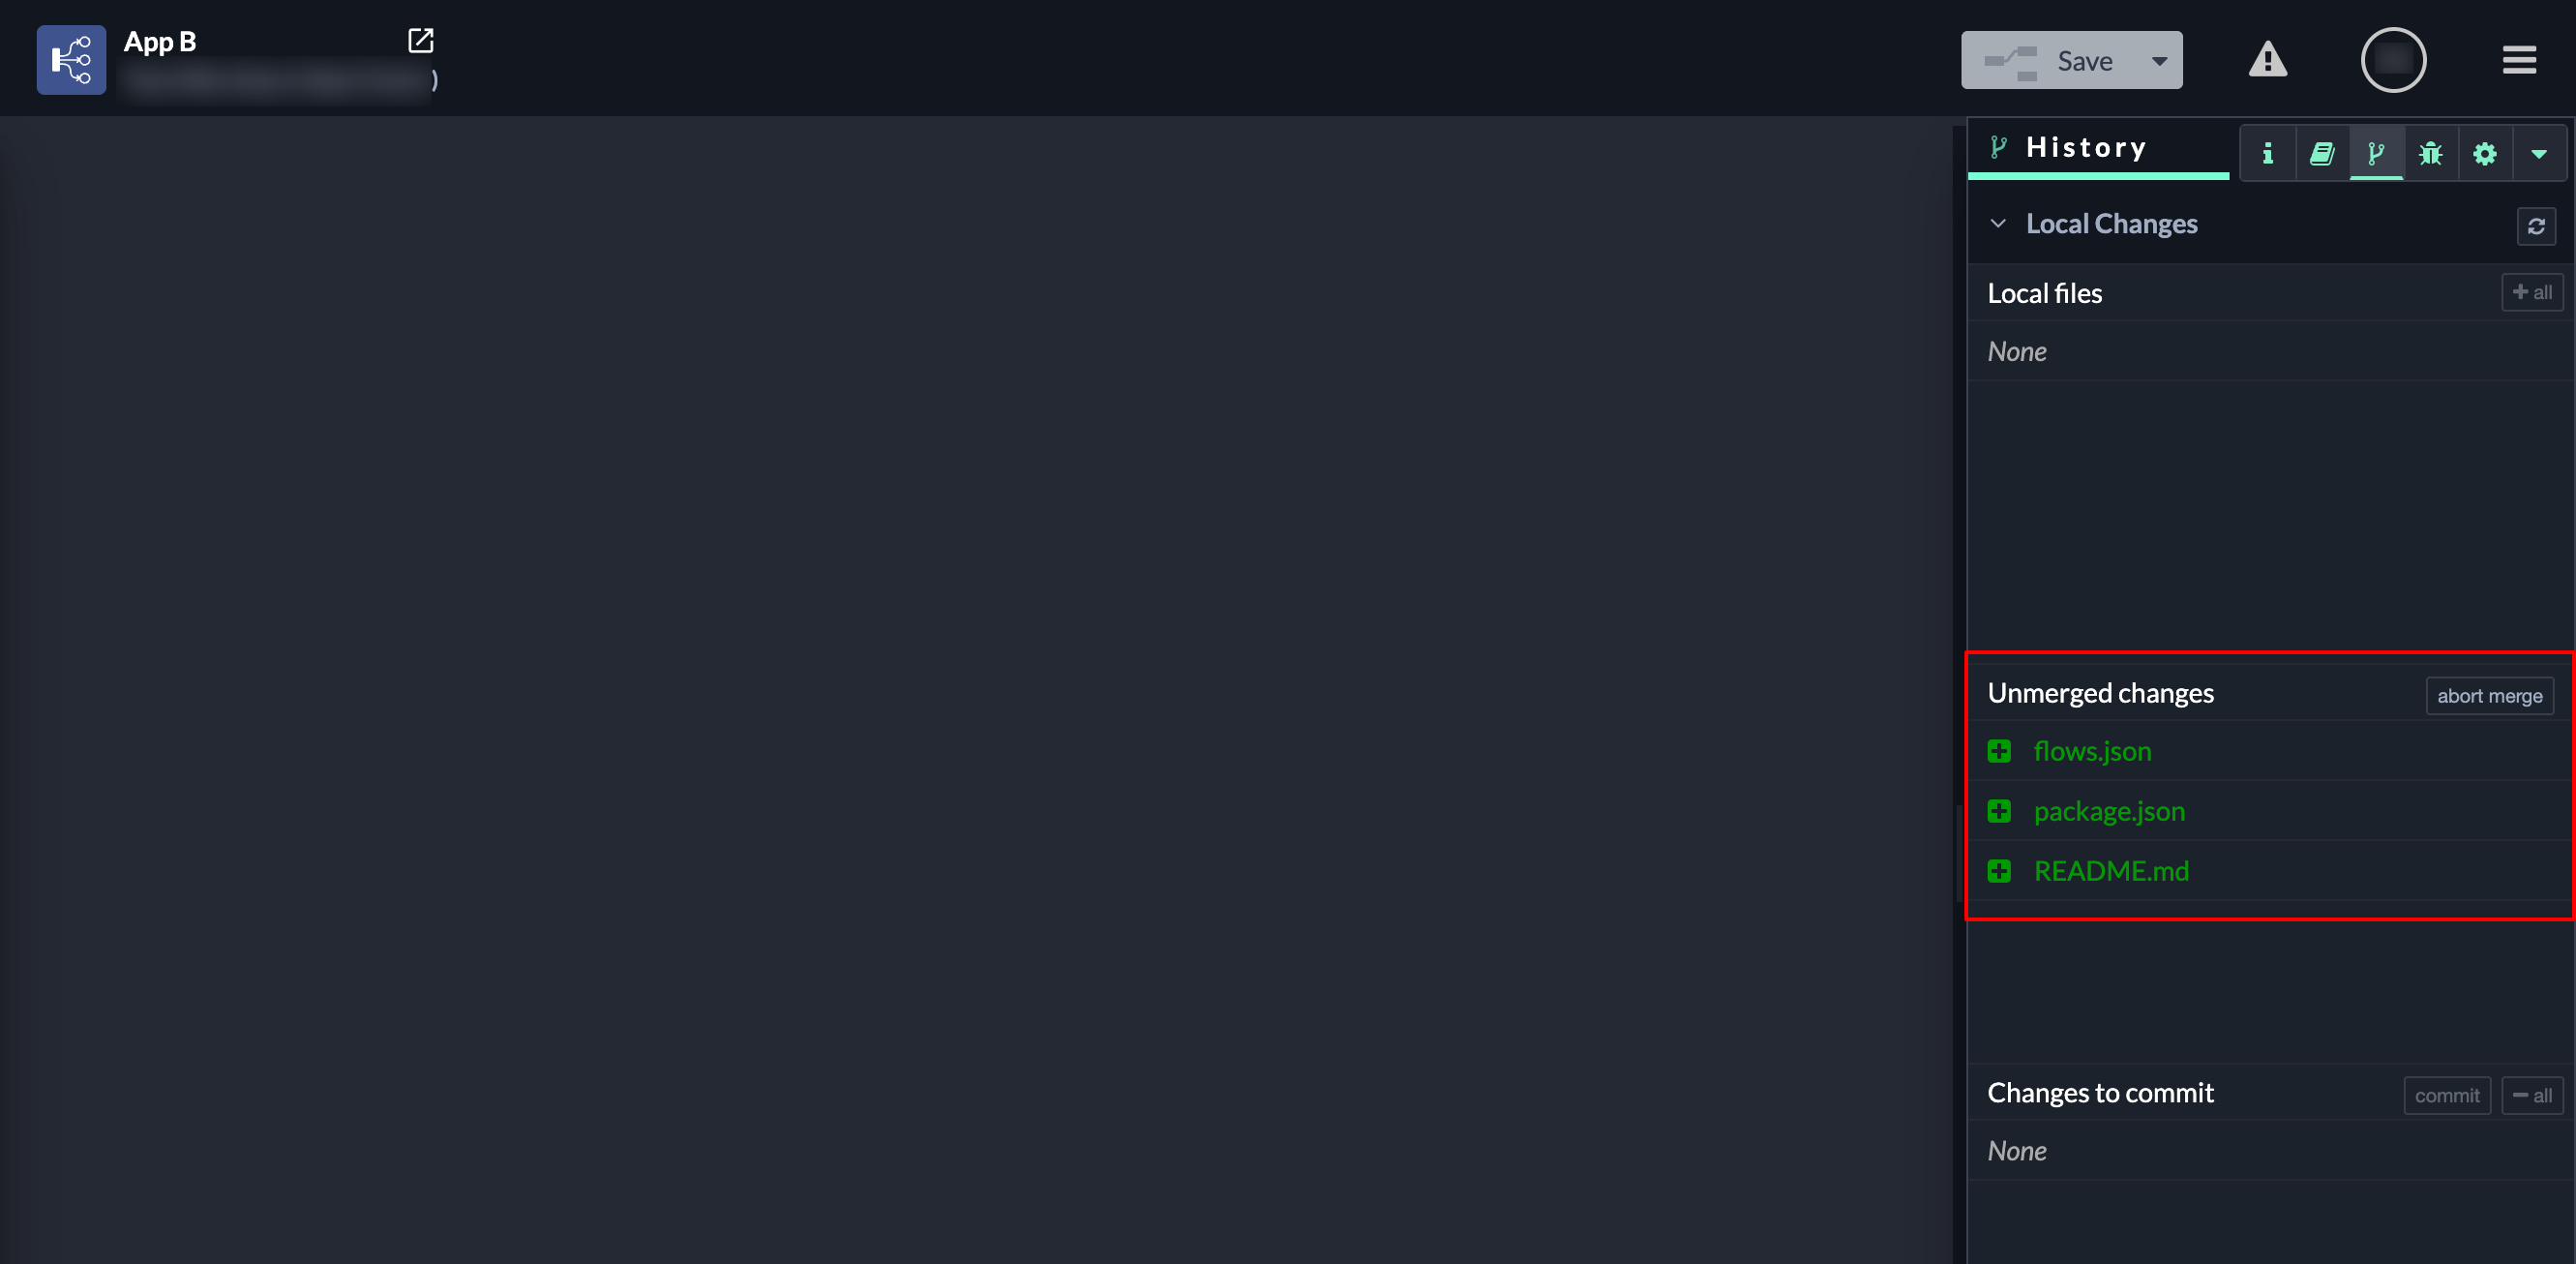
Step 5: Review unmerged files
All files that contain merge conflicts are now listed in the Unmerged changes section in the History panel.
Each file must be reviewed and resolved individually before the merge can be completed.
Step 6: Resolve Unmerged Files
The next step is to resolve each file one by one.
Step 6.1: Open an unmerged file
In the History panel, under Unmerged changes, click on one of the listed files (e.g. flows.json, package.json, or README.md). This opens the Resolve conflicts view for the selected file.
What you see in this view
Cancel
Closes the conflict resolution view without applying any changes.
Save conflict resolution
Applies the selected resolution for this file. Enabled only when all conflicts in the file are resolved.
Unresolved conflicts counter
Shows how many conflicts still need to be resolved before saving is possible.
Local changes
Represents the current state of the file in this app.
Remote changes
Represents the state of the file coming from the connected Git repository.
Use local changes / Use remote changes
Selects which version should be kept for the highlighted conflict.
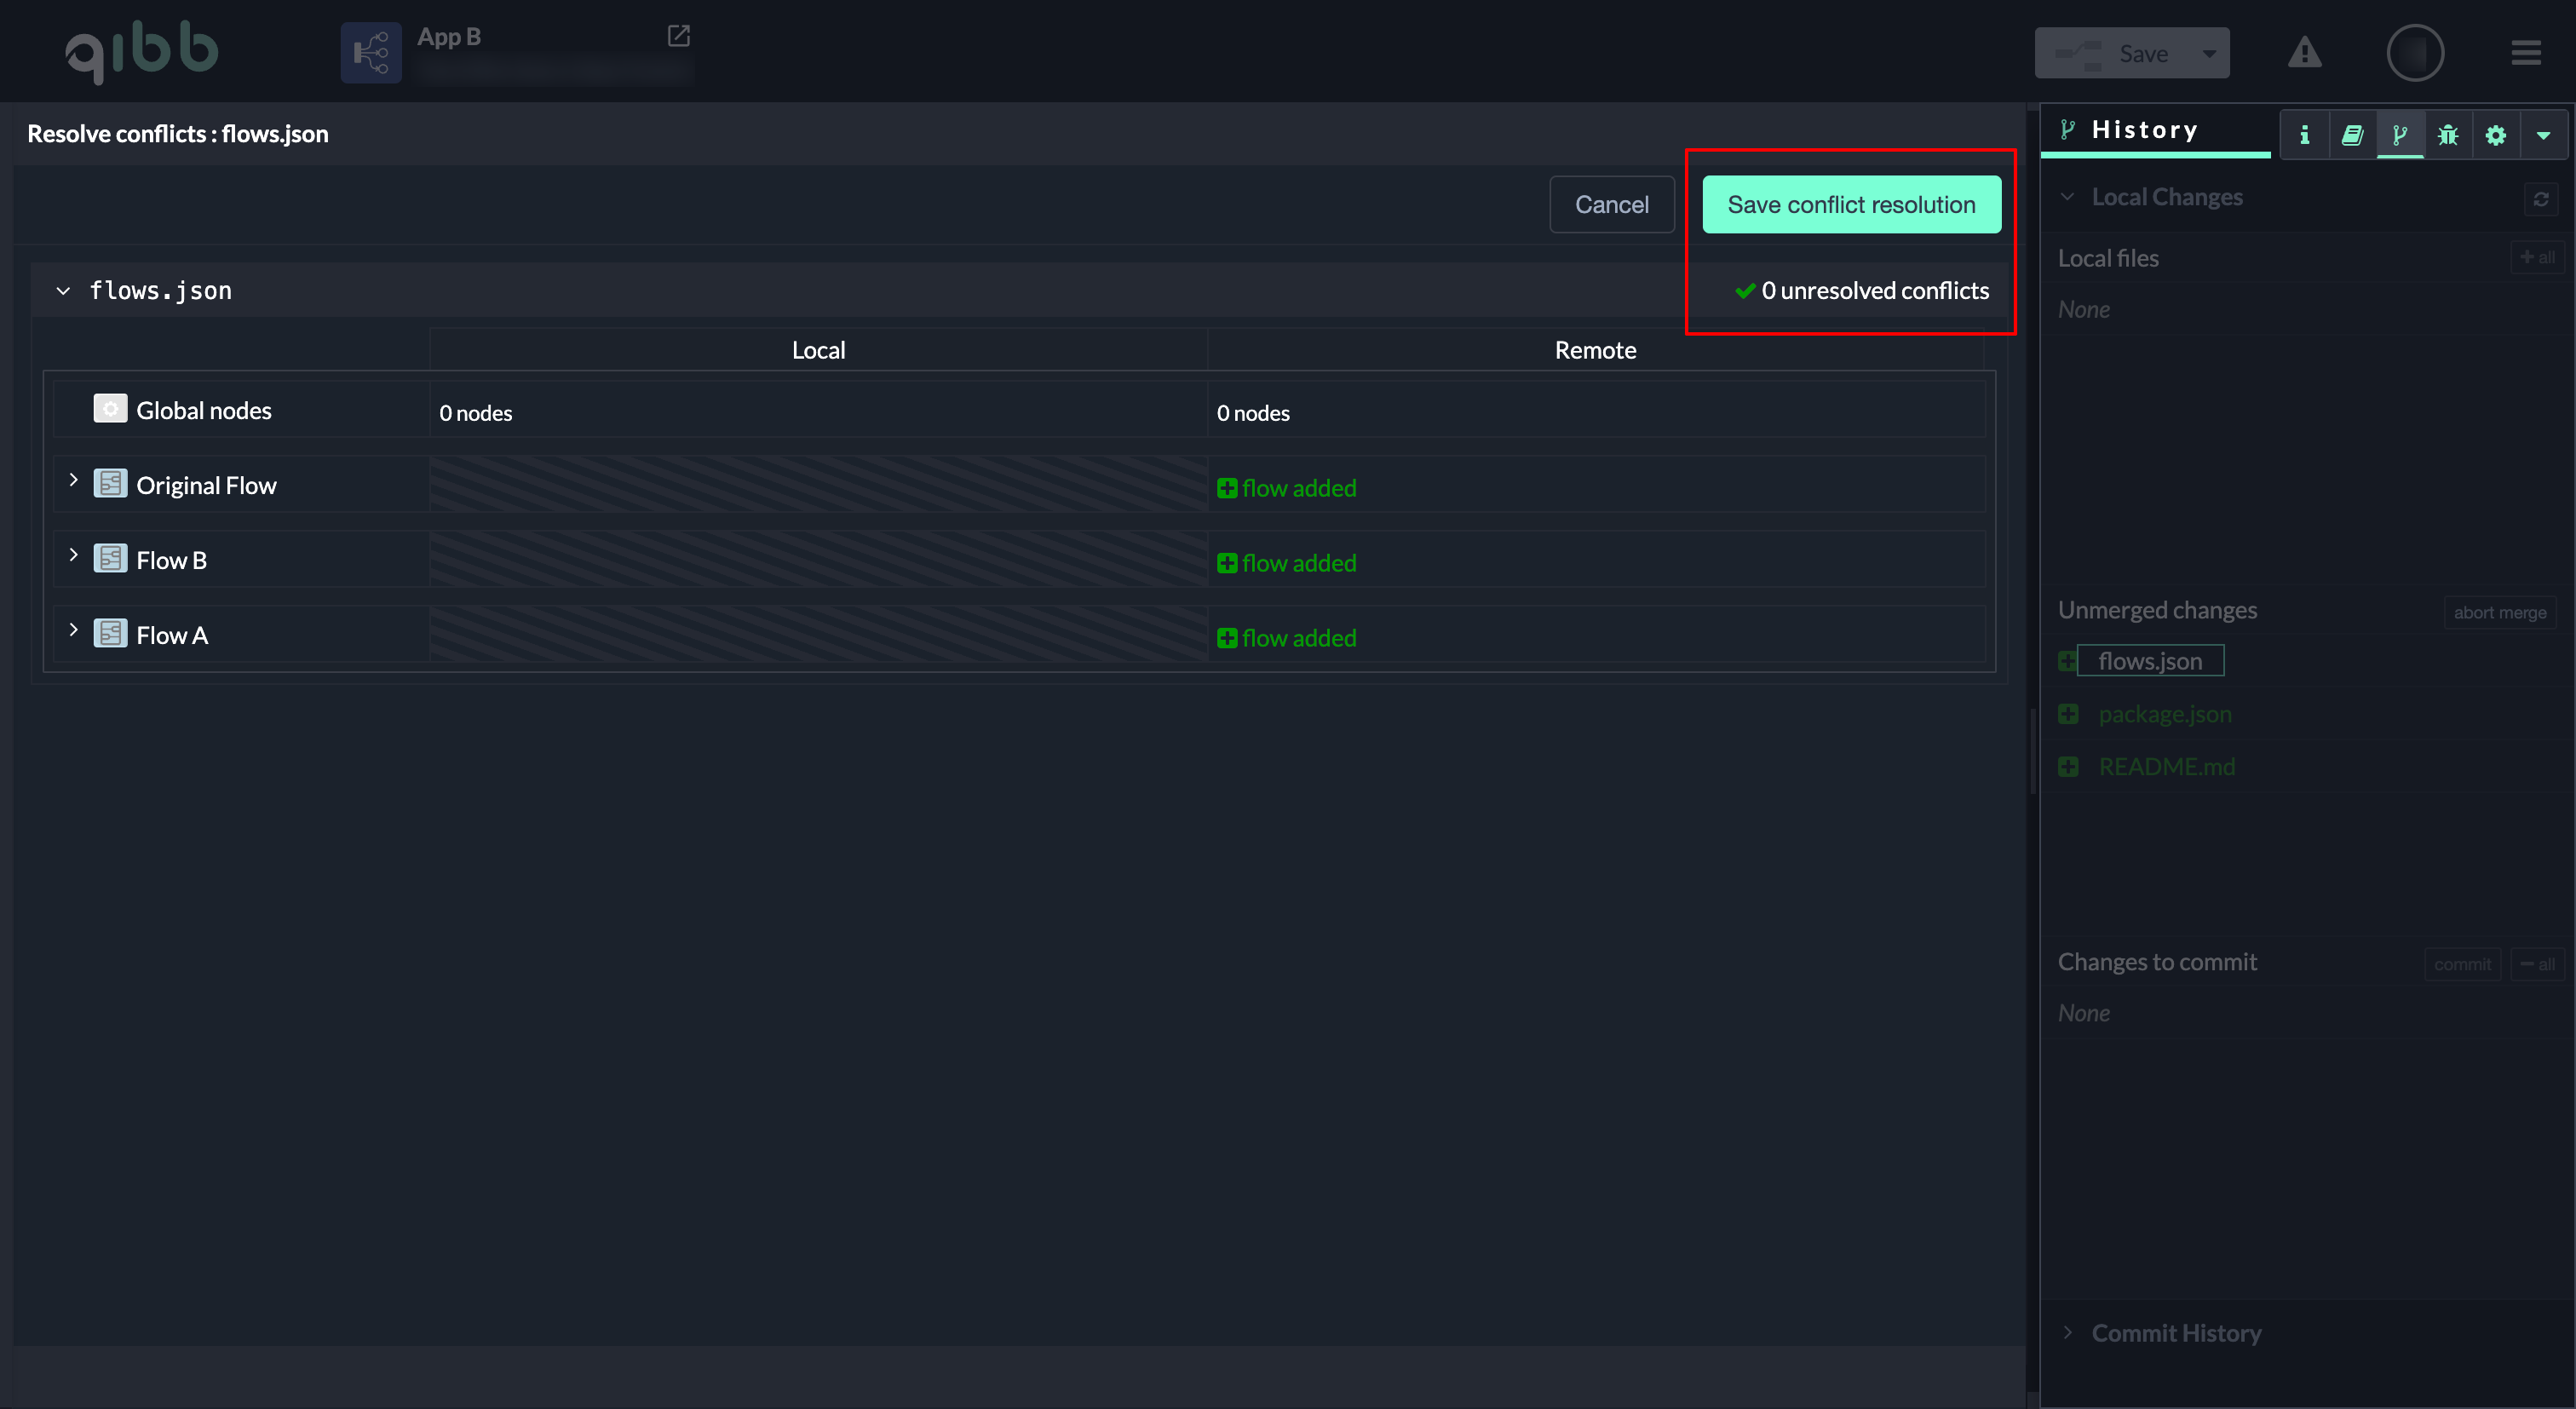
In this example, the app does not contain any flows. All flows are introduced by the incoming changes, which is reflected in flows.json showing 0 unresolved conflicts.
Click Save conflict resolution to continue. The file is resolved immediately.
If flows.json contains overlapping structural changes, unresolved conflicts may appear and require an explicit node-level decision. In that case, see section “Example: Resolving a structural conflict in flows.json” further below.
Step 6.2 Resolve file-based conflicts (package.json, README.md)
After resolving flows.json, continue with the remaining files listed under Unmerged changes.
-
Click on the next file (for example
package.json). -
The Resolve conflicts view opens in a code-based inline editor.
-
The Save conflict resolution button is disabled.
-
For each conflict block, choose one option:
-
Use local changes or
-
Use remote changes
-
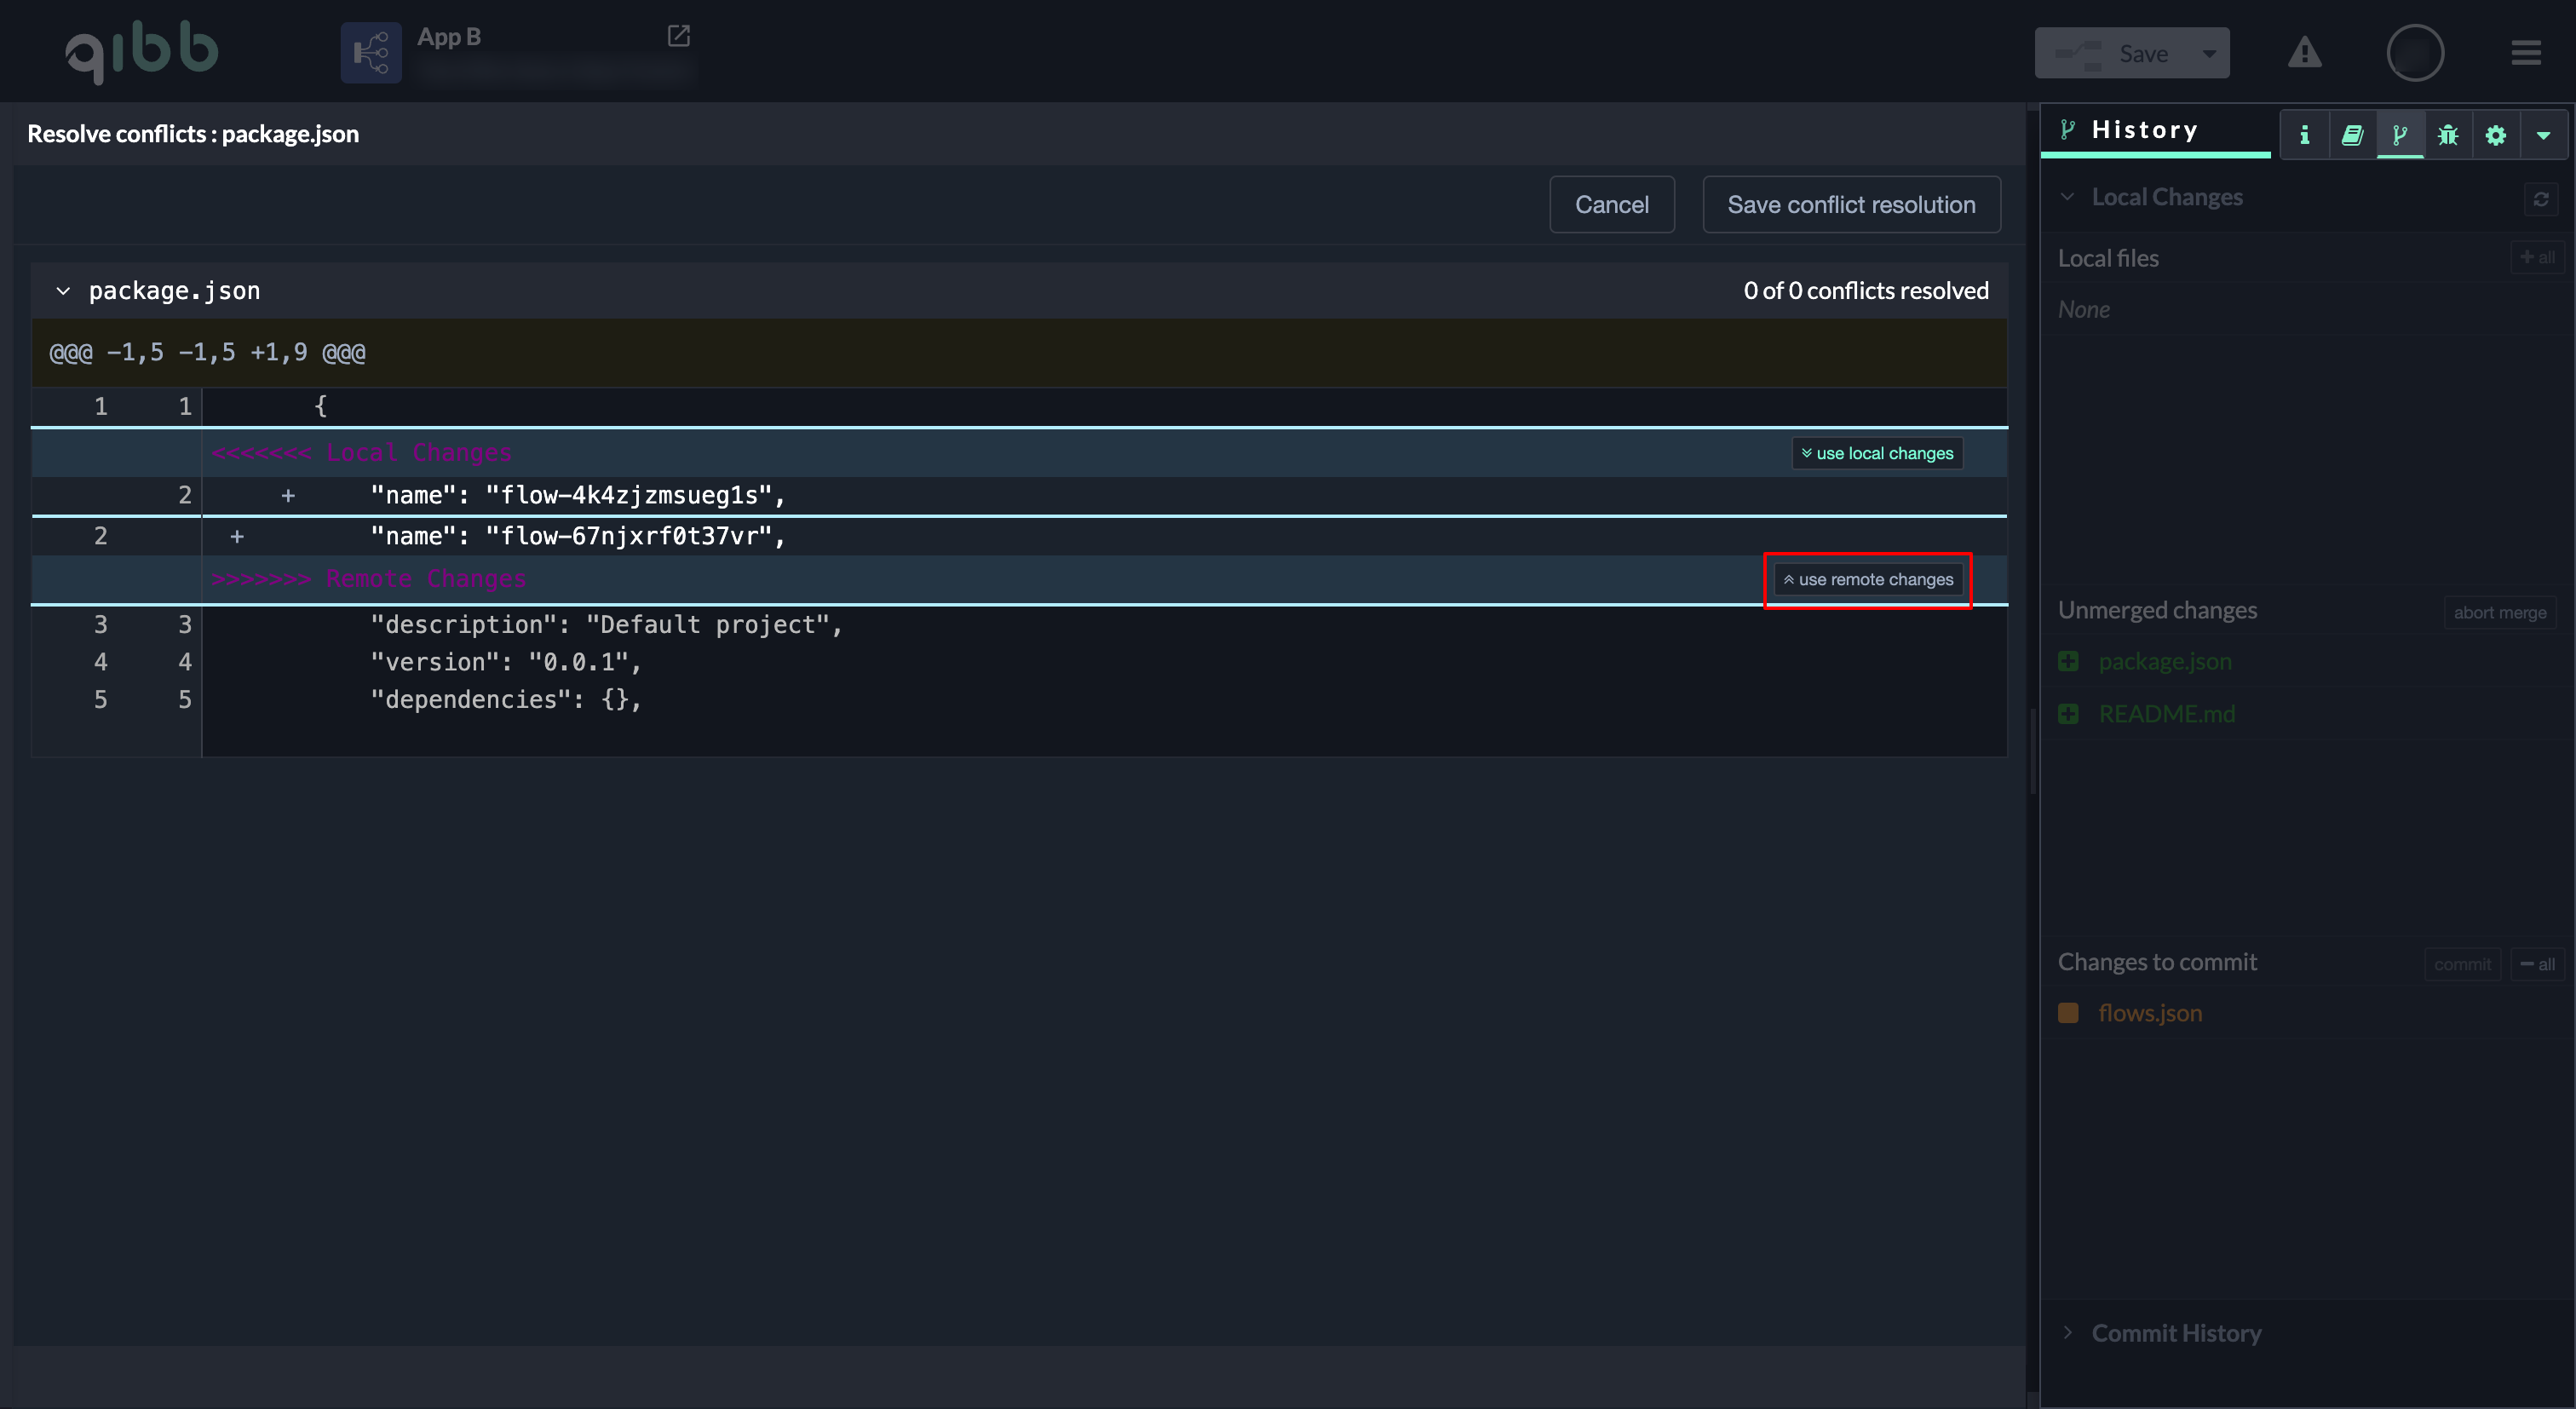
In this example, the goal is to align the app with the existing Git history created by App A.
Therefore, select Use remote changes for all conflict blocks.
-
Once all conflicts in the file are resolved, click Save conflict resolution.
Repeat the same process for README.md.
Understand the different conflict resolution views
Depending on the file, the Flow App shows different conflict resolution views. This is expected and helps you resolve conflicts safely.
-
flows.json(flow-based view)
Conflicts are resolved in a structured, visual view where the Flow App understands flows and nodes. This view often supports automatic resolution. -
Files like
package.jsonandREADME.md(file-based view)
Conflicts are shown in a code-style inline editor. In this view, you will see separate sections for Local changes and Remote changes, and you must resolve conflicts using the provided actions (for example Use local changes / Use remote changes).
Important: If a file-based conflict is not resolved properly, Git conflict markers (for example <<<<<<<, =======, >>>>>>>) can remain in the file content. This can break configuration files and cause follow-up failures (commit/push/deploy). Always ensure every conflict block is fully resolved before saving.
Step 7: Verify all conflicts are resolved
After resolving all files:
-
The Unmerged changes section is empty.
-
All resolved files are now listed under Changes to commit.
-
No unresolved conflicts remain.
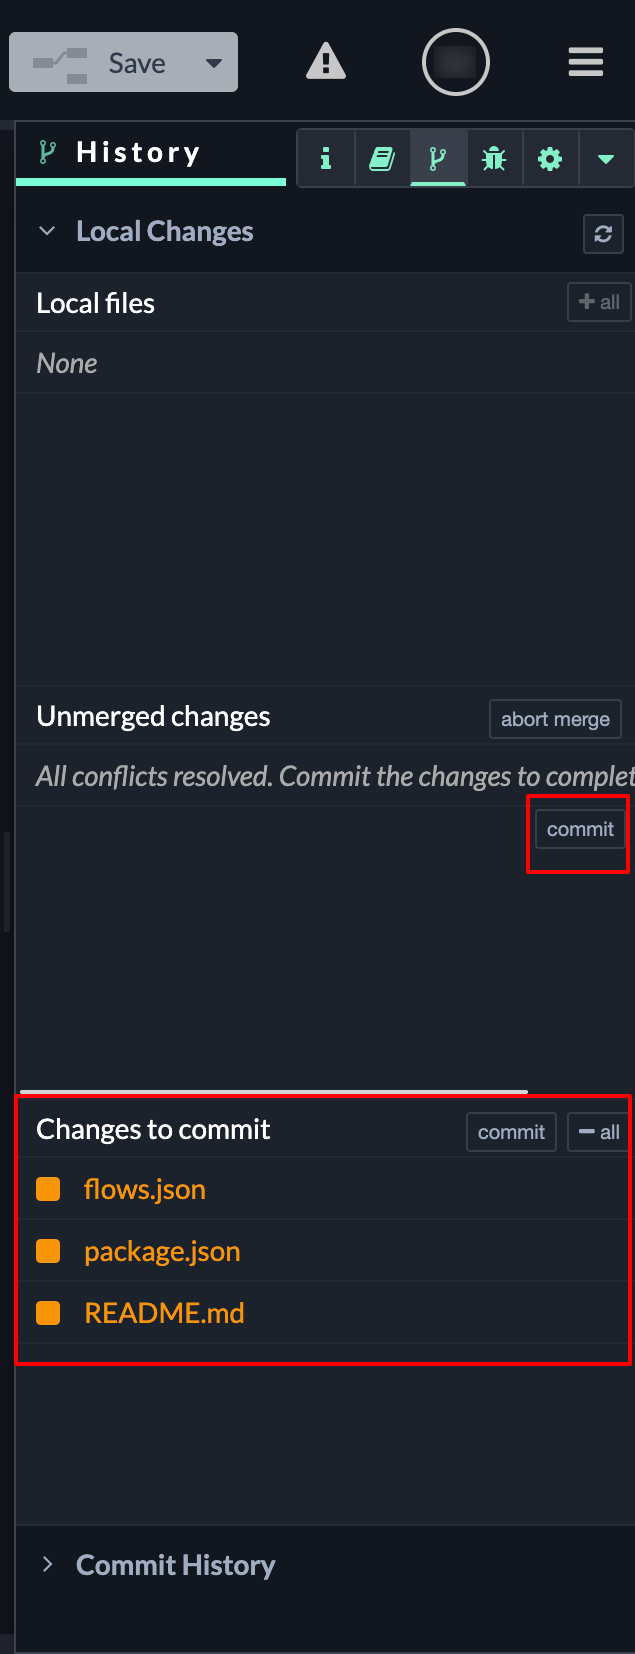
At this point, all merge conflicts are resolved locally.
Step 8: Commit the conflict resolution (local only)
After all conflicts are resolved and listed under Changes to commit, the resolution must be committed.
-
Review the files listed under Changes to commit.
-
Enter a meaningful commit message (for example: “Resolve initial merge conflicts”).
-
Click Commit.

At this point, the conflict resolution exists only locally in this app. No other users or apps can see these changes yet.
Step 9: Check the remote branch status
After committing, open Commit History and review the branch status.
-
Click Refresh in the Commit History.
-
Open Manage remote branch.
-
Select the remote branch (for example
origin/main) if it is not already set as the upstream branch.
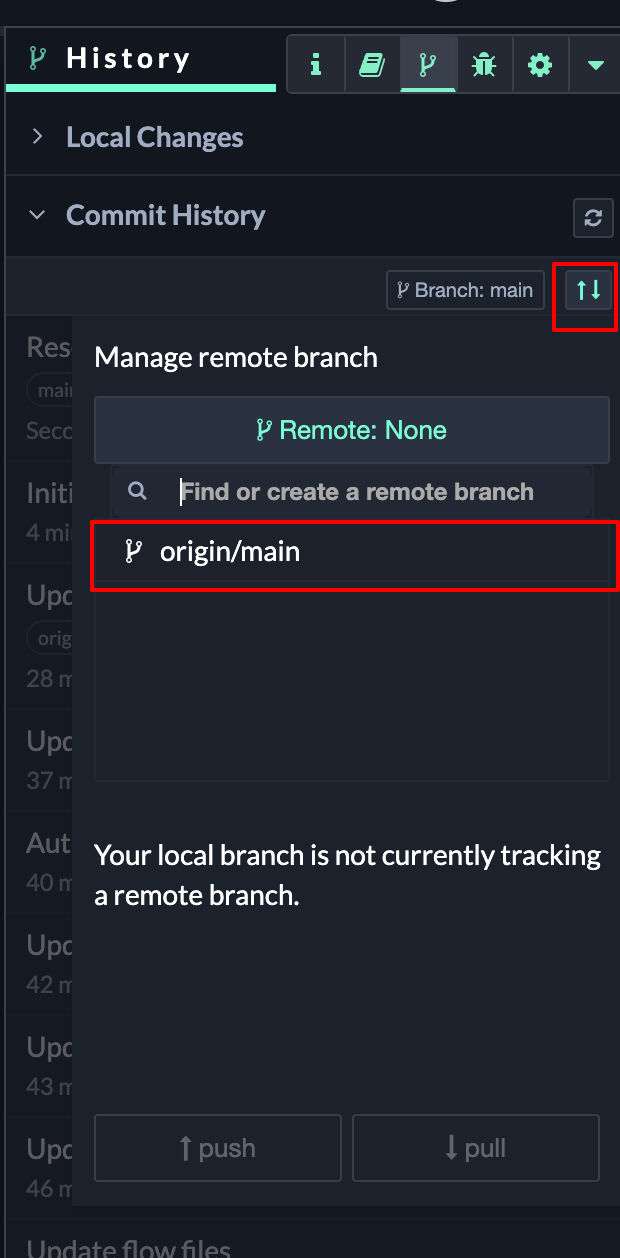
You will now see that:
-
the local branch is ahead of the remote
-
one or more commits are waiting to be pushed
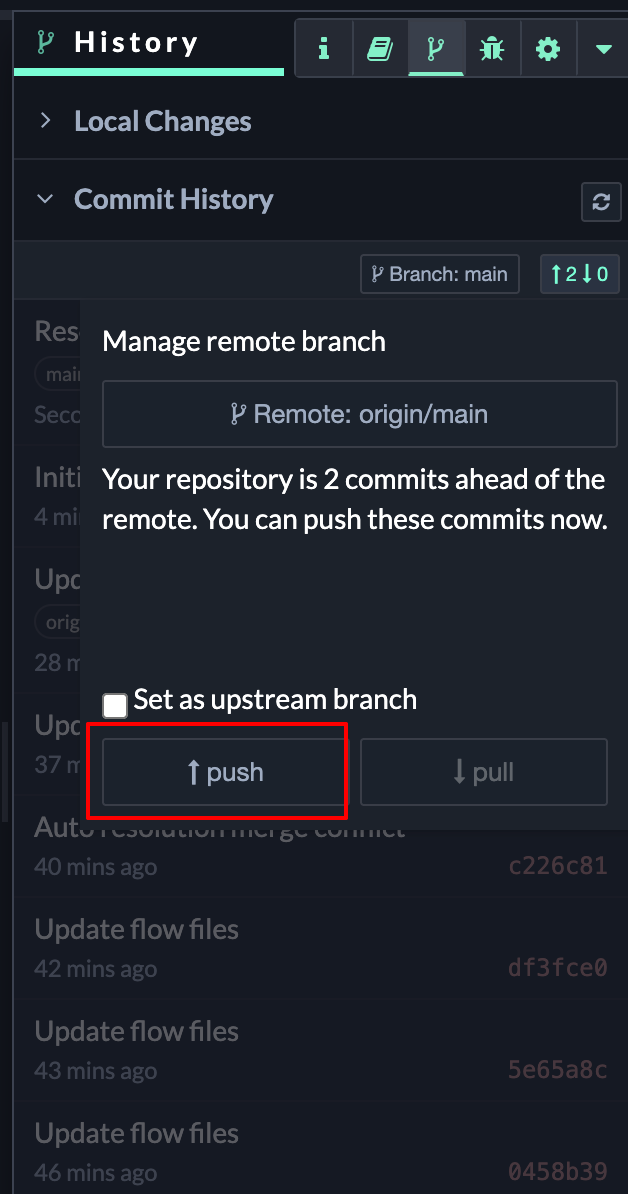
This indicates that the conflict resolution has not yet been shared with the remote repository.
Step 10: Push the resolved state to the remote repository
To complete the conflict resolution and synchronize all collaborators:
-
With the correct remote branch selected, click Push.
-
Wait until the push operation completes successfully.
This publishes the resolved history to the remote repository.
Why pushing immediately is important
Pushing the resolved changes immediately ensures that:
-
All apps and users working on the project are aligned to the same Git history
-
No one continues working on an outdated state
-
Additional and unnecessary merge conflicts are avoided later
Once the push is completed, all collaborators who pull the project will now work from the same state.
Example: Resolving a structural conflict in flows.json
In the previous flows.json example, the file showed 0 unresolved conflicts because the app contained no flows and the incoming flows could be applied without any overlap.
In some cases, flows.json opens in a comparison view with an unresolved conflict, where you must actively choose which version to keep.
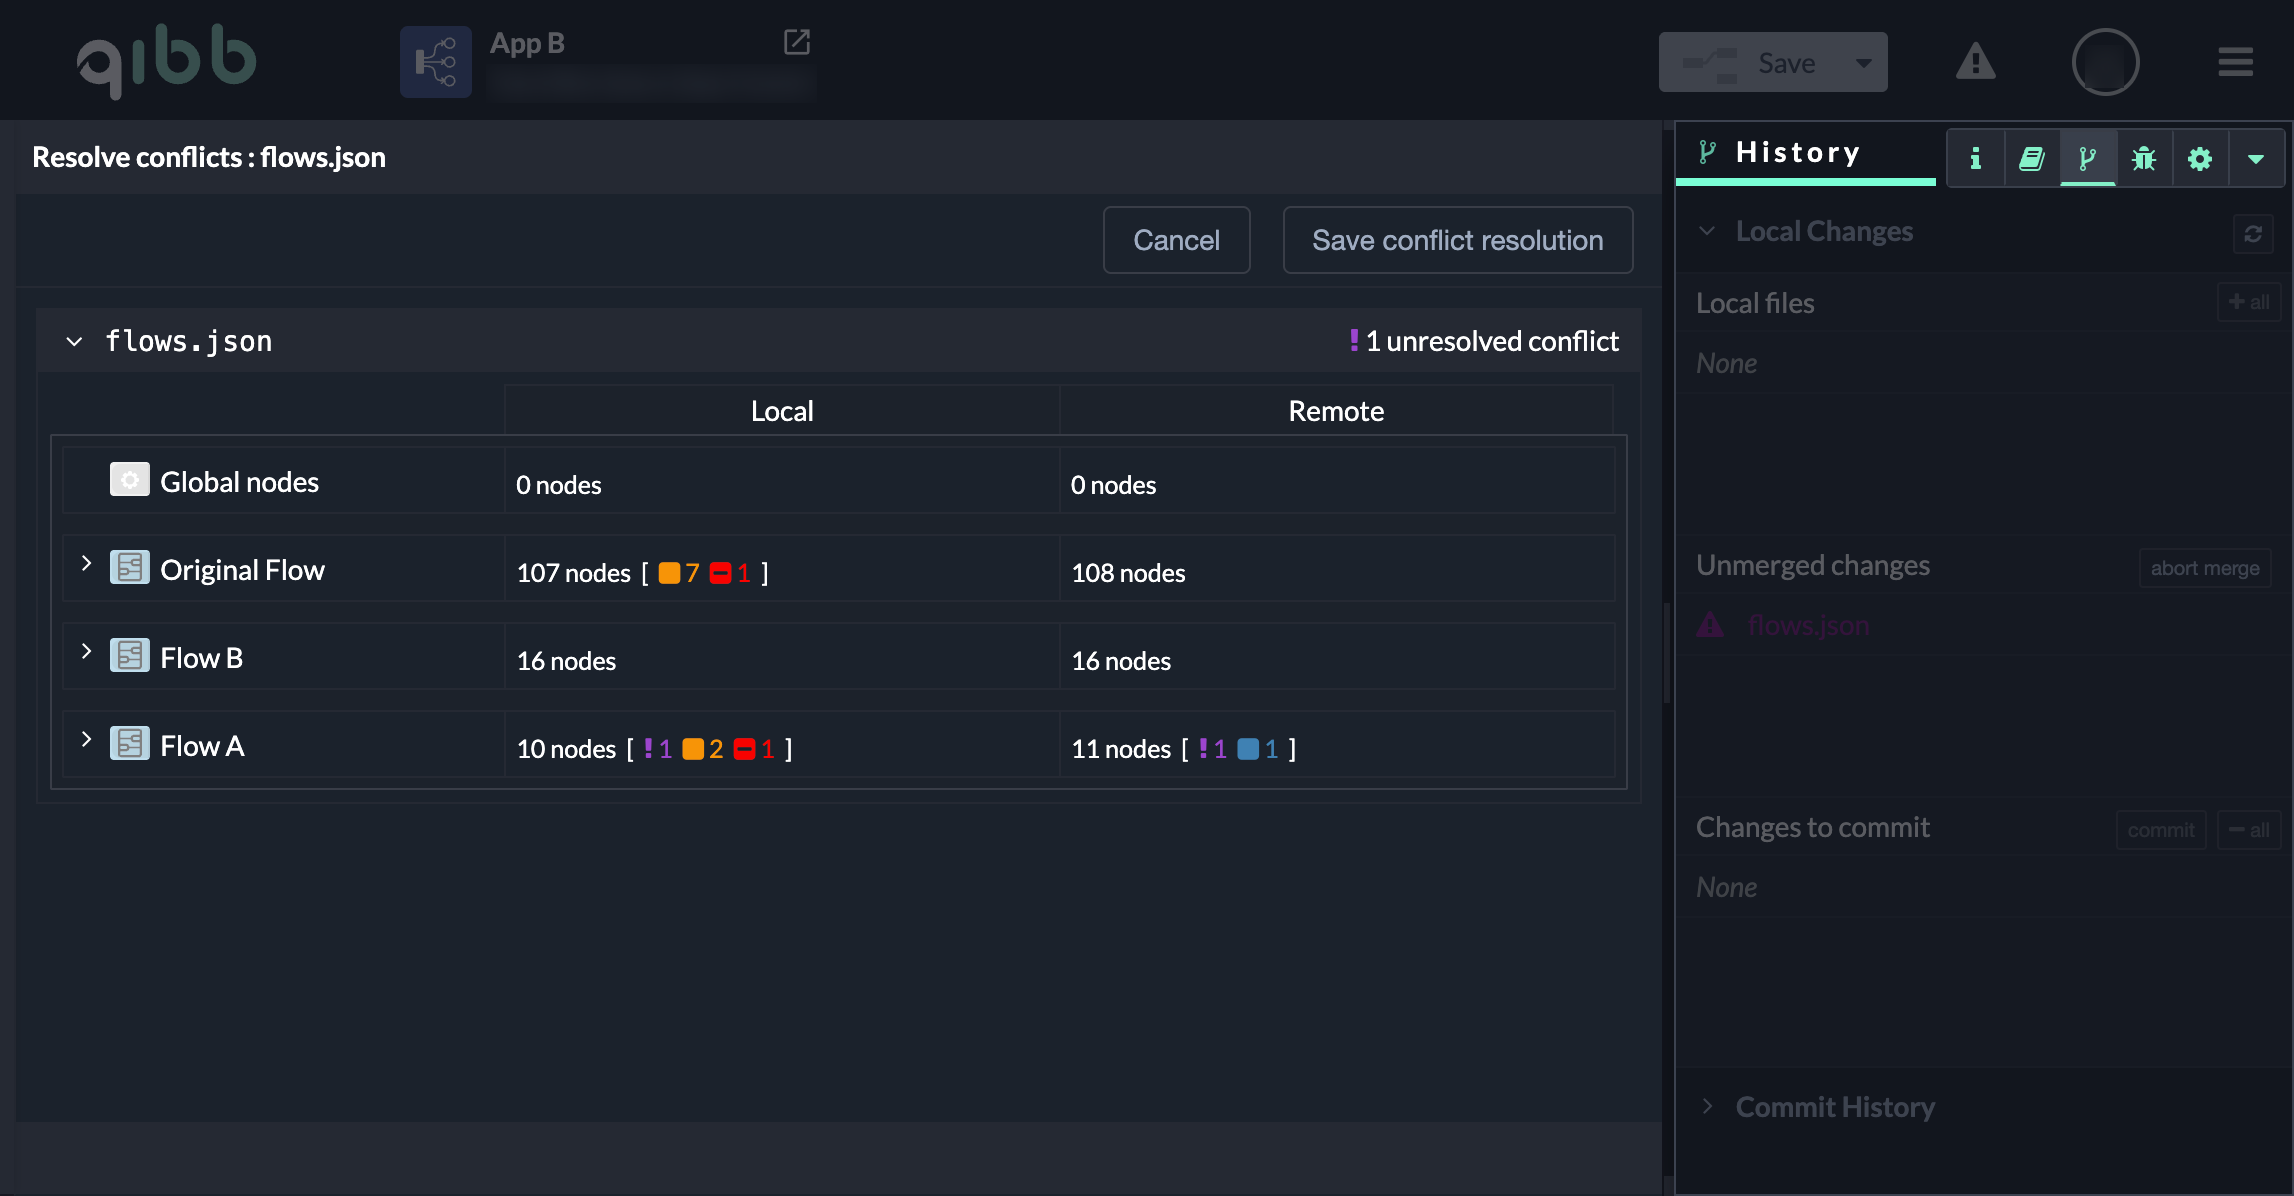
What looks different in this view
-
The header shows “1 unresolved conflict” and Save conflict resolution is disabled.
-
In the flow list, one flow (example: Flow A) shows a mismatch in node counts / change markers.
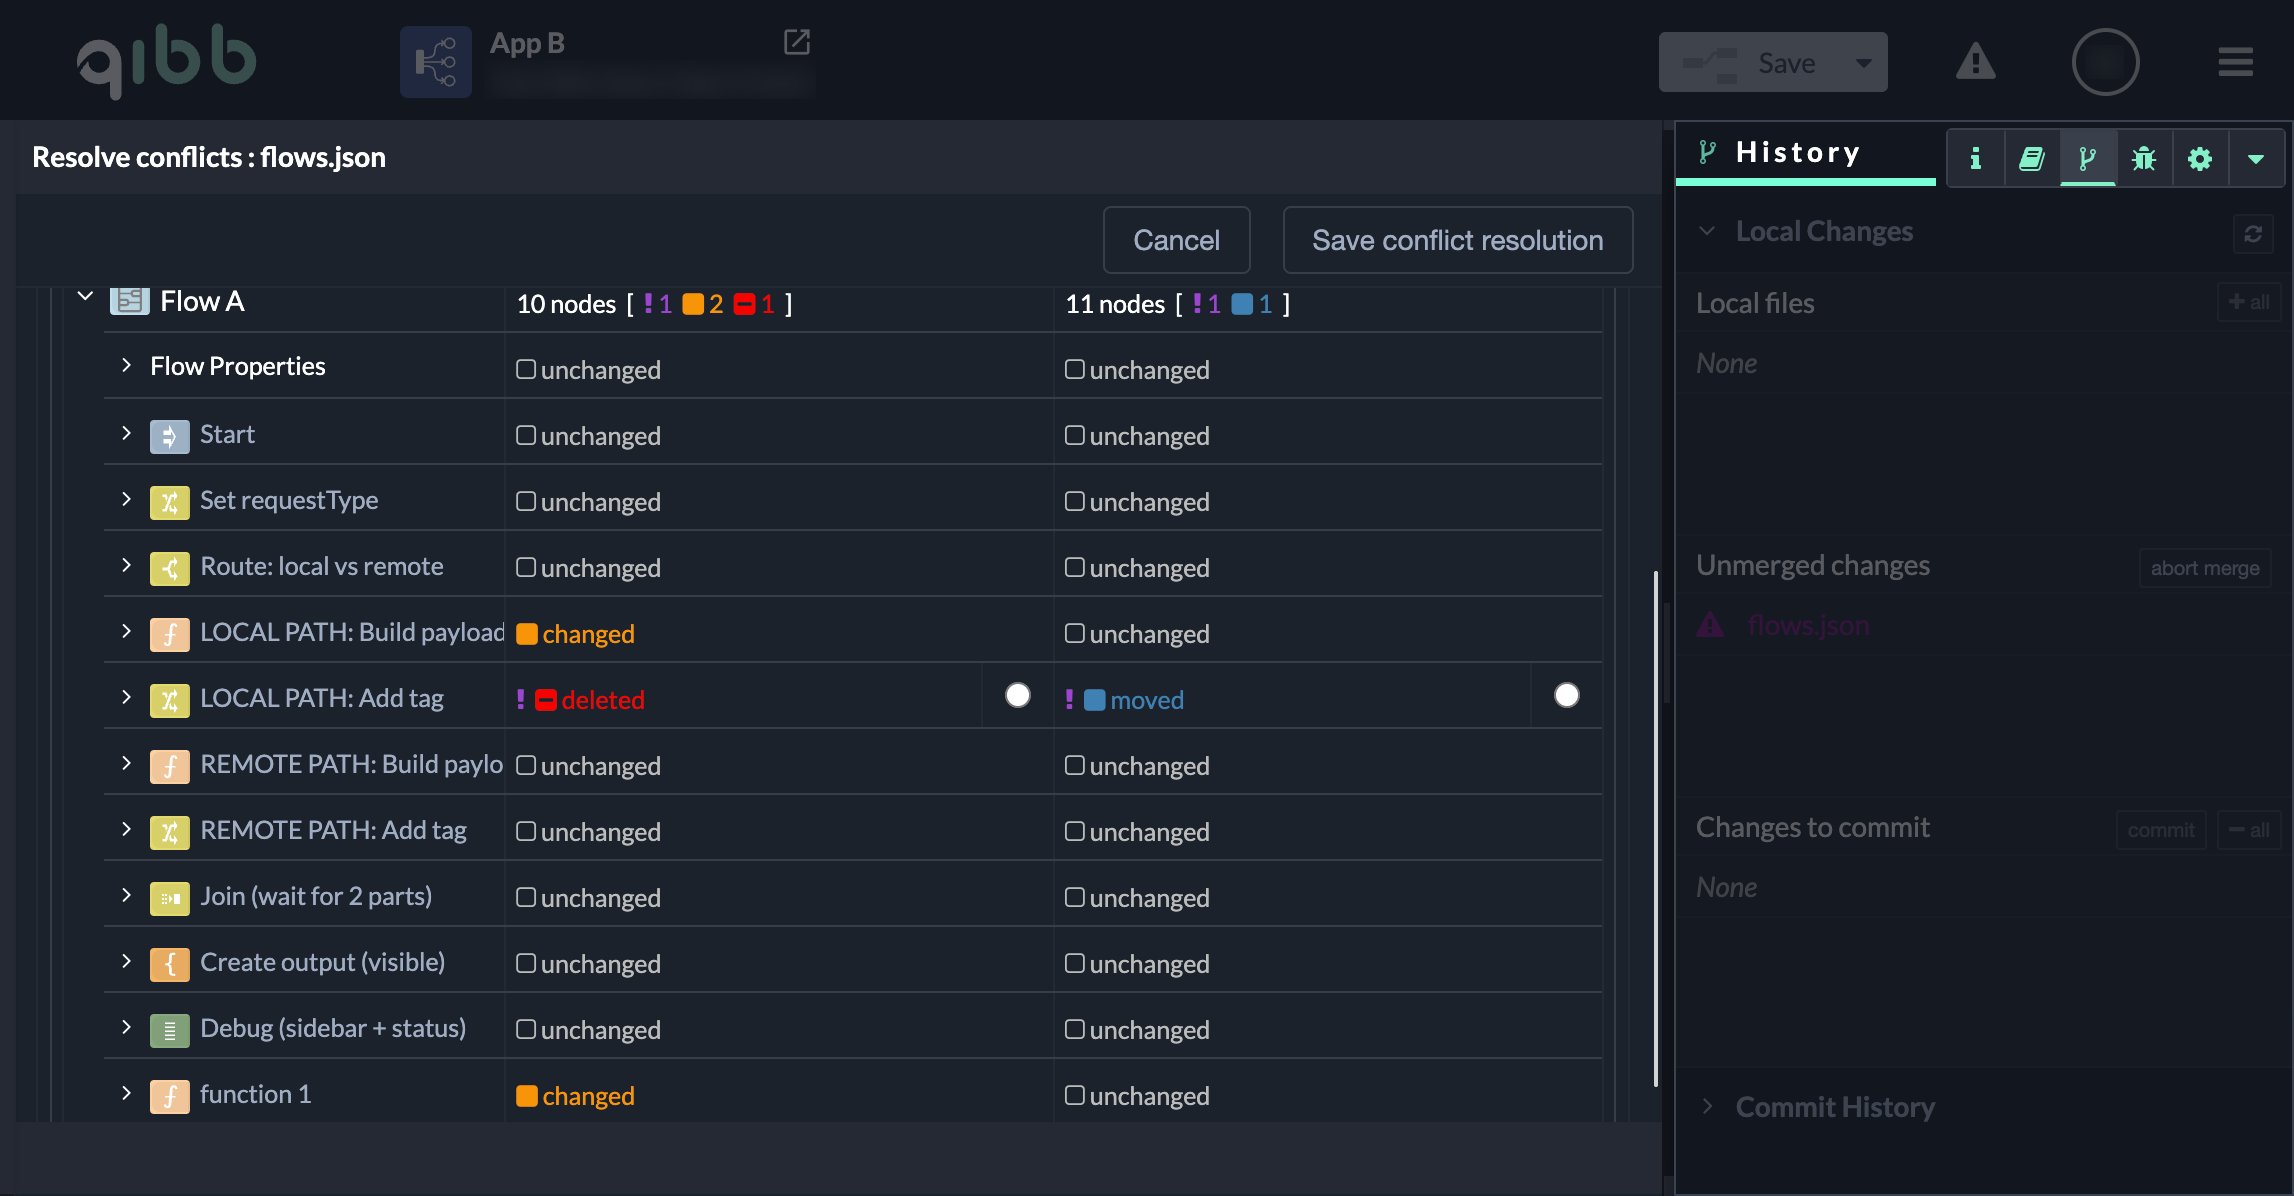
-
Inside the flow, a specific node is flagged with conflicting states, such as:
-
removed on one side
-
moved (or changed) on the other side
-
This indicates a structural conflict: one version removes the node while the other still contains it (with modifications). The Flow App cannot decide automatically.
How to resolve it (quick)
-
Expand the affected flow and click the conflicting node (it becomes the active conflict).
-
Use the radio buttons to select which version should be kept:
-
keep the removal (node will not exist), or
-
keep the existing node (node stays, including its moved/updated state).
-
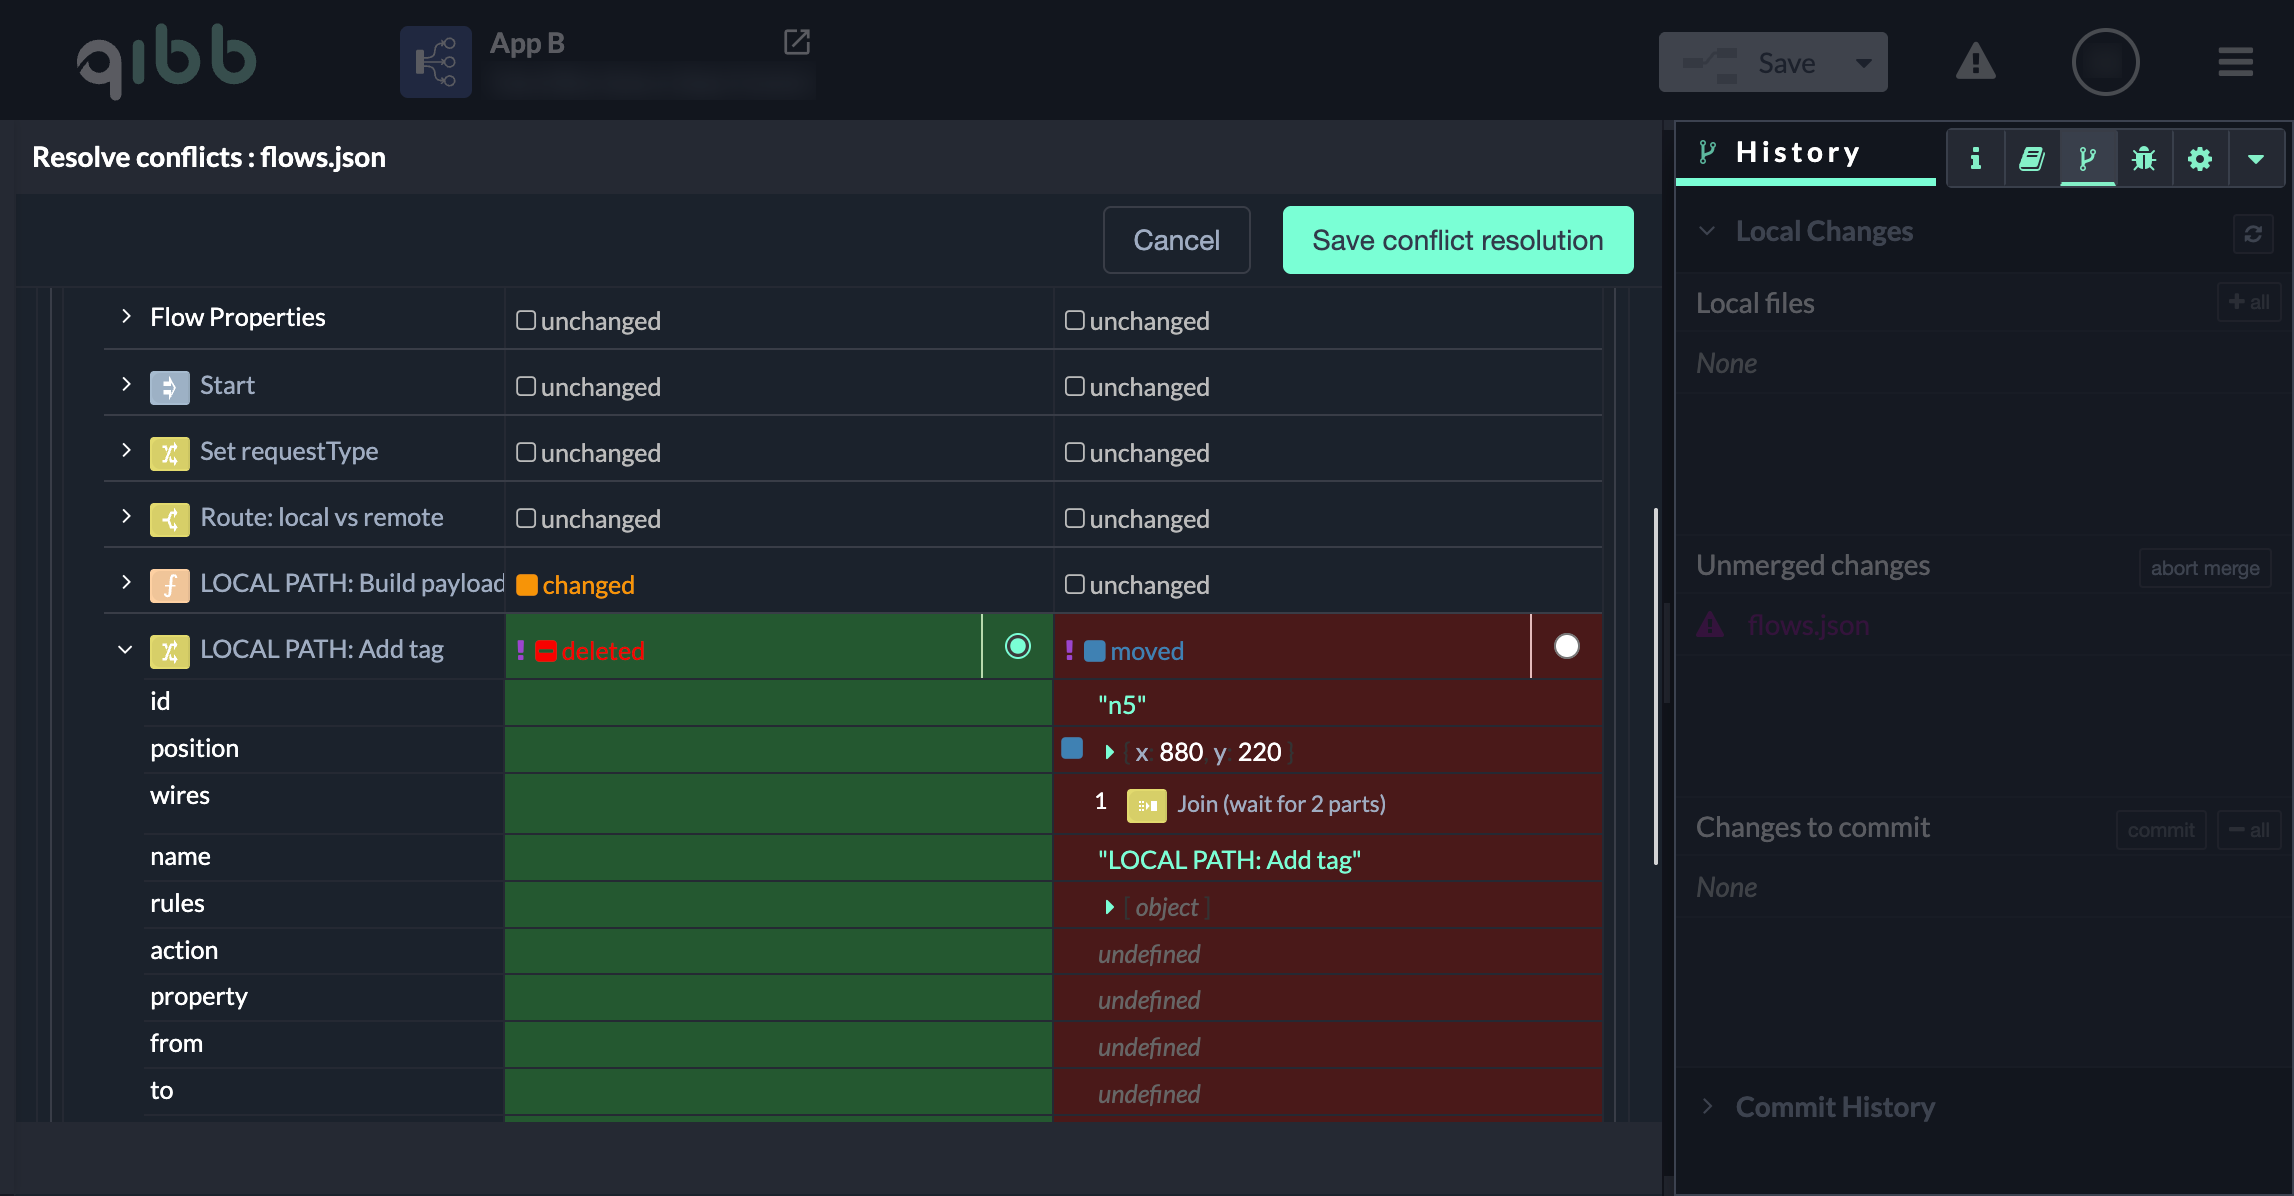
-
Once selected, the unresolved conflict counter clears and Save conflict resolution becomes available.
-
Click Save conflict resolution.