The OpenAPI Client Node lets you import API descriptions based on the OpenAPI specification to easily execute commands on an API.
The OpenAPI Client Node can be installed from the Node Catalog.
How to work with the OpenAPI Client Node
The OpenAPI Client Node can host multiple connections to API services that can be created for use across your Flow App.
Drop a new OpenAPI Client Node in your Flow and open it. The first thing that has to be set up is a connection.
Connections
The connections section includes a dropdown to select the connection to interact with. You can create a new connection by clicking the add (+) button.
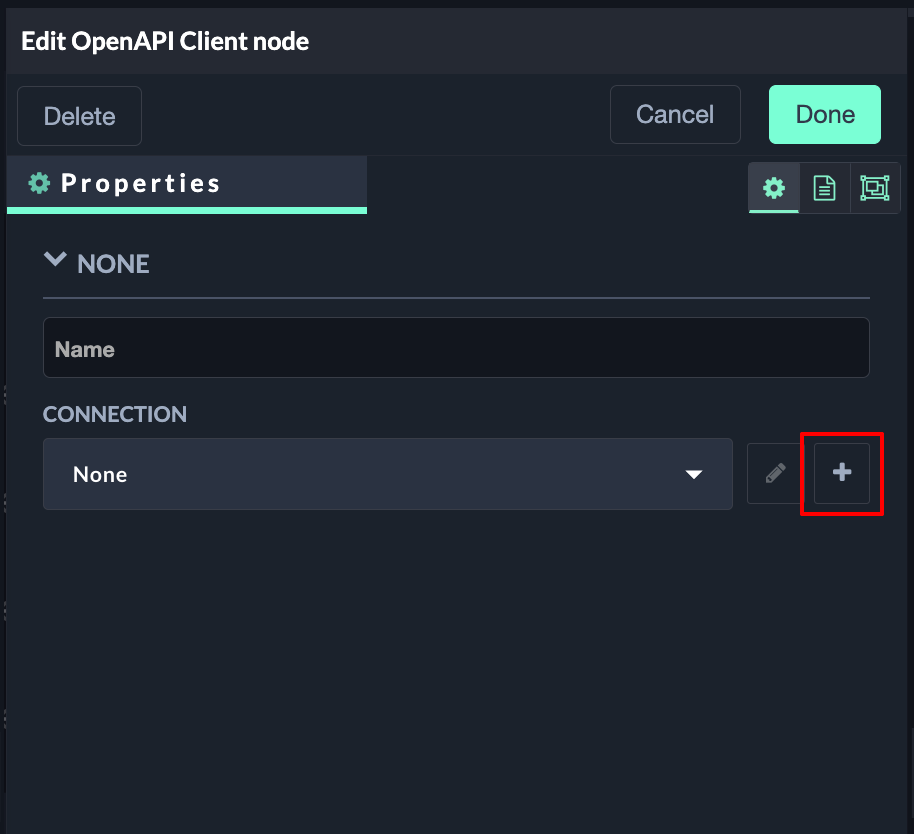
A new view will open to define the connection.

To create a connection, you have to import a valid OpenAPI specification. You can pick a source type for your input: URL, Text or File. With URL you can provide a URL address, with Text you get access to a JSON editor to paste in a JSON specification. Or you upload a JSON file via the File option.
The Host address will be automatically filled in if it exists in the specification. It has to be manually provided otherwise. The Host address is the base host path used for all operations (e.g. https://petstore.swagger.io/v2 for the paths https://petstore.swagger.io/v2/pet and https://petstore.swagger.io/v2/store/inventory).
The Name will also be filled in. You have the option to change the name by enabling the Custom option next to the name.
Underneath the settings is a preview window showing the spec file you have provided.
Click on Update to save this config or Delete to remove it. Cancel will return you to the OpenAPI Node without changes.
Node Overview
Once a connection has been created, it is automatically preselected. You can open the Connection dropdown at any time to switch to a different connection. Selecting a connection determines which settings are available for the API.

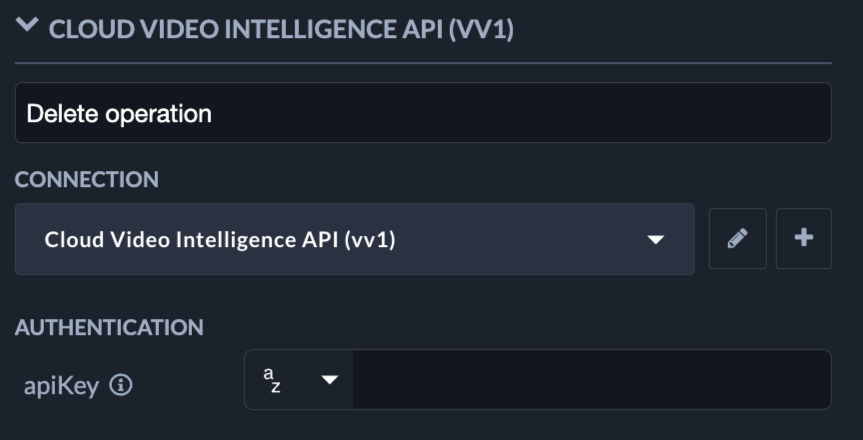
Authentication
You can also configure authentication and security settings as part of the connection configuration, if the API requires authentication.
Security methods are defined by the OpenAPI specification and may consist of one or more input fields (for example, Basic Authentication with username and password or an API key). Each security field provides a tooltip with additional information.
For example, when using an apiKey security scheme, the provided key is automatically added to the request headers using the header name defined in the specification (for example apikey).
All credentials entered in the connection configuration are stored encrypted and are only available to this node. Credentials cannot be retrieved or read back by users.
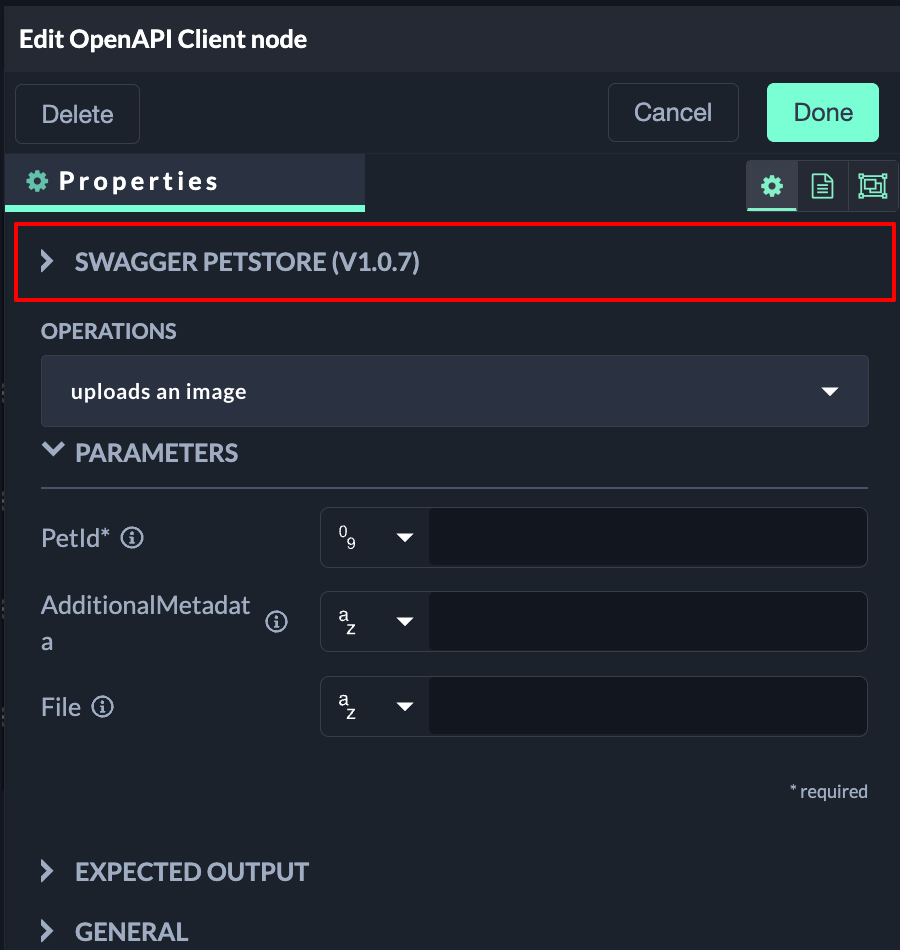
Operations
You can use the dropdown in the Operations section to select one of the available operations. The operations are listed in groups based on their category. Each operation is described with a summary and description, if the information is provided for the given operation. They also use different colors to describe the type of operation based on the HTTP method.
If no summary is provided, the title of the operation will be a combination of the method and path of the operation. For example PUT /pet.
Note: All endpoints marked as deprecated are strikethrough, and their use should be avoided.
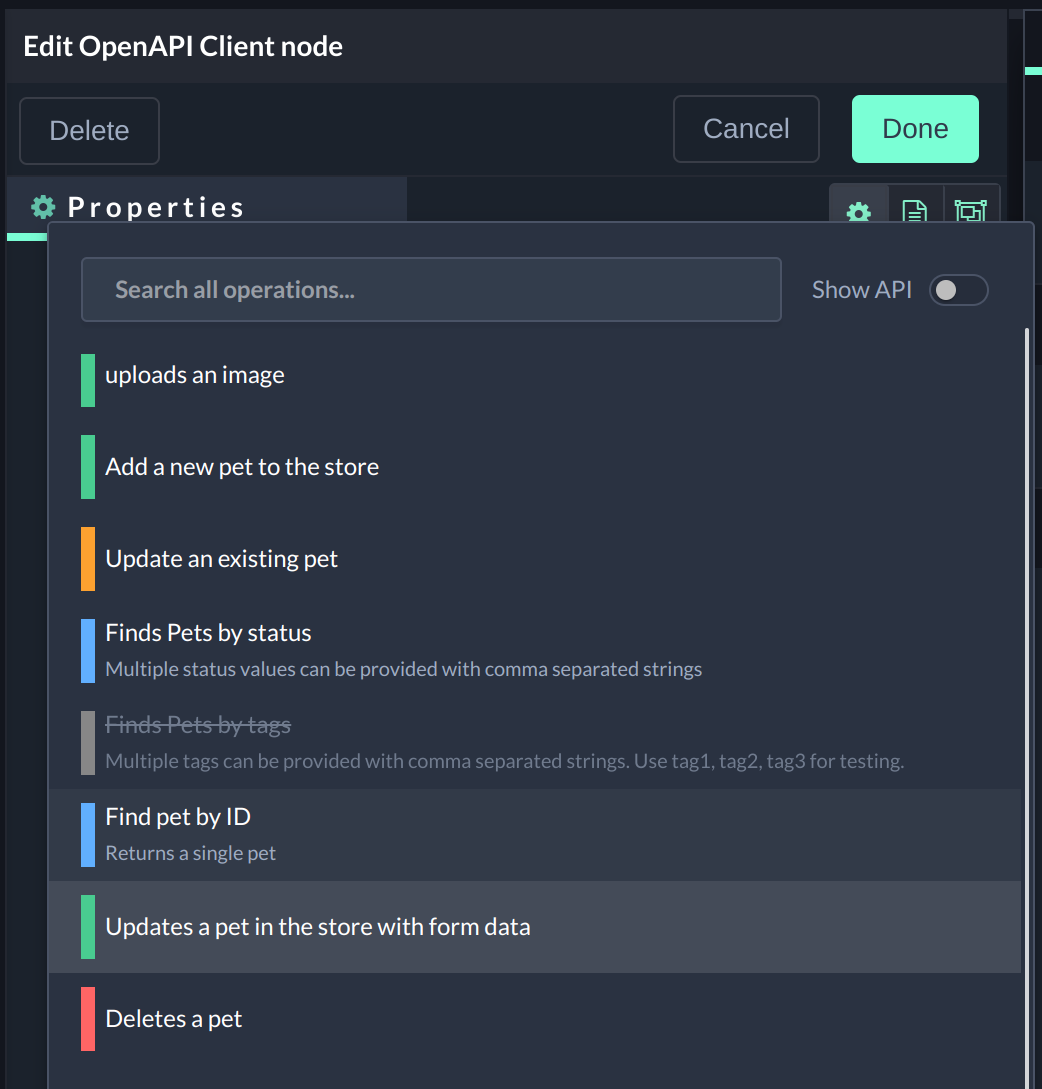
The Operations dropdown also offers an advanced view. The toggle Show API will switch the view to show the HTTP method and path instead of a title for each operation.
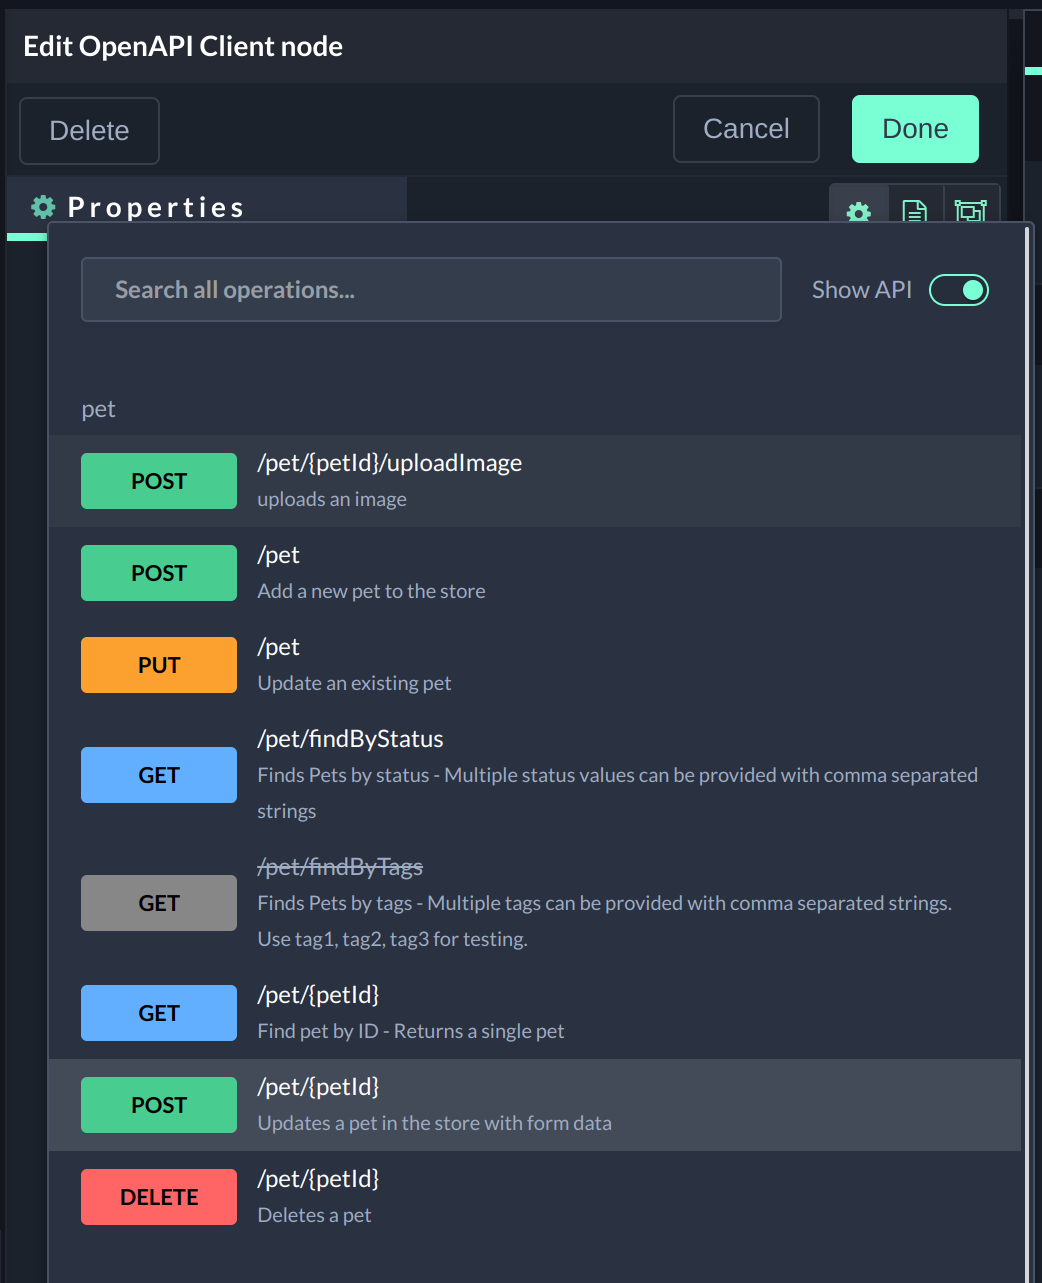
You can use the search to easily filter based on any operation characteristic, be it the content of the method, path, summary or description of the operation. This allows you to find operations for a specific topic, use case or endpoint you want to work with.
After selecting a new operation, the UI updates to provide you access to the configuration of the operation like available parameters or expected outputs.
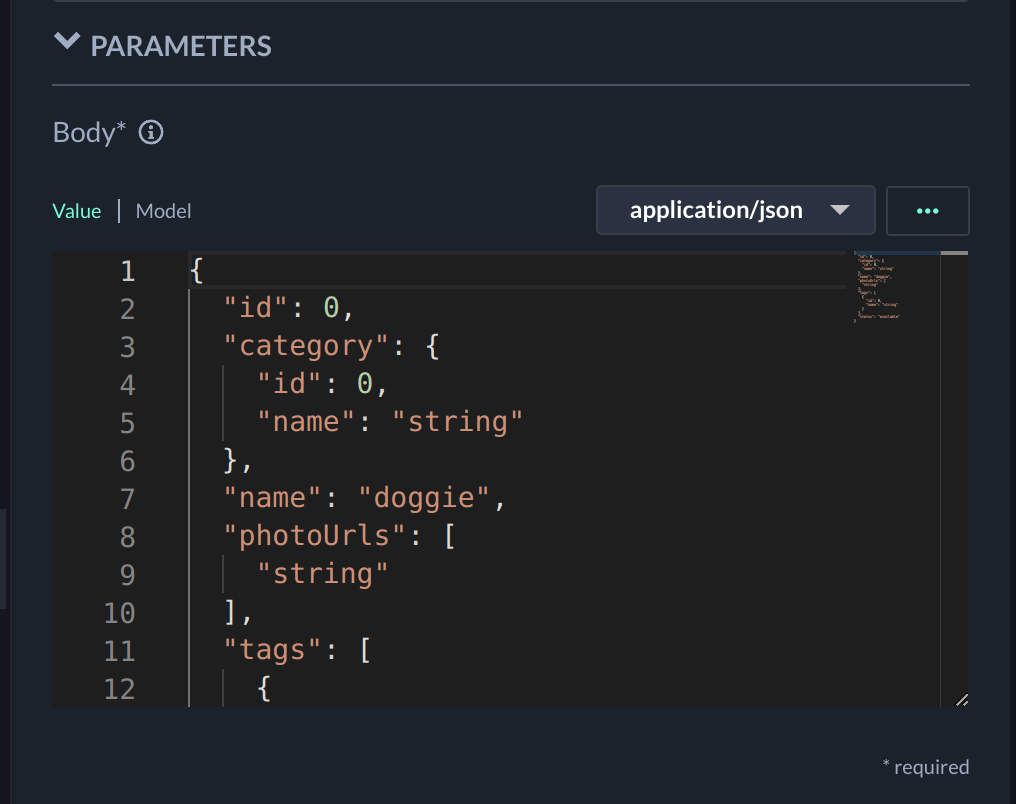
Parameters
Depending on the selected operation, parameters may be required to define the API request or they can be added optionally.
If there are parameters defined for the selected operation, a Parameters section will be displayed. There are different types of input parameters. All of them can be either provided in their input fields or injected through the previous Node (more information in Node Ports). Some parameters are required. They are marked by an asterisk (*). All parameters except the body-parameter use the reference dropdown (more information Reference Dropdown)
Each parameter has a name and an input field. Next to the name is a tooltip.

You can hover over the tooltip to see the description of the parameter, as well as the technical name and type.
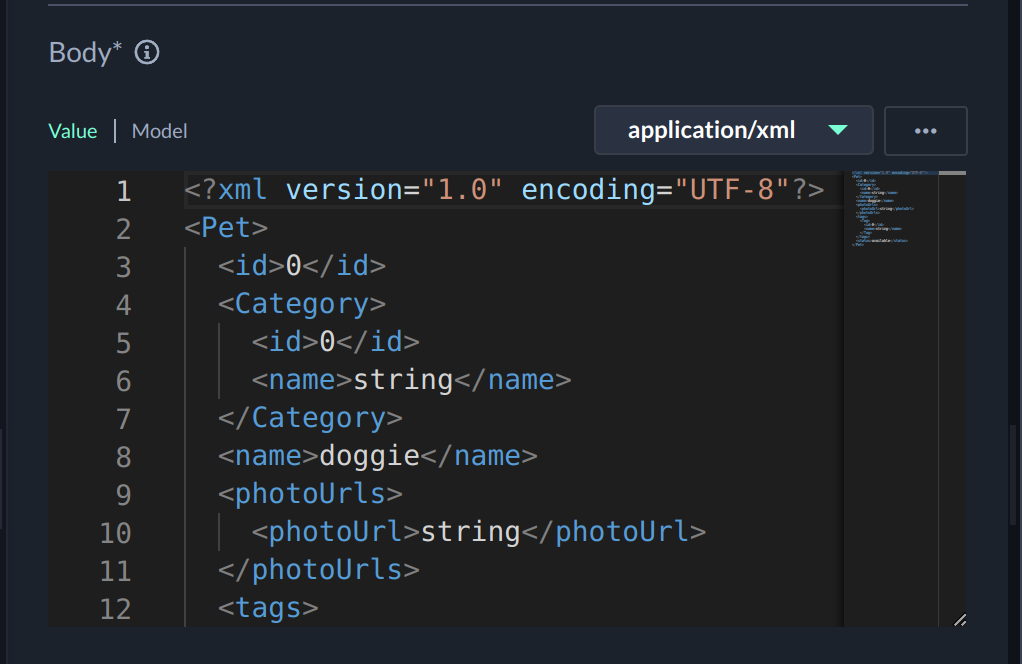
Most types like header, path, query are displayed with a simple input field. Body parameters will be displayed with a text editor to provide the payload.
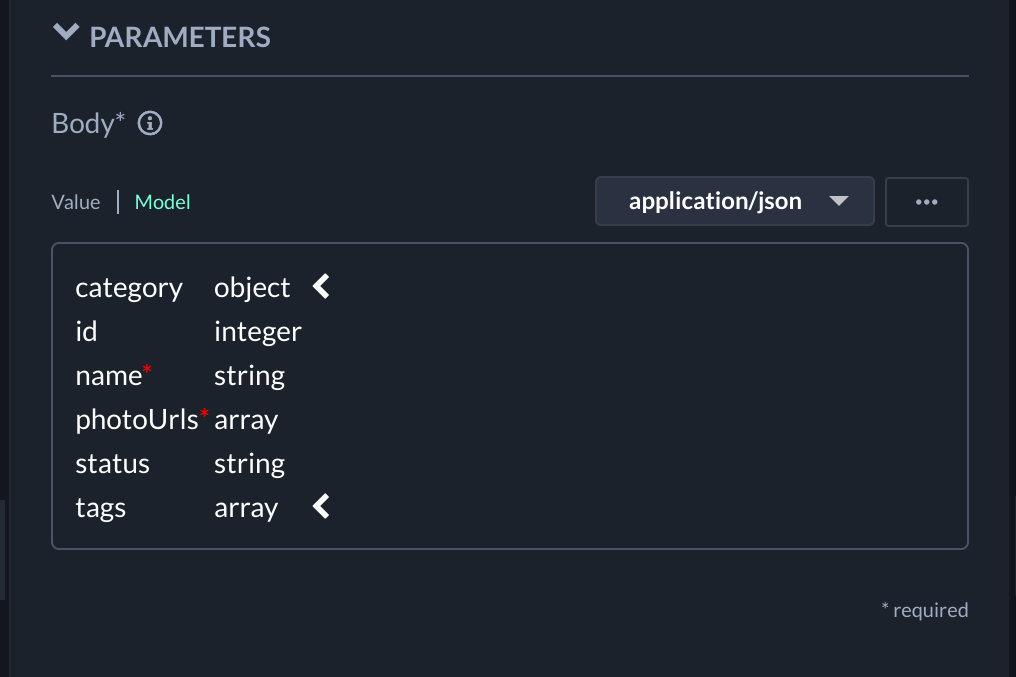
You can use the Model view to see the model of the data object the endpoint supports. It will give you information about the type of each entry.
Supported content types in body parameter
There are four different application types supported by body parameters:
-
application/json
-
application/xml
-
application/x-www-form-urlencoded
-
text/xml
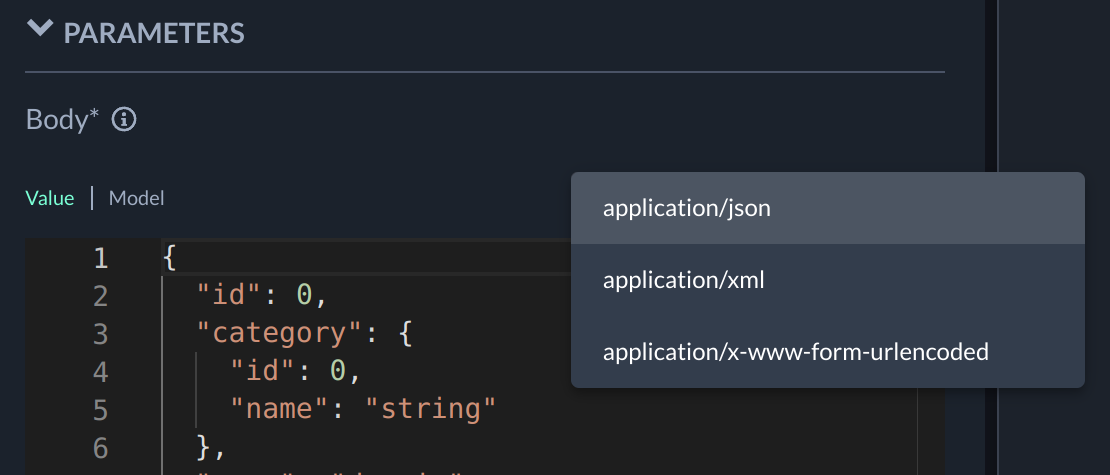
Depending of what you choose on the content type the output from the editor will be change to a JSON view or XML view.
Action Menu
Under the action menu, there are several useful options that can help to streamline the process of editing body parameters for requests. These options are designed to make it easier to create and modify the JSON or other data structures that will be sent as part of the request body.

-
Reset to default values: Overwrite the current body content with default example.
-
Reset to required values: Overwrite the current body content with example only containing the required values.
-
Format code: Reformats or tidies up code.
-
Open expresion editor: Opens JSONata expresion editor. (more information in JSONata Expression Editor)
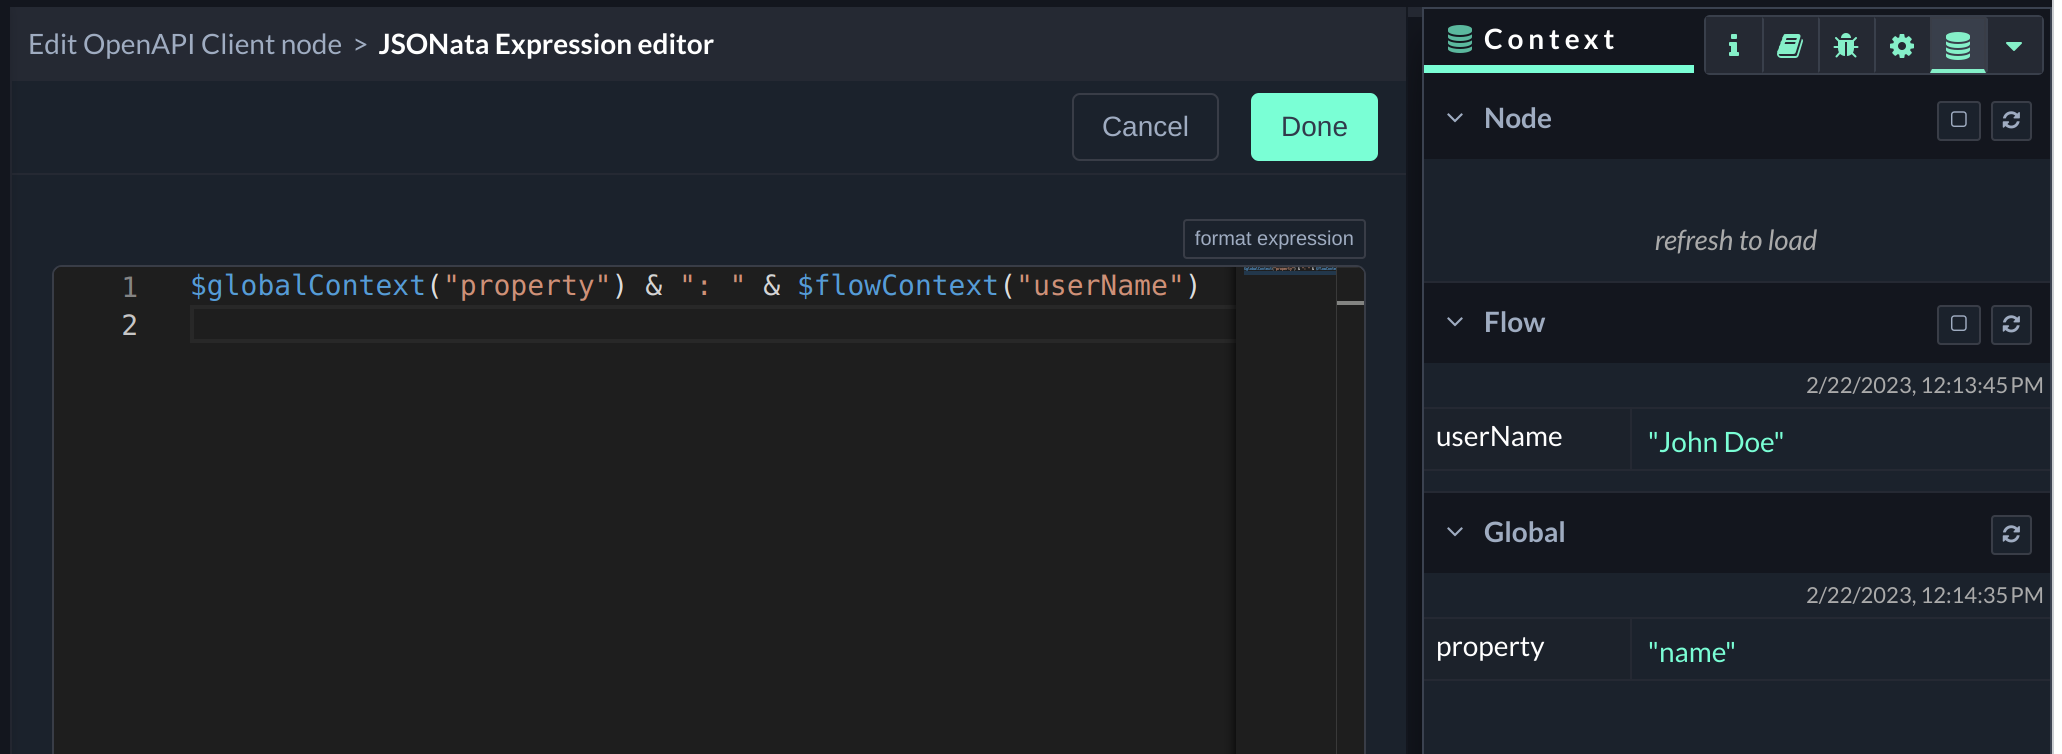
JSONata Expression Editor
JSONata is a query and transformation language designed for working with JSON data. It is a lightweight and powerful language that allows users to extract, filter, and transform JSON data in a flexible and intuitive way.

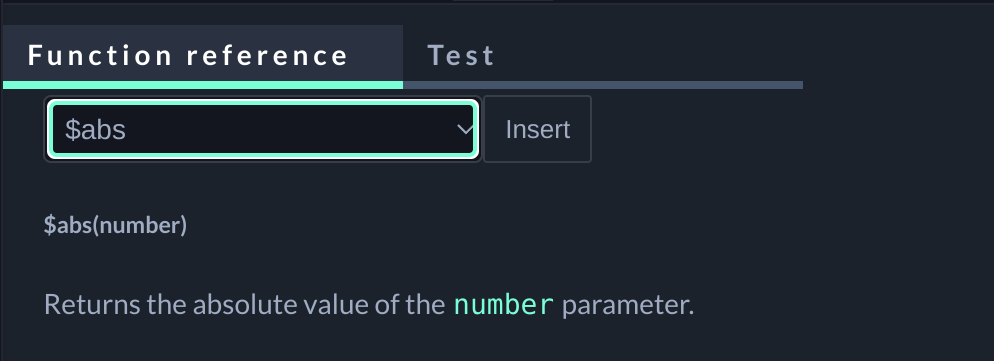
The Function Reference lists all the available functions that can be used in JSONata expressions. Each function is accompanied by a brief description of its purpose. By clicking the "Insert" button next to a function, you can easily include it in your expression.
There are two functions worth mentioning - $flowContext() and $globalContext(). These functions help you extract information from the context data. If you need to access data from the message object, you can do so by simply using the relevant properties, such as payload.your_property.
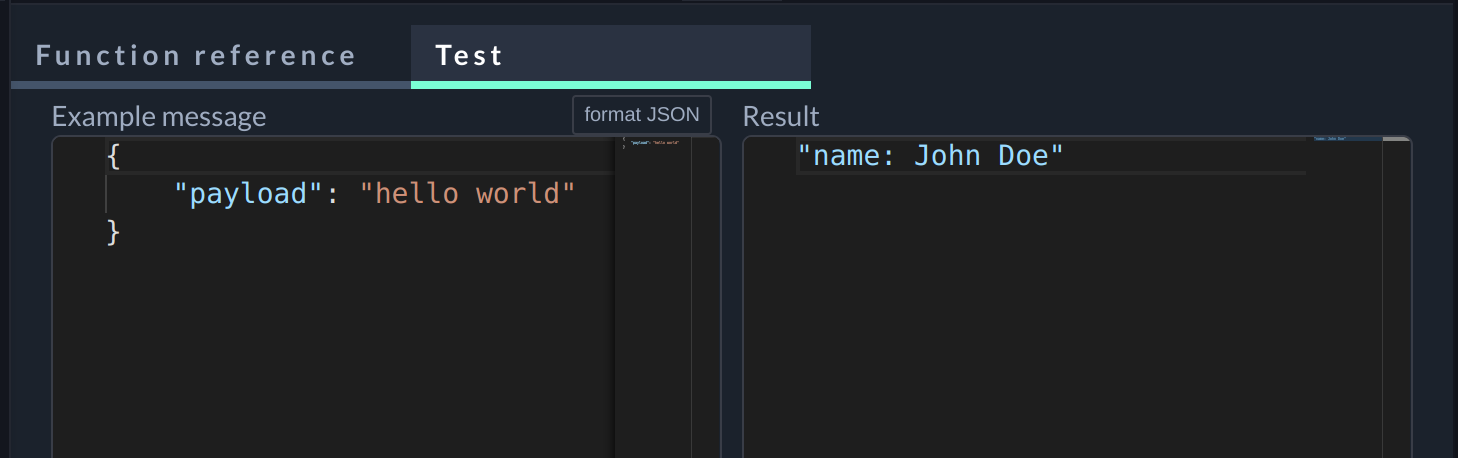
You can preview the appearance of the data that results from applying an expression by navigating to the Test tab. This feature enables you to test and fine-tune your expressions before applying them to the node setup.
To understand more about JSONata expression you can visit their website.
Expected Output
The Expected Output expandable provides status codes, the status text and example objects for expected return values. It is divided in Success, Error and Other return values. Other is used if no status code is available to judge whether it is a success or error response. Other outputs will have a name instead of a status code, usually default.
At the top of this section, you can select the Response Content Type, which determines the format in which the response data is returned and how example outputs are displayed.

General
The General section contains additional Node specific configuration options.
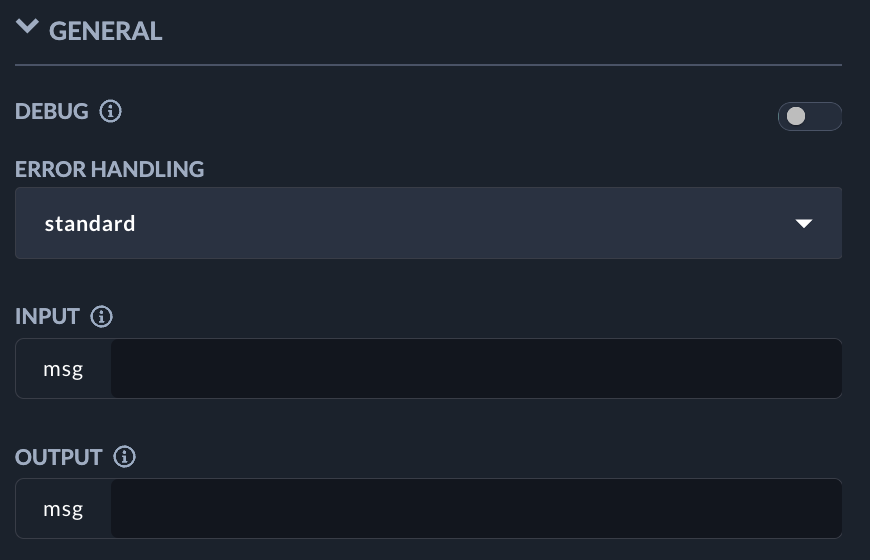
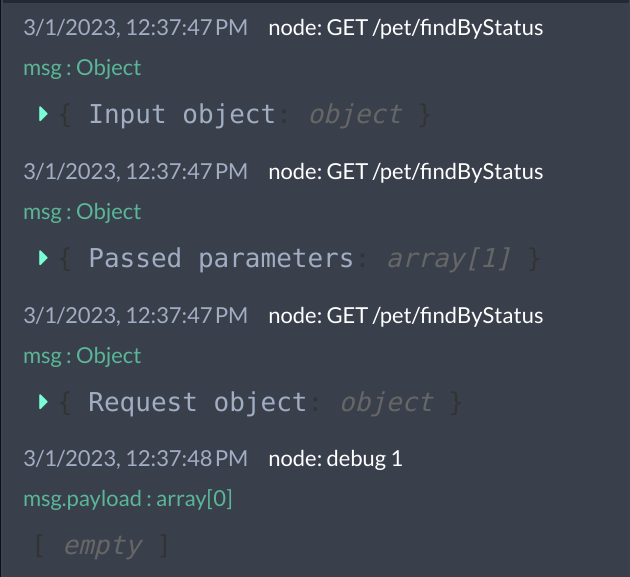
Debug
This option will significantly improve a user's ability to troubleshoot and debug issues. t provides more detailed information about the requests and inputs processed in the node, enabling better tracking and analysis of the flow of data. The debug mode will make it easier to understand the output and quickly identify potential issues.
The following logs are triggered by the debug feature:
-
Input object: the "msg" object passed by the previous node
-
Passed parameters: all parameters set in the node
-
Request object: the whole object sent as a request
Overall, this feature will greatly enhance the user's ability to diagnose and address problems in the node, resulting in a more efficient and effective workflow.
Name
You can define a custom Name for this instance of the Node. By default it will be filled in with the Method and endpoint chosen as current operation.
Error Handling
You can also choose different types of error handling. They define what should happen if a response return an unexpected result (Status codes 4xx-5xx).
Standard will pass every response to the output without treating error responses separately.
Separate will create a second output on the Node. Every error response will be passed to this output instead of the first one.
Exception will pass only successful responses to an output. Error events or failed requests will stop the current flow and throw an error event, which can be picked up by a catch node.
Input / Output
With this feature, the user has the ability to manually select the input and output resources for their workflow, giving them greater control over where the information from the msg object is directed. By default, the msg object is automatically selected as both the input and output resource, but users can now choose to direct the information to other resources based on their specific needs.
Starting from v16, this feature has been added, which includes an update to the openapi-client node. Existing variant nodes will continue to work as they did before, with no impact on their functionality. However, for any new nodes created from v16 onwards, it is important to note that they will include default values in the input and output fields. This feature is include from v16, updated openapi-client node and variant nodes continues working as before. For the new nodes created from v16 on, keep in mind that it will contain default values in input and output fields.
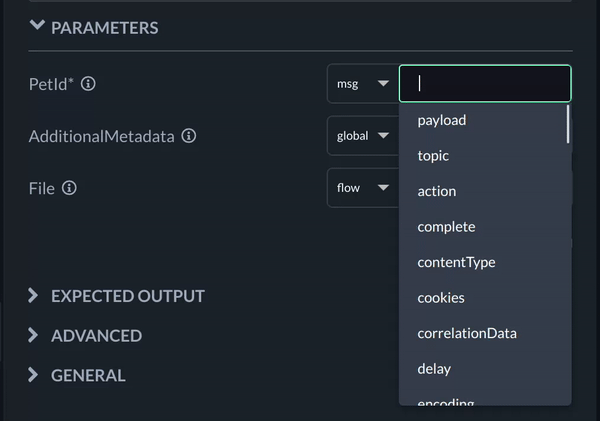
Reference Dropdown
The reference dropdown is located on the left side of an input field and provides a list of types that can be chosen for the corresponding input. This feature works in a similar way to the TypedInput Widget of Node-RED and is designed to help users work more efficiently by providing quick access to commonly used properties.
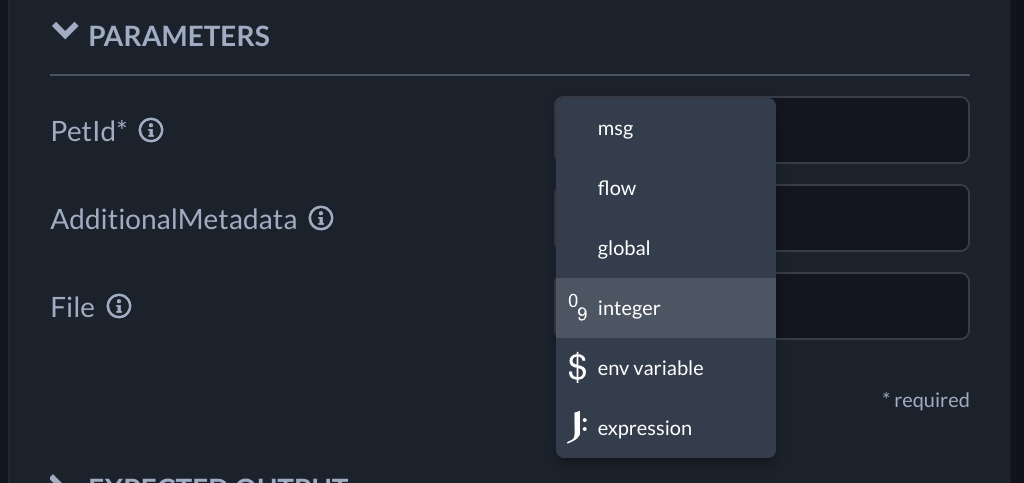
The following types are supported:
-
msg: refers to message passed by previous node -
flow: refers to flow context scope -
global: refers to global context scope -
parameter type: this is the default and represents the type of parameter defined on the specification
-
env variable: previously define variable that follow the pattern${ENV_VAR}, which will substitute the value of that environment variable before passing it to the node -
expression: JSONata expression
The reference-dropdown is integrated and can be used in the following sections:
-
Parameters: All parameters except the body parameter.
-
Host value
-
Security section: All fields in the security section.
Autocomplete
Autocomplete is a feature available for msg, global, and flow variables that predicts and suggests the completion of a word or phrase a user is typing in real-time. It analyzes the characters entered and provides a dropdown list of proposed completions while the user types. This can help users save time, reduce errors, and discover related terms or items they may not have considered. This feature is integrated into the reference dropdown.
Node Ports
The Node has one input and, based on the Error Handling setting, one or two output ports. The following section lists the parameters you can define for the input msg object, and the ones you can expect at the output. Input parameters in the msg object will always overwrite the values directly defined in the Node.
For example, passing a message with msg.payload = "Some Text" to the Node, Some Text will be sent as the body parameter instead of the value defined in the Node.
Inputs
Example input:
{
  "parameters": {
    "path": {
      "paramName": "paramValue"
    },
    "query": {
      "queryName": "queryValue"
    },
    "headers": {
      "headerName": "headerValue"
    },
    "body": {
      "message": "Send this text instead!"
    },
    "credentials": {
      "BasicAuth": {
        "username": "test",
        "password": "pass"
      },
      "ApiKey": "key",
      "BearerAuth": "token"
    }
  },
  "host": "https://custom.host/api",
  "headers": {
    "headerName": "headerValue"
  },
  "payload": {
    "message": "Send this text!"
  }
}
msg Properties:
|
Name |
Type |
Description |
|---|---|---|
|
payload |
string | object | array |
The payload to be sent with the request. |
|
parameters |
object |
Additional parameters available for the selected endpoint. |
|
headers |
object |
Additional headers to be set. |
|
host |
string |
URL for a custom host address. |
parameters Properties:
|
Name |
Type |
Description |
|---|---|---|
|
path |
object |
Path parameters defined in the selected endpoint configuration. The key is the name of the parameter in the configuration. |
|
query |
object |
Query parameters defined in the selected Endpoint configuration. The key is the name of the parameter in the configuration. |
|
headers |
object |
Additional headers as key/value pairs. Headers defined in parameters will overwrite headers with the same name in |
|
body |
string | object | array |
Payload to be defined. If this is defined, it will be used instead of |
|
credentials |
object |
Credentials that can be used if the security scheme is used for the selected endpoint. The names of the credentials are based on the name of the security scheme in the OpenAPI config. The values depend on the scheme. The example demonstrates all available schemes. |
Outputs
Example output:
{
  "payload": {
    "message": "Received this text!"
  },
  "statusCode": 200,
  "headers": {
    "content-type": "application/json"
  },
  "responseUrl": "https://response.url"
}
msg Properties:
|
Name |
Type |
Description |
|---|---|---|
|
payload |
string | object | array |
The response payload. |
|
statusCode |
number |
The status code of the response. |
|
headers |
object |
Headers returned by the response. |
|
responseUrl |
string |
The URL the response came from. This is useful for detecting redirects. |
Known Limitations
-
Body parameters only support JSON formatting. Default and required objects will be pasted in as JSON, syntax highlighting is only JSON. Making a request with a different data object on an endpoint that expects that data type works
-
YAML is only supported in OAS2, besides that only the previously mentioned content-types are supported
-
Only one security scheme is supported, the first one is chosen
-
Supported security schemes are apiKey, basic, bearer, AWS Signature V2
-
OpenAPI Spec compatibility:
|
Swagger Client Version |
Release Date |
OpenAPI Spec compatibility |
|---|---|---|
|
0.41.0 |
2026-04-28 |
2.0, 3.0.0, 3.0.1, 3.0.2, 3.0.3, 3.0.4, 3.1.0, 3.2.0 |
|
0.40.0 and earlier |
2026-03-03 |
2.0, 3.0.0, 3.0.1, 3.0.2, 3.0.3, 3.1.0 |